


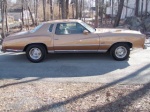
1977 Chevelle Malibu Classic Progress Photo's aka Mali
G3GM :: Media :: G3 Project Pictures
Page 26 of 27 •  1 ... 14 ... 25, 26, 27
 ![]()
Re: 1977 Chevelle Malibu Classic Progress Photo's aka Mali
![]() by dynchel Sat Oct 04, 2014 7:41 pm
by dynchel Sat Oct 04, 2014 7:41 pm
I did it on my Arizona replacement doors while I was doing bodywork. I also brushed the inside of the fenders when they were off. Granted it has been driven in the rain only once since 2000, & is almost always inside.(except for a month outside under a cover while my olds was getting painted) so there hasn't been any real "torture" test to see how it holds up.Mcarlo77 wrote:
I've got a question since you mentioned the POR 15. Are you (or, has anyone else on here) coated the inside bottom of the doors? I get some water leakage when it rains and was wondering if that would be a good idea? Or, is it fine to leave as is as long as the drain holes are open and there isn't any crud laying along the bottom that can hold moisture?
dynchel- Donating Member

- Street Cred : 40
Re: 1977 Chevelle Malibu Classic Progress Photo's aka Mali
![]() by 77mali Sat Oct 04, 2014 9:34 pm
by 77mali Sat Oct 04, 2014 9:34 pm
Mcarlo77 wrote:Lookin' good, Paul! Feels good to clean up and paint rusty parts, huh?!
I've got a question since you mentioned the POR 15. Are you (or, has anyone else on here) coated the inside bottom of the doors? I get some water leakage when it rains and was wondering if that would be a good idea? Or, is it fine to leave as is as long as the drain holes are open and there isn't any crud laying along the bottom that can hold moisture?
Yes, really easy to do with a brush. Of course my doors are torn apart and that made it easy. Just be careful not to plug up the drain holes. Clean them out first by vacuuming (if needed) and use a mild detergent to get the dust/crap out through the drain holes. If you have compressed air, blow any standing water out and then use a good lint free cloth and some acetone to prep the surface. let that evaporate (pretty quick actually) and then use the POR 15. Grab a couple of 1.5"-2" throw away "chip brushes", they'll do just fine for application.
I've learned that if you seal the can back up ASAP and turn it upside-down, the product will not cure in the can. The longer you leave it exposed to open air, the greater the likelihood is that it will begin to cure- then you're screwed. That's really all you need to do to keep it "fresh". I also make a "scoop" out of a plastic cup- 8oz or so, in order to keep from tilting the can and getting sh!t in the grooves.
Hammer the lid back on ASAP after taking what you need with the cup. Also have another plastic container handy to place the scoop in and have some acetone handy in case you spill it or get it on you. Once it cures- THAT's it! It will take a few days to come off your skin and if you get it on your clothes, it's there for good. Make sure the recesses for the lid & can are clean and free of any paint before resealing the can-again acetone will work good for this w/ a clean rag.
Also, the vapors are harmful to your respiratory system, in the open air it's not that bad but in a garage you'll want good ventilation and to invest in a good respirator that is rated for paint/chemical use. I just bought a new one today for $30.00, well worth the money and I still killed a few brain-cells (well more than on a usual Sat) even with an exhaust fan going in my workshop. I use the respirator even when I'm outside. Safety first, man!
77mali- Donating Member
- Street Cred : 62
Re: 1977 Chevelle Malibu Classic Progress Photo's aka Mali
![]() by 77mali Wed Oct 22, 2014 9:19 am
by 77mali Wed Oct 22, 2014 9:19 am
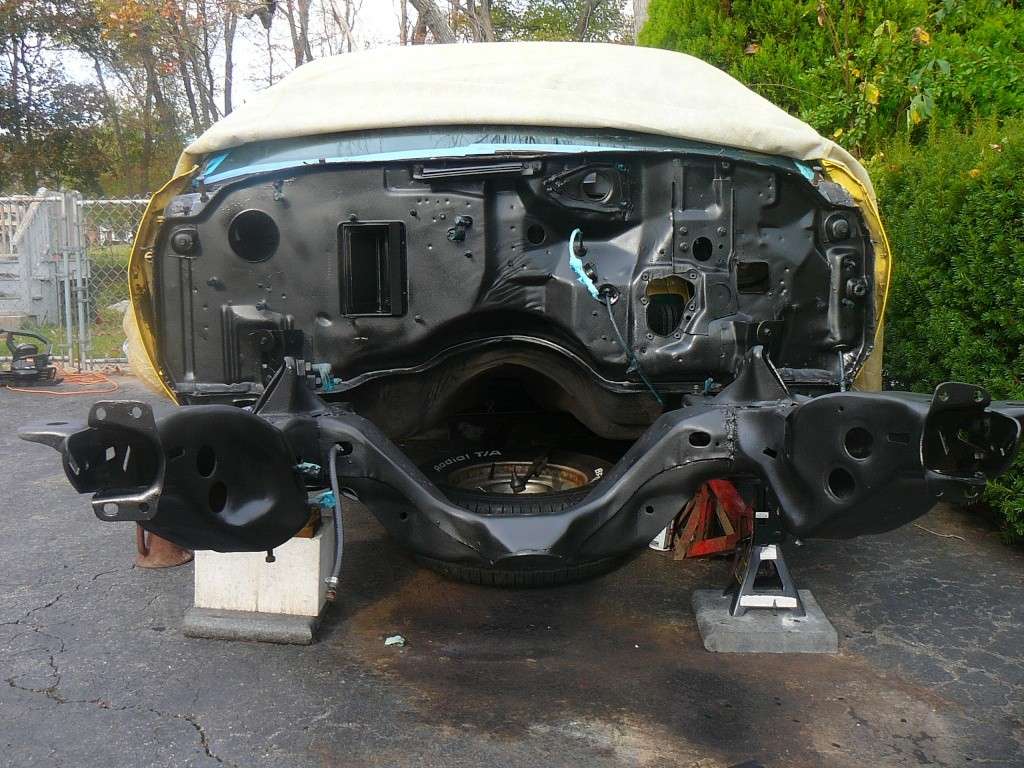
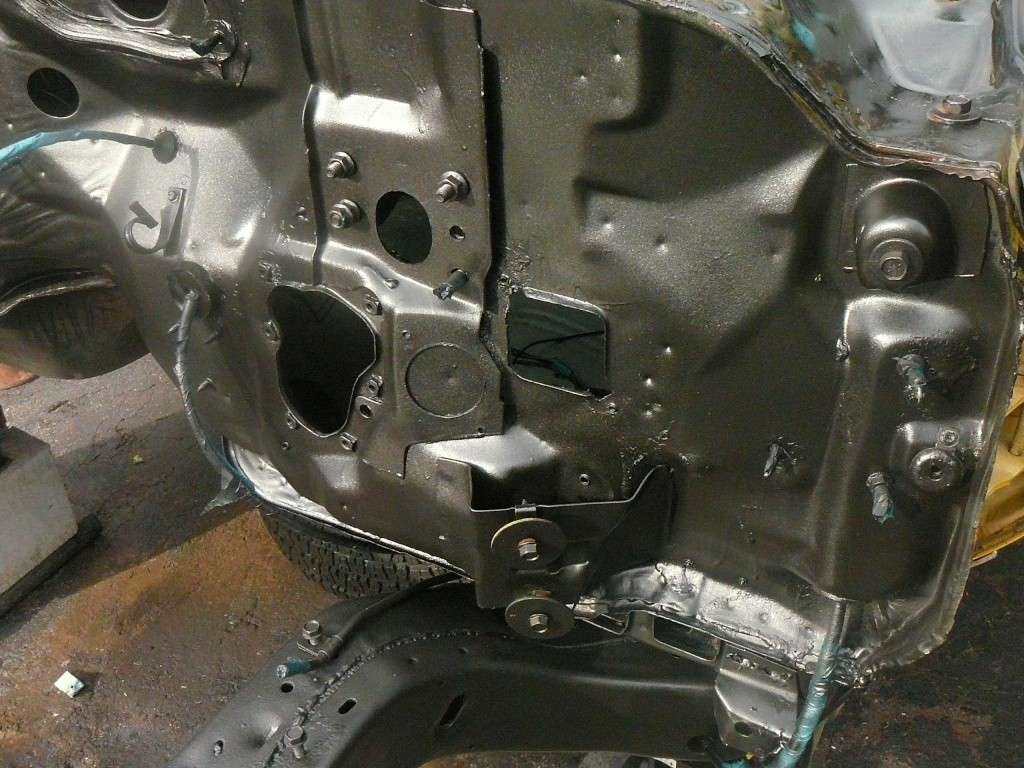
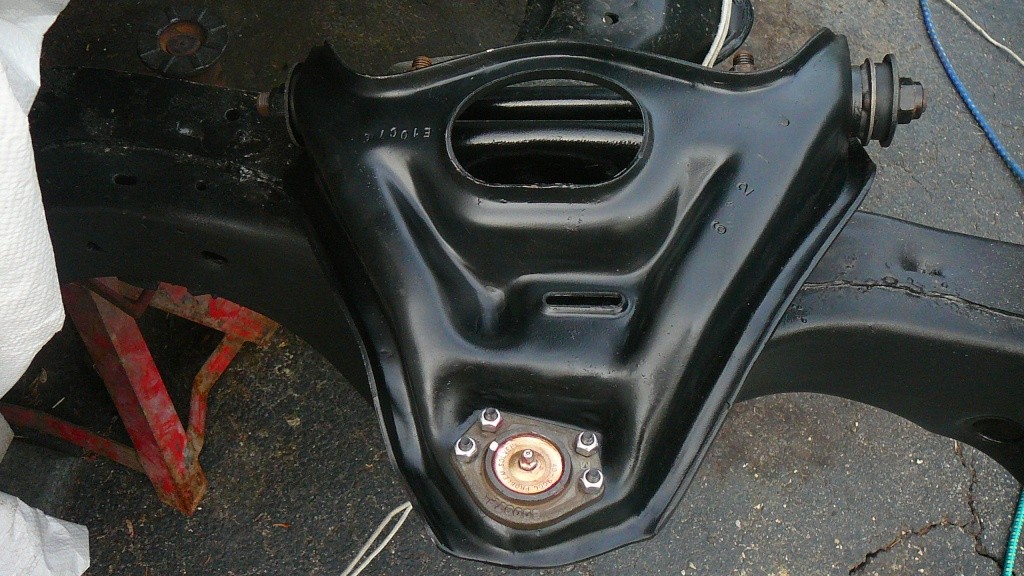
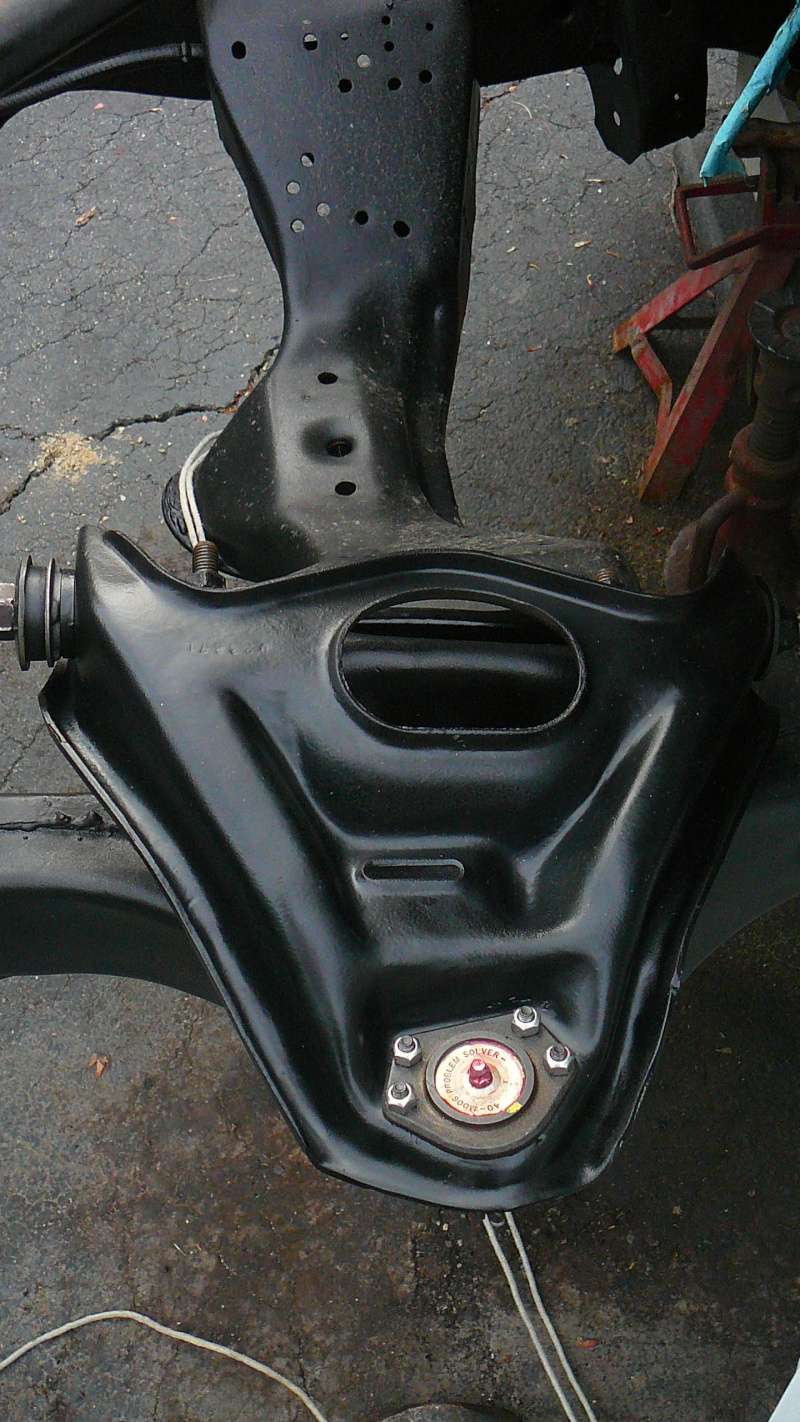
The lower arms received a base coat of Por-15 followed by Duplicolor Self-etch primer. I've decided to use POR-15 "Chassis-coat Black" as a hard protective coating. (Using on frame & firewall also). I decided I really like the Duplicolor engine enamel ultra low gloss and will use that as the finish coat with Duplicolor's "Paint-Shop" matte finish as a clear on all frame/engine bay/suspension stuff. Hoping to spray the Chassis-coat, finish & clear coats this weekend.
The one upper arm from the last series of pics that was down to bare metal just got the self etch primer as a base, it was in super shape for some reason and really didn't need the Por-15 base-coat.

77mali- Donating Member
- Street Cred : 62
Re: 1977 Chevelle Malibu Classic Progress Photo's aka Mali
![]() by thatfnthing Wed Oct 22, 2014 9:45 am
by thatfnthing Wed Oct 22, 2014 9:45 am

thatfnthing- Donating Member
- Street Cred : 65
Re: 1977 Chevelle Malibu Classic Progress Photo's aka Mali
![]() by 77mali Wed Oct 22, 2014 12:51 pm
by 77mali Wed Oct 22, 2014 12:51 pm
BTW- I posted a pic of the wrong upper arm-lmao. Oh well they look the same in primer!
77mali- Donating Member
- Street Cred : 62
Re: 1977 Chevelle Malibu Classic Progress Photo's aka Mali
![]() by ant7377 Wed Oct 22, 2014 10:04 pm
by ant7377 Wed Oct 22, 2014 10:04 pm
Mcarlo77 wrote:Lookin' good, Paul! Feels good to clean up and paint rusty parts, huh?!
I've got a question since you mentioned the POR 15. Are you (or, has anyone else on here) coated the inside bottom of the doors? I get some water leakage when it rains and was wondering if that would be a good idea? Or, is it fine to leave as is as long as the drain holes are open and there isn't any crud laying along the bottom that can hold moisture?
What I did inside my doors was I cleaned them out really good with a vacuum and a piece of hose taped to the end to really get in the corners then I sprayed chain oil all over the inside down in the corners and it held up good. Was still there when I took the door panel off again a few years later.
ant7377- G3GM Addict

- Street Cred : 36
Re: 1977 Chevelle Malibu Classic Progress Photo's aka Mali
![]() by pila Fri Oct 24, 2014 12:55 am
by pila Fri Oct 24, 2014 12:55 am
I've used LPS-3 for years on airplanes & cars, in the doors & quarter panels. I get it in gallon jugs, but it's in spray cans also. It's supposed to be a corrosion inhibitor .......
pila- Donating Member
- Street Cred : 43
Re: 1977 Chevelle Malibu Classic Progress Photo's aka Mali
![]() by ant7377 Fri Oct 24, 2014 6:09 am
by ant7377 Fri Oct 24, 2014 6:09 am
ant7377- G3GM Addict
- Street Cred : 36
Re: 1977 Chevelle Malibu Classic Progress Photo's aka Mali
![]() by 77mali Sat Oct 25, 2014 8:23 am
by 77mali Sat Oct 25, 2014 8:23 am
77mali- Donating Member
- Street Cred : 62
Re: 1977 Chevelle Malibu Classic Progress Photo's aka Mali
![]() by thatfnthing Sat Oct 25, 2014 12:29 pm
by thatfnthing Sat Oct 25, 2014 12:29 pm
thatfnthing- Donating Member
- Street Cred : 65
Re: 1977 Chevelle Malibu Classic Progress Photo's aka Mali
![]() by 77mali Sat Oct 25, 2014 4:19 pm
by 77mali Sat Oct 25, 2014 4:19 pm


77mali- Donating Member
- Street Cred : 62
Re: 1977 Chevelle Malibu Classic Progress Photo's aka Mali
![]() by thatfnthing Sat Oct 25, 2014 4:53 pm
by thatfnthing Sat Oct 25, 2014 4:53 pm
thatfnthing- Donating Member
- Street Cred : 65
Re: 1977 Chevelle Malibu Classic Progress Photo's aka Mali
![]() by ant7377 Sun Oct 26, 2014 5:02 pm
by ant7377 Sun Oct 26, 2014 5:02 pm
ant7377- G3GM Addict
- Street Cred : 36
Re: 1977 Chevelle Malibu Classic Progress Photo's aka Mali
![]() by 77mali Sun Oct 26, 2014 6:27 pm
by 77mali Sun Oct 26, 2014 6:27 pm
I'm sad though, had to cover the car today- they're forecasting snow showers here on Halloween night sometime
I'm glad I got that done before today though. I used a new HVLP gun I got and sprayed the POR Chassis Coat @ only 30 psi. I reduced the coating by 15% with their solvent. They say the lower you can shoot it the flatter it is, I guess it came out OK.
77mali- Donating Member
- Street Cred : 62
Re: 1977 Chevelle Malibu Classic Progress Photo's aka Mali
![]() by pila Mon Oct 27, 2014 12:39 am
by pila Mon Oct 27, 2014 12:39 am
pila- Donating Member
- Street Cred : 43
Re: 1977 Chevelle Malibu Classic Progress Photo's aka Mali
![]() by 77mali Tue Jun 02, 2015 8:57 pm
by 77mali Tue Jun 02, 2015 8:57 pm
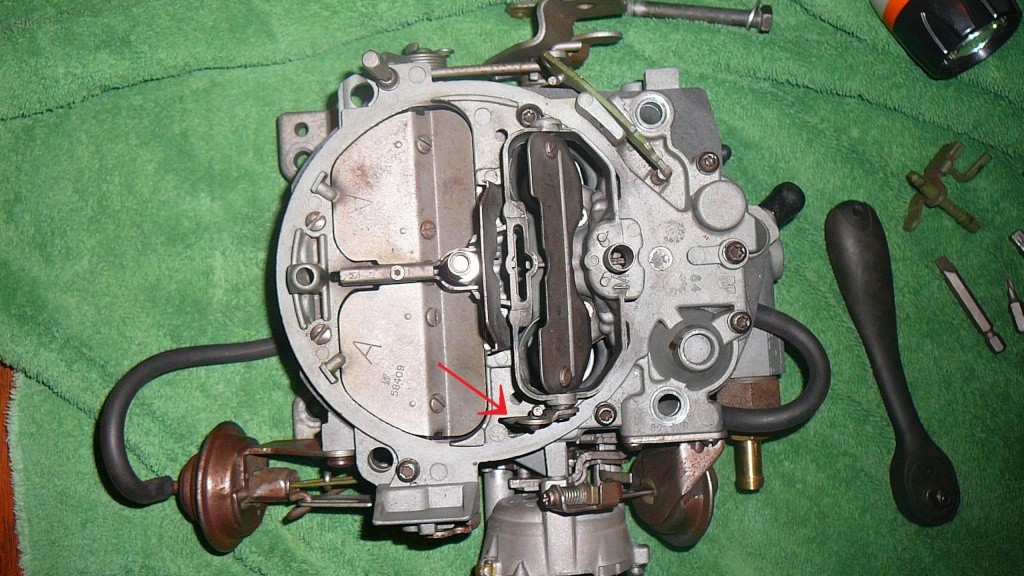
It seems after all the hassle that a little rod had disconnected itself from the bottom side and nothing ended up being broken. There is a little tab that the fast idle cam goes through on it's way inside the carb. If your primaries don't work and that rod is loose- you have to take off the entire electric choke assembly in order to remove the fast idle assembly. There is also a small screw that attaches that rod to the primary butterfly assembly. Once that is off you can turn the carb upside down and the metal tab will fall out so you can reconnect everything.
You'll need you some tweezers, a good light source and maybe a helper to hold the carb up so you can see what you're doing! There is barley enough length on the end of the fast idle cam to keep that tab it where it should be. If you are working on you electric choke- be careful not to remove the fast idle cam assembly behind the chokes housing or you will end up doing this same repair. What a pain!
There is a spare fast idle cam in this pic just to the top right of the socket wrench if you're curious.
77mali- Donating Member
- Street Cred : 62
Re: 1977 Chevelle Malibu Classic Progress Photo's aka Mali
![]() by pila Tue Jun 02, 2015 9:47 pm
by pila Tue Jun 02, 2015 9:47 pm
One good book on those is the one by Cliff Ruggles..."How to rebuild & modify Q-jet carbs". Worth the money at a bit over 20 bucks from Amazon....
pila- Donating Member
- Street Cred : 43
Re: 1977 Chevelle Malibu Classic Progress Photo's aka Mali
![]() by ant7377 Tue Jun 02, 2015 11:27 pm
by ant7377 Tue Jun 02, 2015 11:27 pm
ant7377- G3GM Addict
- Street Cred : 36
Re: 1977 Chevelle Malibu Classic Progress Photo's aka Mali
![]() by 77mali Tue Jun 02, 2015 11:52 pm
by 77mali Tue Jun 02, 2015 11:52 pm
Question is now do I just keep it as a spare or sell it? I don't think the new Holley will ever die- or be this hard to mess with.
77mali- Donating Member
- Street Cred : 62
Re: 1977 Chevelle Malibu Classic Progress Photo's aka Mali
![]() by G3NUT Sat Jun 06, 2015 11:07 pm
by G3NUT Sat Jun 06, 2015 11:07 pm

G3NUT- Donating Member
- Street Cred : 11
Re: 1977 Chevelle Malibu Classic Progress Photo's aka Mali
![]() by 77mali Sun Jun 07, 2015 8:16 am
by 77mali Sun Jun 07, 2015 8:16 am
Do you still have the same cell # & email I have for you?
77mali- Donating Member
- Street Cred : 62
Re: 1977 Chevelle Malibu Classic Progress Photo's aka Mali
![]() by G3NUT Sun Jun 07, 2015 11:04 pm
by G3NUT Sun Jun 07, 2015 11:04 pm
G3NUT- Donating Member
- Street Cred : 11
Re: 1977 Chevelle Malibu Classic Progress Photo's aka Mali
![]() by 77mali Tue Jul 14, 2015 8:26 am
by 77mali Tue Jul 14, 2015 8:26 am
77mali- Donating Member
- Street Cred : 62
Re: 1977 Chevelle Malibu Classic Progress Photo's aka Mali
![]() by thatfnthing Tue Jul 14, 2015 8:59 am
by thatfnthing Tue Jul 14, 2015 8:59 am
thatfnthing- Donating Member
- Street Cred : 65
Re: 1977 Chevelle Malibu Classic Progress Photo's aka Mali
![]() by 77mali Tue Jul 14, 2015 9:20 am
by 77mali Tue Jul 14, 2015 9:20 am
77mali- Donating Member
- Street Cred : 62
Page 26 of 27 • 1 ... 14 ... 25, 26, 27 ![]()

 Similar topics
» Looking for an In-Dash Tic-tock Tach for my 1977 Chevelle Classic,
» '73 Chevelle coupe progress
G3GM :: Media :: G3 Project Pictures
|
|
|
» 76 Laguna parked in 2002
» El Camino/Sprint LH Aftermarket Quarter Panel FOR SALE
» dashes
» Thanks for having me
» 77 elco SS
» 3-g cars in Finland
» Stainless brake lines
» New chassis for my 73
» 1973 Chevelle SS, 350, 4spd. build