


Headlight extension MOD
2 posters

Headlight extension MOD
![]() by Joe73 Wed Sep 28, 2016 11:33 am
by Joe73 Wed Sep 28, 2016 11:33 am
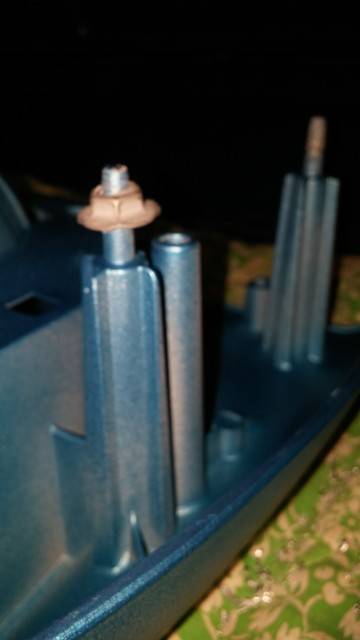
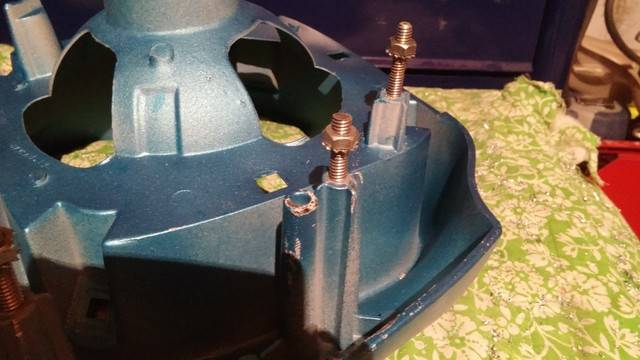
Just thought I'd share. I had 3 out of the 6 self tapping nuts, that hold the headlight extension to the fender, "strip" or kind of. They just werent holding well. So I decided to do something about it.
I took (2) 4" long, 1/4"x20, grade 5 bolts which only had threads at the bottom 1 1/2" or so. I pulled out the tap and die set and made them FULLY threaded. Then I cut them into 1" sections.
Then I used a hacksaw to cut off each stud (only where the self tapping nut bites in) on the back of both headlight extensions. Then I took a 13/64" drill bit and drilled a hole where the stud was located and went in about 3/4" inch. Plenty of meat on the part below where the stud was. With the stud cut off it kind of looks like a tower. After drilling the hole to about 3/4" I proceeded to tap the hole with 1/4"-20 threads. Use some oil for lubrication during tapping.
After all 6 holes were tapped, I cleaned out the holes with some brake cleaner and blew them dry with the compressor. Mixed up some JB Weld epoxy and put some in each hole. Then I threaded in the studs I made. Let dry overnight.
Installed the extension the next morning with a small washer and a nut that has a star washer built into it. I also thought of using a nylon stop nut but found that wasnt needed.
Just a tip I thought I'd throw out there in case someone runs into the same problem.

Joe73- Donating Member

- Street Cred : 83
Re: Headlight extension MOD
![]() by Limey SE Wed Sep 28, 2016 1:35 pm
by Limey SE Wed Sep 28, 2016 1:35 pm
You Have been Stickied Joe EEWWWWW That sounded gross LMAO
___________________________________________
1977 Chevelle SE x2
One Mild original
one Wild NON original
Anthony

Limey SE- Management

- Street Cred : 98
Re: Headlight extension MOD
![]() by Joe73 Wed Sep 28, 2016 2:11 pm
by Joe73 Wed Sep 28, 2016 2:11 pm
Thanks Limey. I thought it was a.good idea.
Joe73- Donating Member
- Street Cred : 83

 Similar topics
» 2003 Yukon extension bar
» Head light / fender extension '75 Monte
» 1973 Chevelle Malibu El Camino USED LH Front Fender Extension 3992689
» Head light / fender extension '75 Monte
» 1973 Chevelle Malibu El Camino USED LH Front Fender Extension 3992689
Permissions in this forum:
You cannot reply to topics in this forum|
|
|
» vinyl top removal
» Roll Call and Car showcase
» Limeys Shirt House yes its me Doing a Sale on Custom Shirts
» Life & Back On The Radio
» fuel gauge malfunction?
» 1973 Grand Am Parts Needed
» 73 laguna trim
» 1973 Grand Am
» Things are looking up