


1973 Chevelle SS 454 Project
5 posters
G3GM :: Media :: G3 Project Pictures
Page 1 of 1

1973 Chevelle SS 454 Project
![]() by mattdbal Tue Jan 15, 2013 10:22 pm
by mattdbal Tue Jan 15, 2013 10:22 pm
If you want to skip the talking, pictures are in a slideshow at the bottom! For larger viewing click "See Full Story"
Hey everyone, this is my dad and I's project car. It is not a frame off or any sort of profession, just a father son thing to do. This is our first project.
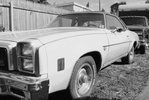
A little about me.. My name is Matt and I am 18 from Southeast Wisconsin. (Probably saw the intro). I have worked at a transmission shop and another automotive shop doing various beginner things like tires and oil changes. I have to thank TNS Transmissions, LLC for being a great friend and help in this project, installing rear end gears and helping instruct us on how to rebuild the TH-400 trans. We bought the car about a year and a half ago. It ran, but didn't drive. It is a factory big block car with a TH-400, 454, 2.73 gears and an interesting power bench seat. The interior of the car was rough and the motor hardly ran. The front end was a tad smashed, but the rest of the body and frame was really almost rust free (except for above the windshield, that is rotted out unfortunately due to the vinyl top). Overall the car was an amazing starting point.
Enough of this paragraph stuff, let me break the build so far down into easier to read sections
Part 1: Not running correctly
When we tried taking the car around the block, it would constantly die. We decided to do a full tune up, but that didn't fix the problem. We decided to take the carb off, a 750 Quadrajet, and get that rebuilt. Off it went to a shop to get fully rebuilt for a cheap price. Well with the carb off, we decided to fix up the dent and began taking the front header and headlights off. Well at that point we saw a big engine full of dirt just sitting there waiting to be pulled out. So, out it came.
Part 2: Engine rebuild & trans pull
We decided to pull this monster out and get it rebuilt, my dad was looking for a stock rebuild..More on that later. We disconnected everything and took the fenders and everything off and yanked the motor and trans. We began tearing the motor apart and discovered 781 Heads and a super clean motor. Although clean, we decided to send it off to the machine shop. While there, the motor got cleaned, bored .030 over, and prepped for rebuild. The heads got worked with bigger valves and some porting/polishing and the goods. We were set.
The parts list:
454, 030 over
kb small domes, should be around 10:1 cr
rpm airgap
781 heads, bigger valves, port/polish
comp cams xtreme energy
274/230 @ .050
286/236 @ .050
750 holley dp
3.73 gears
27" tire 275/60/15 (Nitto 555r..Great tire for street/track little loud on road)
TH400 with 2200 stall.
Stock exhaust with stock manifolds (very temporary) Have hooker long tubes waiting in the trunk for spring.
We got the block back and all the parts and began building it. This is my first ever engine and well, it was easier than I thought it would be!
Part:3 Trans rebuild
With the motor all rebuilt, it was time for a trans rebuild. We took it over to my friend's shop TNS Transmissions where my friends dad, Tim, helped us tear the trans apart and rebuild everything. Everything was going great, and in went a 2200 stall converter.
Part 4: Engine bay clean up & suspension
Well with everything out of the way, it was time for the front to get cleaned up. There was a hole in the radiator core support so we fixed that up and sandblasted and sprayed it with a few coats of paint. We got all the rust off the firewall and coated that. We also sand blasted the frame in the engine bay and coated it with rust proof primer 2 coats and 2 coats of rust proof gloss black. Both were tractor paints from farm and fleet and worked really well. We sprayed that on the core support too, it needed thinner in the gun as it was pretty thick. Once all that was done, we got all new front steering and suspension parts/ bushings (polyurethane bushings) all from PST, and replaced the springs. The spring compressor snapped on me while trying to install the new spring, luckily i chained the spring to the frame.
Part 5: Install
By now, it was time to drop the trans and motor in. We tried to drop the motor in with the Hooker headers on, but we couldn't get it in right so we opted to put the stock manifolds back on for the time being just so it was drivable for the summer. Once the trans and motor were in, we went for the first start up. After some timing and carb adjustments, it fired right up and we broke the motor and cam in. It all went flawlessly. Oil pressure was perfect and the temp stayed constant.
Part 6: Interior
Before we fired the motor up, my dad and I took all the seats, trim, and carpet out of car. The seats were all torn up and the carpet all stained and moldy. (water was getting in through the rusted out windshield lip ( I don't know the correct term for above the windshield haha). Luckily we discovered a rust free floor underneath the damp carpet. We took the seats off to get re upholstered. The original back fabric was a lighter color, but there was not an exact match so we opted to go darker in the same patter as it looked good. We washed all the interior trim and door panels and got dye matched from the color code on the tag. Once sprayed, the trim pieces and doors looked almost brand new except for a few spots where some of the plastic was scratched away. Anways it looks 1000x better than it did, I don't have any before pictures of the interior unfortunately, just know it doesn't smell like death and mold anymore We got all of the seats, carpet and trim back in the car and well, it was time to drive it.
Part 7: Motor Break In and Minor Issues
We drove the car around a good 500 miles and suddenly the car would be driving and die. We first checked the fuel pump. A rare case occurred where the fuel pump rod got stuck somehow. It doesn't effect anything, however you can not get it out. The solution? Block off the pump and get an electric pump. Turns out that did not fix the problem completely. Time to drop the gas tank! We pulled the tank and drained it. It was full of crud, so we made a solution and poured it into the tank and let it sit a day. I don't remember what we put in there, but it cleaned the tank out great. We sand blasted it and got it ready to put in with a new sending unit. Took the car out and it drove great!
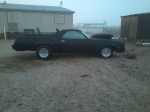
Part 8: Wheels, Tires, Gears
With the car driving, it was time for some new wheels and tires! We decided to go with the SS396 wheels from Wheel Vintiques 15x7 for the fronts and 15x8 for the rears. The rear tires were
275/65/15 Nitto 555 Drag radials. These were great tires at the track for also daily driving, although they were a little loud as to be expected. The fronts were the BF goodrich radial with the black walls out, I don't remember the size. The wheels and tires fit great. Next step was the rear end gear. We stepped up to a 3.75 for some good launch and for street manners. These were installed by my friend's dad Tim at TNS Transmissions again. The car is completely changed.
Part 9: Track Time and After Winter Plans
Since the car is done and waiting to be driven, I decide to take it to the local track Great Lakes Dragaway. It was my first time racing and I was doing pretty well with the launches and reaction time. The car however, was having some major tuning issues. The car would pull every other car all the way to the 1/8th and then the motor was just done. My first ever run was a 15.2 @ 90.86. Something besides tuning felt wrong. Made a few more passes, each time getting worse. At least the first time beat a ricer celica running a 15.5, that made up for the issues and all the other losses! Took the car back to TNS and pulled the trans. This time Tim looked it over and found Third gear burnt out due to an upside down part blocking an oiling hole (woops..can't remember if it was me or my dad who did that!) He fixed it up and I took it to the track a bit later and managed a 14.9. This pig needs some serious tuning, timing and carb wise. My dad and I don't really know much on timing, just enough to get it to run. We eventually changed the timing which made it feel better, but we never got back out. Now she sits in the garage for winter waiting for headers, exhaust, and some major tuning help.
I know that was a lot of reading, but that is how it sits so far, and I am sure I am missing something! Thanks for checking it out. Comments, tips, concerns are welcome and encouraged!
I must say, Tim at TNS Transmissions in Hales Corners Wisconsin was a great help. He is my friends dad and my employer for 2 years. I can say if you are in wisconsin and need trans or drivability help, he is the man. Completely honest, fair pricing and the best at what he does. I have worked for another auto shop and they were criminals, but Tim is in his own class there. I can't say enough about it. (No i'm not getting payed haha! ) He rebuilds anything from 50's cars to brand new cars. If you need any help , let me know!
Hey everyone, this is my dad and I's project car. It is not a frame off or any sort of profession, just a father son thing to do. This is our first project.
A little about me.. My name is Matt and I am 18 from Southeast Wisconsin. (Probably saw the intro). I have worked at a transmission shop and another automotive shop doing various beginner things like tires and oil changes. I have to thank TNS Transmissions, LLC for being a great friend and help in this project, installing rear end gears and helping instruct us on how to rebuild the TH-400 trans. We bought the car about a year and a half ago. It ran, but didn't drive. It is a factory big block car with a TH-400, 454, 2.73 gears and an interesting power bench seat. The interior of the car was rough and the motor hardly ran. The front end was a tad smashed, but the rest of the body and frame was really almost rust free (except for above the windshield, that is rotted out unfortunately due to the vinyl top). Overall the car was an amazing starting point.
Enough of this paragraph stuff, let me break the build so far down into easier to read sections
Part 1: Not running correctly
When we tried taking the car around the block, it would constantly die. We decided to do a full tune up, but that didn't fix the problem. We decided to take the carb off, a 750 Quadrajet, and get that rebuilt. Off it went to a shop to get fully rebuilt for a cheap price. Well with the carb off, we decided to fix up the dent and began taking the front header and headlights off. Well at that point we saw a big engine full of dirt just sitting there waiting to be pulled out. So, out it came.
Part 2: Engine rebuild & trans pull
We decided to pull this monster out and get it rebuilt, my dad was looking for a stock rebuild..More on that later. We disconnected everything and took the fenders and everything off and yanked the motor and trans. We began tearing the motor apart and discovered 781 Heads and a super clean motor. Although clean, we decided to send it off to the machine shop. While there, the motor got cleaned, bored .030 over, and prepped for rebuild. The heads got worked with bigger valves and some porting/polishing and the goods. We were set.
The parts list:
454, 030 over
kb small domes, should be around 10:1 cr
rpm airgap
781 heads, bigger valves, port/polish
comp cams xtreme energy
274/230 @ .050
286/236 @ .050
750 holley dp
3.73 gears
27" tire 275/60/15 (Nitto 555r..Great tire for street/track little loud on road)
TH400 with 2200 stall.
Stock exhaust with stock manifolds (very temporary) Have hooker long tubes waiting in the trunk for spring.
We got the block back and all the parts and began building it. This is my first ever engine and well, it was easier than I thought it would be!
Part:3 Trans rebuild
With the motor all rebuilt, it was time for a trans rebuild. We took it over to my friend's shop TNS Transmissions where my friends dad, Tim, helped us tear the trans apart and rebuild everything. Everything was going great, and in went a 2200 stall converter.
Part 4: Engine bay clean up & suspension
Well with everything out of the way, it was time for the front to get cleaned up. There was a hole in the radiator core support so we fixed that up and sandblasted and sprayed it with a few coats of paint. We got all the rust off the firewall and coated that. We also sand blasted the frame in the engine bay and coated it with rust proof primer 2 coats and 2 coats of rust proof gloss black. Both were tractor paints from farm and fleet and worked really well. We sprayed that on the core support too, it needed thinner in the gun as it was pretty thick. Once all that was done, we got all new front steering and suspension parts/ bushings (polyurethane bushings) all from PST, and replaced the springs. The spring compressor snapped on me while trying to install the new spring, luckily i chained the spring to the frame.
Part 5: Install
By now, it was time to drop the trans and motor in. We tried to drop the motor in with the Hooker headers on, but we couldn't get it in right so we opted to put the stock manifolds back on for the time being just so it was drivable for the summer. Once the trans and motor were in, we went for the first start up. After some timing and carb adjustments, it fired right up and we broke the motor and cam in. It all went flawlessly. Oil pressure was perfect and the temp stayed constant.
Part 6: Interior
Before we fired the motor up, my dad and I took all the seats, trim, and carpet out of car. The seats were all torn up and the carpet all stained and moldy. (water was getting in through the rusted out windshield lip ( I don't know the correct term for above the windshield haha). Luckily we discovered a rust free floor underneath the damp carpet. We took the seats off to get re upholstered. The original back fabric was a lighter color, but there was not an exact match so we opted to go darker in the same patter as it looked good. We washed all the interior trim and door panels and got dye matched from the color code on the tag. Once sprayed, the trim pieces and doors looked almost brand new except for a few spots where some of the plastic was scratched away. Anways it looks 1000x better than it did, I don't have any before pictures of the interior unfortunately, just know it doesn't smell like death and mold anymore
Part 7: Motor Break In and Minor Issues
We drove the car around a good 500 miles and suddenly the car would be driving and die. We first checked the fuel pump. A rare case occurred where the fuel pump rod got stuck somehow. It doesn't effect anything, however you can not get it out. The solution? Block off the pump and get an electric pump. Turns out that did not fix the problem completely. Time to drop the gas tank! We pulled the tank and drained it. It was full of crud, so we made a solution and poured it into the tank and let it sit a day. I don't remember what we put in there, but it cleaned the tank out great. We sand blasted it and got it ready to put in with a new sending unit. Took the car out and it drove great!
Part 8: Wheels, Tires, Gears
With the car driving, it was time for some new wheels and tires! We decided to go with the SS396 wheels from Wheel Vintiques 15x7 for the fronts and 15x8 for the rears. The rear tires were
275/65/15 Nitto 555 Drag radials. These were great tires at the track for also daily driving, although they were a little loud as to be expected. The fronts were the BF goodrich radial with the black walls out, I don't remember the size. The wheels and tires fit great. Next step was the rear end gear. We stepped up to a 3.75 for some good launch and for street manners. These were installed by my friend's dad Tim at TNS Transmissions again. The car is completely changed.
Part 9: Track Time and After Winter Plans
Since the car is done and waiting to be driven, I decide to take it to the local track Great Lakes Dragaway. It was my first time racing and I was doing pretty well with the launches and reaction time. The car however, was having some major tuning issues. The car would pull every other car all the way to the 1/8th and then the motor was just done. My first ever run was a 15.2 @ 90.86. Something besides tuning felt wrong. Made a few more passes, each time getting worse. At least the first time beat a ricer celica running a 15.5, that made up for the issues and all the other losses! Took the car back to TNS and pulled the trans. This time Tim looked it over and found Third gear burnt out due to an upside down part blocking an oiling hole (woops..can't remember if it was me or my dad who did that!) He fixed it up and I took it to the track a bit later and managed a 14.9. This pig needs some serious tuning, timing and carb wise. My dad and I don't really know much on timing, just enough to get it to run. We eventually changed the timing which made it feel better, but we never got back out. Now she sits in the garage for winter waiting for headers, exhaust, and some major tuning help.
I know that was a lot of reading, but that is how it sits so far, and I am sure I am missing something! Thanks for checking it out. Comments, tips, concerns are welcome and encouraged!
I must say, Tim at TNS Transmissions in Hales Corners Wisconsin was a great help. He is my friends dad and my employer for 2 years. I can say if you are in wisconsin and need trans or drivability help, he is the man. Completely honest, fair pricing and the best at what he does. I have worked for another auto shop and they were criminals, but Tim is in his own class there. I can't say enough about it. (No i'm not getting payed haha!
) He rebuilds anything from 50's cars to brand new cars. If you need any help , let me know! 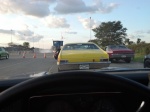
mattdbal- G3GM Newbie

- Street Cred : 0
Re: 1973 Chevelle SS 454 Project
![]() by 77mali Tue Jan 15, 2013 10:38 pm
by 77mali Tue Jan 15, 2013 10:38 pm
Great story- Nice job too. Wish I had started w/ cars @ your age!
Those darn sending units...they hate ethanol gas that's sat too long. When you put the car away for the winter add fuel stabilizer & fill the tank w/ hi octane (91+).
Those darn sending units...they hate ethanol gas that's sat too long. When you put the car away for the winter add fuel stabilizer & fill the tank w/ hi octane (91+).
77mali- Donating Member

- Street Cred : 62
Re: 1973 Chevelle SS 454 Project
![]() by mattdbal Tue Jan 15, 2013 11:07 pm
by mattdbal Tue Jan 15, 2013 11:07 pm
Car has a full tank and 93 octane
mattdbal- G3GM Newbie
- Street Cred : 0
Re: 1973 Chevelle SS 454 Project
![]() by 77mali Tue Jan 15, 2013 11:10 pm
by 77mali Tue Jan 15, 2013 11:10 pm
LOL...I forgot it's already winter time!!!!
77mali- Donating Member
- Street Cred : 62
Re: 1973 Chevelle SS 454 Project
![]() by mattdbal Wed Jan 16, 2013 12:10 am
by mattdbal Wed Jan 16, 2013 12:10 am
I forgot to say thanks for the complements, and yeah winter time for sure, a nice 18 degrees..
mattdbal- G3GM Newbie
- Street Cred : 0
Re: 1973 Chevelle SS 454 Project
![]() by Bruisr Wed Jan 16, 2013 12:22 am
by Bruisr Wed Jan 16, 2013 12:22 am
Can you give some info on the carb. your using and possibly anything you might have done to it, ie; jet changes. Also some info on the ignition system your using. There is plenty of us here that can help get you in the right direction. Tuning is easy but tedious, lots of trial and error, but little cash needed. Its all about figuring out what you have and trying to make it work before dropping cash.
Bruisr- G3GM Member

- Street Cred : 8
Re: 1973 Chevelle SS 454 Project
![]() by Bruisr Wed Jan 16, 2013 12:28 am
by Bruisr Wed Jan 16, 2013 12:28 am
Just seen you posted that your using a holley HP 750. Is that a vacuum secondary? Not sure myself. You will need to adjust timing curve of dizzy, What kind of dizzy are you using?
Bruisr- G3GM Member
- Street Cred : 8
Re: 1973 Chevelle SS 454 Project
![]() by mattdbal Wed Jan 16, 2013 11:06 am
by mattdbal Wed Jan 16, 2013 11:06 am
Bruisr wrote:Just seen you posted that your using a holley HP 750. Is that a vacuum secondary? Not sure myself. You will need to adjust timing curve of dizzy, What kind of dizzy are you using?
The carb is a vac secondary. As for the jets, I'm not sure, we looked but never wrote it down. We are using the stock distributor upgraded with pertronix to make it electric with the pertronix flamethrower coil.
mattdbal- G3GM Newbie
- Street Cred : 0
Re: 1973 Chevelle SS 454 Project
![]() by pila Wed Jan 16, 2013 3:04 pm
by pila Wed Jan 16, 2013 3:04 pm
The vacuum secondary Holleys work good on the street. The Pertronix distributor conversions seem to have a good reputation, and I've seen more problems with MSD stuff than the Pertronix stuff.
pila- Donating Member
- Street Cred : 43
74MonteCarlo- G3GM Fanatic

- Street Cred : 17
Re: 1973 Chevelle SS 454 Project
![]() by Bruisr Wed Jan 16, 2013 4:23 pm
by Bruisr Wed Jan 16, 2013 4:23 pm
Try setting the intial timing, (at the crank) to 8dgrees BTDC. Next you will need to see how much centrifugal timing your pulling, and limit to around 30-32 degrees by 3000 rpms. Sounds scary but it is really easy just takes time. You can adjust your total timing by swapping out springs and weights inside your dizzy. Also, You need to find out if the vac. secondaries are opening too early or not at all. Purchase a vac. spring kit (about 15.00) and start by installing a lighter tension spring. Then drive and see what changes, either going lighter or heavier depending on driveablilty results. Start with vacuum springs first, they are the easiest to change and will yeild faster results!
Bruisr- G3GM Member
- Street Cred : 8
Re: 1973 Chevelle SS 454 Project
![]() by Bruisr Wed Jan 16, 2013 4:27 pm
by Bruisr Wed Jan 16, 2013 4:27 pm
One more note, where are you pulling vacuum from for vac. advance? Try changing to either manifold vacuum or ported vacuum. Results varies depending on what you like and what the engines wants. Thus, the time consuming part, change one thing at a time and test drive, if it helps leave it alone, if it don't go back to where you started at and try the other things suggested.
Bruisr- G3GM Member
- Street Cred : 8
Re: 1973 Chevelle SS 454 Project
![]() by Bruisr Wed Jan 16, 2013 4:48 pm
by Bruisr Wed Jan 16, 2013 4:48 pm
http://www.chevytalk.org/fusionbb/showtopic.php?tid/290435/post/2297055/hl/timing+advance/fromsearch/1/#2297055
check out these threads.
check out these threads.
Bruisr- G3GM Member
- Street Cred : 8
Re: 1973 Chevelle SS 454 Project
![]() by mattdbal Wed Jan 16, 2013 11:44 pm
by mattdbal Wed Jan 16, 2013 11:44 pm
Thanks for all the useful info Bruisr, I will remember this for the spring and get things all worked out. Thanks for the comments!
mattdbal- G3GM Newbie
- Street Cred : 0

 Similar topics
» 1973 Chevelle SS 350 Project
» Kyle's Red 1973 Chevelle SS 454 wagon project
» Official Show Us Your Car ( 73-77 )
» Kyle's Red 1973 Chevelle SS 454 wagon project
» Official Show Us Your Car ( 73-77 )
G3GM :: Media :: G3 Project Pictures
Page 1 of 1
Permissions in this forum:
You cannot reply to topics in this forum|
|
|
» Painting Interior Plastic
» Anyone good at photoshop?
» El Camino/Sprint LH Aftermarket Quarter Panel FOR SALE
» 1973 chevelle four speed console
» dashes
» Used OEM Hood 73-77
» 76 Laguna parked in 2002
» Thanks for having me
» 77 elco SS