


74Malibu383 Build
G3GM :: Media :: G3 Project Pictures
Page 8 of 12 •  1, 2, 3 ... 7, 8, 9, 10, 11, 12
 ![]()
Re: 74Malibu383 Build
![]() by 74Malibu383 Wed Jan 13, 2016 11:13 am
by 74Malibu383 Wed Jan 13, 2016 11:13 am
Showtime73 wrote:Bryan what offset and backspace are you using? Did you have to get an adapter? Do you ever wish you had smaller wheels? I'm on the fence with between the 18 and 20 inch.
I don't think I wish I had smaller wheels. I think the stance is just right. However, I don't think you would go wrong with 18"s all the way around either. I will say the 20's are a little big for some people, but we all know what opinions are right?
If you're ever unsure on the backspacing and think you could use a little more, then do so. You can always run a spacer between the hub and the wheel to bring it back outside. I don't have one but you obviously can't go the other way, so plan accordingly...
Originally I went with:
19x8 with a 5" and 20x10 with a 5.75" with 275/35/19’s and 315/35/20’s
You do have to subtract 1/8" backspacing for the Baer Brakes on front and rear!
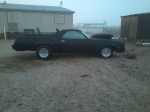
The 275's on the 8 didn't look that good up front. They cupped over the rim pretty bad. So I sent the front ones back in and had a 19x10" rim built for the front. I went with 5.25" of backspacing on the front. Turns out they could have moved inwards another 1/4" to 1/2" as I am really close to rubbing the fender. However, it DOES NOT RUB. Not sure if it's the suspension or what, but no matter what I do, I have no issues.
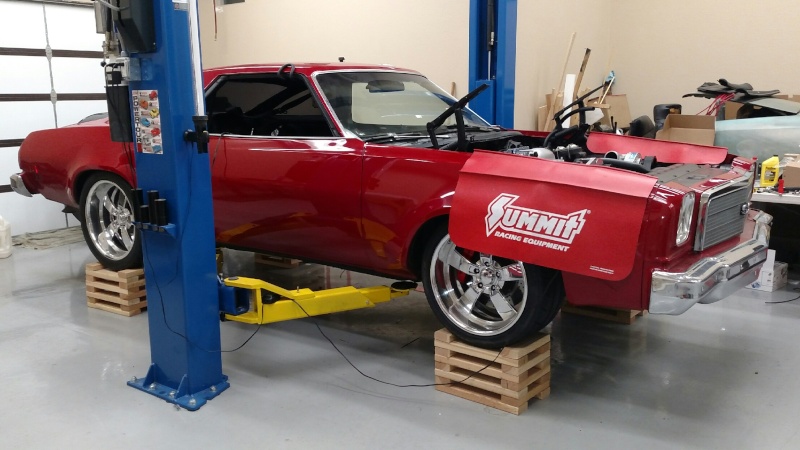
Here's a photo from a couple years ago at full lock to the left. I thought for sure it was going to rub on a hard turn at speed, but it doesn't. Still not sure how... These were Nitto Invo's as well... I do not recommend. No traction at all in the rear, and for an opinion.... I don't like the tread pattern anyway. They're long gone.


74Malibu383- Donating Member

- Street Cred : 26
Re: 74Malibu383 Build
![]() by Limey SE Wed Jan 13, 2016 1:37 pm
by Limey SE Wed Jan 13, 2016 1:37 pm
74Malibu383 wrote:Video:
https://youtu.be/yxMLFn5vjQo
Still a lot of work to be done, but I had to get it started!!! Sound doesn't really do it justice. It sounds pretty damn mean.
Man that sounds mean as heck at the back end of that Video, Cant wait for the Smoke show !!

Limey SE- Management

- Street Cred : 97
Re: 74Malibu383 Build
![]() by 74Malibu383 Thu Jan 14, 2016 3:03 pm
by 74Malibu383 Thu Jan 14, 2016 3:03 pm
- 3.50 Polished Gears
- Wavetrac Differential
Lifetime warranty on the Wavetrac Differential and they say there isn't a HP number that is too much....
Pretty cool explanation of how they work on their site.
http://www.wavetrac.net/technical.htm
With that said, I'll curious if anyone needs a built 10 bolt for their car... I'll post up in the for sale section.
74Malibu383- Donating Member
- Street Cred : 26
Re: 74Malibu383 Build
![]() by 74Malibu383 Thu Jan 14, 2016 3:16 pm
by 74Malibu383 Thu Jan 14, 2016 3:16 pm
74Malibu383- Donating Member
- Street Cred : 26
Re: 74Malibu383 Build
![]() by Showtime73 Sat Jan 16, 2016 9:35 pm
by Showtime73 Sat Jan 16, 2016 9:35 pm

Showtime73- Donating Member
- Street Cred : 1
74Malibu383- Donating Member
- Street Cred : 26
Re: 74Malibu383 Build
![]() by Showtime73 Sun Jan 17, 2016 8:24 pm
by Showtime73 Sun Jan 17, 2016 8:24 pm
Showtime73- Donating Member
- Street Cred : 1
Re: 74Malibu383 Build
![]() by 74Malibu383 Mon Jan 18, 2016 12:32 pm
by 74Malibu383 Mon Jan 18, 2016 12:32 pm
Showtime - I don't think I have a photo of the wiring coming through the firewall, but if you go to page two, you can see a shot of the clean firewall. There's a hole to the lower left that is barely visible, but that is where most of the wiring came through.
Now though, due to the EFI conversion, there are a couple passages. First would be the fuse block. Painless provides a couple of extra "pass through" holes in their panels. Wiring for the electric fans, vacuum pump, line lock, and sending units for my instrument cluster route through there. Then there is a large hole w/grommet right above the transmission that serve all of my EFI wiring goes though. Lastly, the hole on the passenger side that you should be able to see on page 2. I have a 2g power wire, and 4g ground wire that pass through that hole to distribution blocks. I think I went a little overboard rewiring the car... Pretty much every circuit has it's own ground going to the distribution block instead of the body.
74Malibu383- Donating Member
- Street Cred : 26
Re: 74Malibu383 Build
![]() by Limey SE Mon Jan 18, 2016 12:49 pm
by Limey SE Mon Jan 18, 2016 12:49 pm
___________________________________________
1977 Chevelle SE x2
One Mild original
one Wild NON original
Anthony
Limey SE- Management
- Street Cred : 97
Re: 74Malibu383 Build
![]() by Limey SE Mon Jan 18, 2016 1:00 pm
by Limey SE Mon Jan 18, 2016 1:00 pm
___________________________________________
1977 Chevelle SE x2
One Mild original
one Wild NON original
Anthony
Limey SE- Management
- Street Cred : 97
Re: 74Malibu383 Build
![]() by 74Malibu383 Mon Jan 18, 2016 1:06 pm
by 74Malibu383 Mon Jan 18, 2016 1:06 pm
74Malibu383- Donating Member
- Street Cred : 26
Re: 74Malibu383 Build
![]() by Limey SE Mon Jan 18, 2016 1:41 pm
by Limey SE Mon Jan 18, 2016 1:41 pm
___________________________________________
1977 Chevelle SE x2
One Mild original
one Wild NON original
Anthony
Limey SE- Management
- Street Cred : 97
Re: 74Malibu383 Build
![]() by 74Malibu383 Wed Jan 20, 2016 2:39 pm
by 74Malibu383 Wed Jan 20, 2016 2:39 pm
I know there are a couple of drag guys here, and I'm curious if you know your Anti-Squat%? Also curious to know if anyone has figured out what these cars came with stock?
After measuring, I can tell you that my current set-up is an earth shattering 33%... No wonder it NEVER hooks up.
I'm planning on moving the upper trailing arm mount on the axle up 1", and having 2 extra lower adjustable holes for the Axle side of the lower trailing arm.
That would give me:
65% in the stock lower arm mounting location
85% in the first additional hole
102% in the second additional hole
I'm not looking for crazy times in the 1/4 and may never even put slicks on it, but just want some more traction....
74Malibu383- Donating Member
- Street Cred : 26
Re: 74Malibu383 Build
![]() by Limey SE Tue Jan 26, 2016 9:48 pm
by Limey SE Tue Jan 26, 2016 9:48 pm


Limey SE- Management
- Street Cred : 97
74Malibu383- Donating Member
- Street Cred : 26
Re: 74Malibu383 Build
![]() by 74Malibu383 Tue Feb 02, 2016 4:43 pm
by 74Malibu383 Tue Feb 02, 2016 4:43 pm
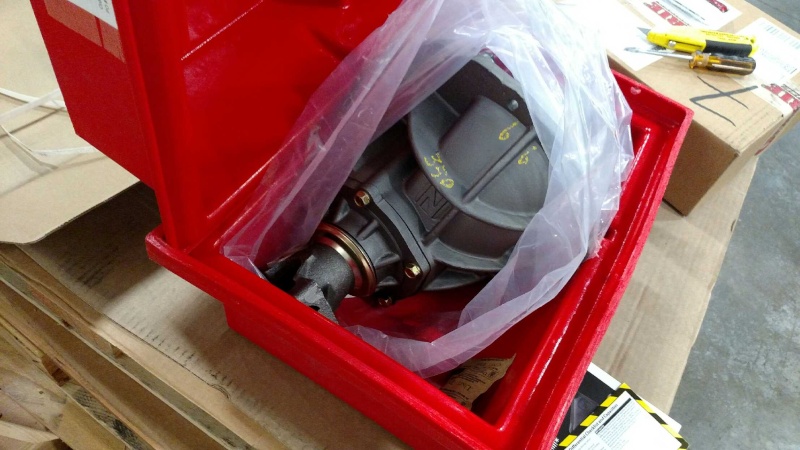
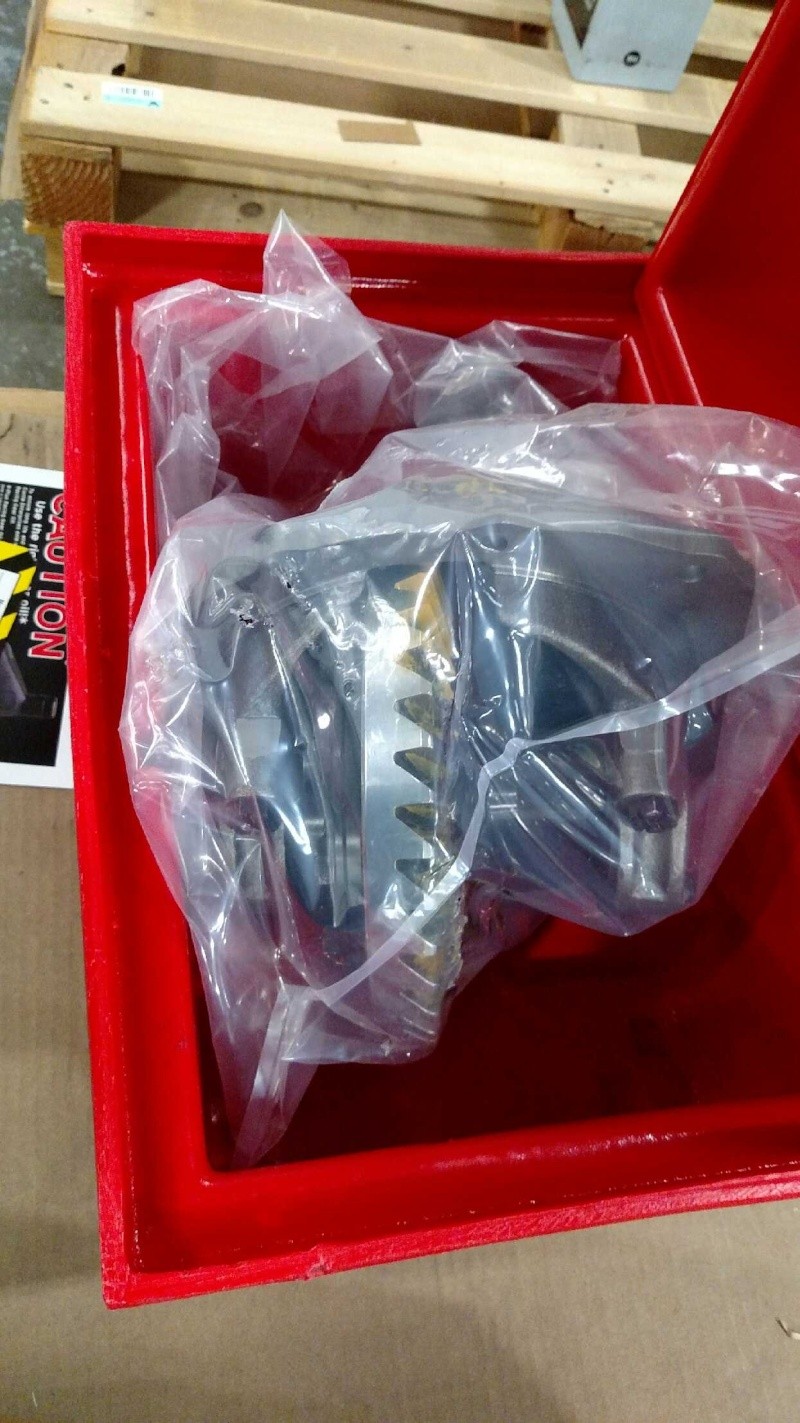
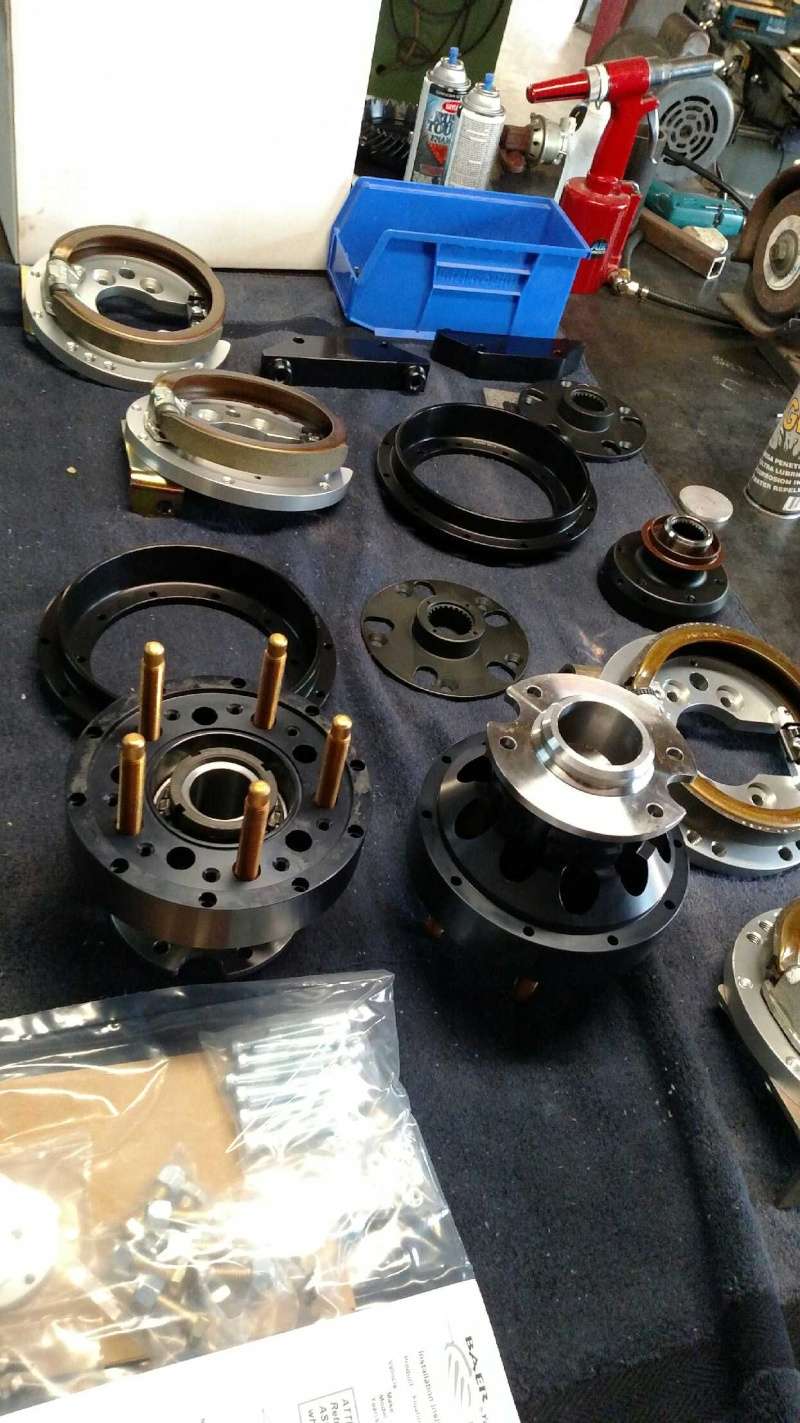
Anyway, some parts came in!
- 3rd member from Currie
- Full floater 6P kit from Baer (Disregard the ebrake adapters on the right. Those are for another build he is doing)
Dropped my old rear end and all the parts off at my friend's shop. Hoping to have a new housing by the end of the week!
74Malibu383- Donating Member
- Street Cred : 26
Re: 74Malibu383 Build
![]() by Limey SE Tue Feb 02, 2016 8:25 pm
by Limey SE Tue Feb 02, 2016 8:25 pm
74Malibu383 wrote:So.... no takers on the anti-squat question huh?
Anyway, some parts came in!
I will bite by changing that what does it help, I need to know I am an Enquireing Mind (cant speel though LOL )
Limey SE- Management
- Street Cred : 97
Re: 74Malibu383 Build
![]() by Bruisr Thu Feb 04, 2016 8:20 am
by Bruisr Thu Feb 04, 2016 8:20 am
Bruisr- G3GM Member

- Street Cred : 8
Re: 74Malibu383 Build
![]() by Bruisr Thu Feb 04, 2016 8:24 am
by Bruisr Thu Feb 04, 2016 8:24 am
Bruisr- G3GM Member
- Street Cred : 8
Re: 74Malibu383 Build
![]() by bracketchev1221 Thu Feb 04, 2016 8:45 am
by bracketchev1221 Thu Feb 04, 2016 8:45 am
bracketchev1221- G3GM Enthusiast

- Street Cred : 15
Re: 74Malibu383 Build
![]() by 74Malibu383 Mon Feb 08, 2016 12:24 pm
by 74Malibu383 Mon Feb 08, 2016 12:24 pm
74Malibu383- Donating Member
- Street Cred : 26
Re: 74Malibu383 Build
![]() by 74Malibu383 Mon Feb 08, 2016 12:26 pm
by 74Malibu383 Mon Feb 08, 2016 12:26 pm
Bruisr wrote:Bryan- are you having your friend use the old rear end for mocking purposes? Gettin a little worried you may have changed your mind? I hope not I'm really looking forward to actually having a posi for the first time ever. I got a friend who is willing to modify my driveshaft for the 1350 u joint, rather than swap the yoke. I'm gonna see about installing 1350 u joints on both ends of the drive shaft while its out.
Yes, he is using the old rear end to mock everything up. I haven't changed my mind. It's YOURS!
Check out this conversion u-joint from Spicer. Might be exactly what you need.
http://www.jegs.com/i/Spicer/094/5-460X/10002/-1?parentProductId=2814754
74Malibu383- Donating Member
- Street Cred : 26
Re: 74Malibu383 Build
![]() by Joe73 Mon Feb 08, 2016 2:14 pm
by Joe73 Mon Feb 08, 2016 2:14 pm
74Malibu383 wrote:Bruisr wrote:Bryan- are you having your friend use the old rear end for mocking purposes? Gettin a little worried you may have changed your mind? I hope not I'm really looking forward to actually having a posi for the first time ever. I got a friend who is willing to modify my driveshaft for the 1350 u joint, rather than swap the yoke. I'm gonna see about installing 1350 u joints on both ends of the drive shaft while its out.
Yes, he is using the old rear end to mock everything up. I haven't changed my mind. It's YOURS!
Check out this conversion u-joint from Spicer. Might be exactly what you need.
http://www.jegs.com/i/Spicer/094/5-460X/10002/-1?parentProductId=2814754
Thats a good joint. If you use a joint with a grease fitting make sure you position it so that when forward power is being applied, the grease fitting area is under compression. If you put it with the power trying to spread the fitting area it makes for an easy place for the fitting to crack.
This time around I bought spicer joints with no grease fitting. Dropped my driveshaft a couple times doing burnouts.

Joe73- Donating Member
- Street Cred : 83
Re: 74Malibu383 Build
![]() by Bruisr Mon Feb 08, 2016 8:06 pm
by Bruisr Mon Feb 08, 2016 8:06 pm
Thanks for the reasurrance Bryan, about the rear end purchase. I didn't think you would have changed your mind, but I wasn't certain. I'm so glad! Again no rush, but whenever your ready just give a shout, and I'll come get it.
Thanks Again.
Bruisr- G3GM Member
- Street Cred : 8
Re: 74Malibu383 Build
![]() by 74Malibu383 Tue Feb 09, 2016 6:32 pm
by 74Malibu383 Tue Feb 09, 2016 6:32 pm
As with everything, this is taking longer than I originally hoped. Sorry for the delay. He is coming over with the new rear end tonight with all brackets mocked/tacked on. If all goes well, I'll see if I can get the old unit back this week. I'll let you know.
74Malibu383- Donating Member
- Street Cred : 26
Page 8 of 12 • 1, 2, 3 ... 7, 8, 9, 10, 11, 12 ![]()


G3GM :: Media :: G3 Project Pictures
|
|
|
» Rusty's progress motor Parts arrived LOL Half are on
» Painting Interior Plastic
» Anyone good at photoshop?
» El Camino/Sprint LH Aftermarket Quarter Panel FOR SALE
» 1973 chevelle four speed console
» dashes
» Used OEM Hood 73-77
» 76 Laguna parked in 2002
» Thanks for having me