


75 el camino project.
G3GM :: Media :: G3 Project Pictures
Page 11 of 11 •  1, 2, 3 ... 9, 10, 11
Re: 75 el camino project.
![]() by riddick75 Thu 30 Sep 2021 - 22:51
by riddick75 Thu 30 Sep 2021 - 22:51

riddick75- G3GM Member

- Street Cred : 6
Re: 75 el camino project.
![]() by g3chevy / Mr Pontiac Thu 30 Sep 2021 - 23:51
by g3chevy / Mr Pontiac Thu 30 Sep 2021 - 23:51
g3chevy / Mr Pontiac- Donating Member

- Street Cred : 35
Re: 75 el camino project.
![]() by zucchi Fri 1 Oct 2021 - 9:12
by zucchi Fri 1 Oct 2021 - 9:12
So true. I've rebuilt several Q-j's for my two cars myself. The first one (back in the early 1980's) turned out a bit crappy. After learning from my mistakes, I got better and the last few were flawless. In agreement with g3chevy / Mr Pontiac, warped QJs can be problematic. Lots of places address that by machining the respective surfaces flat. Sounds good on paper but that process removes the gasket sealing ridge. There is a better way to address that. Years ago, Dennis Baker developed a "un-warping" tool which he used to sell. I got one and it works great. As for the play in the throttle shafts, any shop worth their weight in salt will machine out the throttle body shaft guide holes and install bronze bushings as well as straighten the throttle shafts.g3chevy / Mr Pontiac wrote:My first suspect would be the reman carb. Most are not rebuilt correctly and have excessive play in the throttle shafts which causes a vacuum leak. Also to much torque on the carb mounting bolts will warp the carb creating issues as well.
Last year, I was rather preoccupied getting my new engine built and the car ready to receive it so, against my better judgment (as you'll see), I opted to have a "professional" shop based in Boerne, TX, that specializes in Quadrajet carbs custom build and tune a carburetor for my engine.
From the get go, I could not get it to idle correctly. After accumulating about 12-hours of engine running time, I readjusted the rocker arms. I hooked up a remote starter switch in order to turn the engine (without starting it) as part of the rocker adjustment process. I began on the driver's side. Three rockers into this process, I smelled gasoline. Considering I am working inside my garage with the air cleaner removed from the carburetor, I didn't think much of it until I witnessed a drop of liquid fall from the outside of the carb onto the intake manifold. It was gasoline seeping out between the air horn and main body, the part of that gasket which is exposed outside the carb was completely soaked with fuel.
Seeing how there's fuel leaking from between the carb body and air horn even though the carb was not touched and the stock style mechanical fuel pump was operating only at cranking speed, I could only conclude that the carburetor was flooding due to a bad needle/seat, mis-adjusted float, or bad float. I had been banging my head against the wall for weeks trying to figure out why my engine was manifesting flooding symptoms, never taking into account the possibility of a professionally built custom carburetor being defective. I immediately swapped it out for a QJ I built.
Considering what I paid for this carburetor, to say that I was disappointed would be an understatement. I expect shoddy work from today's repair shops where they hire inept air-heads who can't wipe off poop after using a toilet unless they're plugged into a computer that told them where to find their own butt.
I was so utterly disillusioned by that whole experience that I would have preferred to simply return this carb for a full refund and be done. However, being that I am a realist, I was aware that "All sales are final. No refunds for carburetor purchase...". Furthermore, despite its being in operation for only two-months (September to mid-November 2020), unfortunately, I did not discover this issue until seven-months after receiving the carb which put it just over one month outside the time frame for return for service: "Contact QP within 6 months of original purchase if your QP built carburetor has issues that cannot be tuned out with enclosed tuning guide". This is the area where the builder would have earned one star. They offered to examine/inspect/repair the carb, catch is I had to pay for shipping the defective carb back to the shop. They never told me what was causing the problem, only that: "It was disassembled. Changed the needle/seat. Set float changed the air horn gasket and assembled. Tested and needle/seat holds pressure. Also changed the fuel filter."
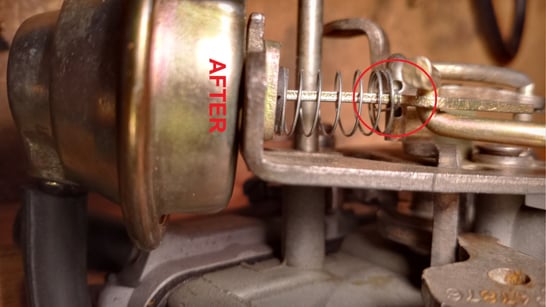
I got the carb back on 12/10/2020. Since I was running a QJ I built, I had no occasion to open the package and inspect it until 01/30/2021. Upon simple checking of operation (throttle valves and choke valve open/close) the choke valve was jammed. In, what I can only surmise as a bonehead rookie mistake, one of the linkage rods was not installed correctly (see before photo) which caused the choke mechanism to bind.
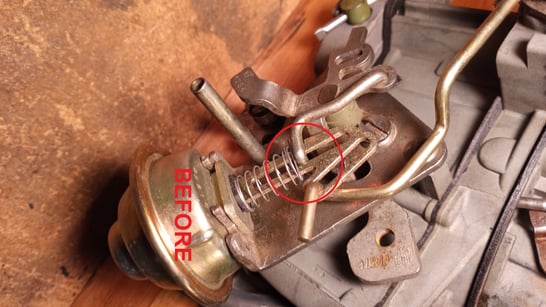
Albeit was a three-minute fix (see after photo), it should not have been necessary to fix the fixed carb in the first place.
How many inspections/hands did this carb pass through before sending it back to the customer? None of them noticed the choke valve was jammed? Where's the pride in workmanship? What's their standard for quality control? I now wonder what else is wrong with this professionally built and repaired carb? Just for giggles, I installed and ran it. It runs nicely at wide-open-throttle. The idle, however, is erratic no matter how much I adjust it. I rebuilt the carb I had on the engine before the engine rebuild; shockingly, it worked perfectly. Swapped it for one of the other carbs I built; runs smooth. Tried yet another carb I built, runs smooth. I suspect there must be something wrong with the idle circuit in the "professional" custom built carb. Im now stuck with a $500.00 paperweight. At some point, I'll tear into it and fix it correctly.
I posted a detailed review about this on both the builder's own website and their Facebook page; both were deleted. That explains why they only have glowing reviews, they delete the ones they disagree with.
As I looked more into this company, I found two complaints filed against them with the Better Business Bureau in the last three-years (https://www.bbb.org/us/tx/boerne/pro...825-1000146148), by the way, theyre not BBB accredited. I wish I would have learned about this sooner.
I am beyond disillusioned, disappointed, and dissatisfied, I am downright disgusted. The money I spent represents an immediate pain in the wallet, but the time I wasted because of this is time Ill never get back; time I could have spent with my family was, instead, spent in the garage.
My experience of being sent a defective "professionally built" carburetor twice may be an isolated anomaly but its a cautionary tale nevertheless.
The message being communicated is don't discount the possibility that your rebuilt carb is defective.

zucchi- G3GM Member
- Street Cred : 4
Hawk03 likes this post
Re: 75 el camino project.
![]() by g3chevy / Mr Pontiac Fri 1 Oct 2021 - 10:23
by g3chevy / Mr Pontiac Fri 1 Oct 2021 - 10:23
g3chevy / Mr Pontiac- Donating Member
- Street Cred : 35
Re: 75 el camino project.
![]() by riddick75 Fri 1 Oct 2021 - 11:04
by riddick75 Fri 1 Oct 2021 - 11:04
riddick75- G3GM Member
- Street Cred : 6
Re: 75 el camino project.
![]() by Iggy Fri 1 Oct 2021 - 18:56
by Iggy Fri 1 Oct 2021 - 18:56

Iggy- G3GM Member
- Street Cred : 15
Re: 75 el camino project.
![]() by fasrnur Fri 1 Oct 2021 - 19:29
by fasrnur Fri 1 Oct 2021 - 19:29
fasrnur- G3GM Enthusiast

- Street Cred : 9
Re: 75 el camino project.
![]() by riddick75 Mon 27 Jun 2022 - 0:38
by riddick75 Mon 27 Jun 2022 - 0:38
Second, been working on turning down the apt screw, its getting flooded in about 15 min just cruising, now its about 2 turns out, and im sure it was about 3.5 out originally. luckily i bought the apt kit from that qjet power place on line, has a tap and threaded plug with the adjustment tool so you dont have to take the air horn off every time.
third I got the bed lined by linex and im really happy with the results

unfortunatly today i was messing around with it a little more to get it dialed in better because I am taking it to get aligned tomorrow, the starter fried. not sure if its a bad part, its getting too much heat soak from the header even though I do have the starter heat blanket on it.
it was doing great, spun great all the times I was trying to tune it and plenty of starts when it was hot. last couple of times the starter would crank really slow when hot when filling up gas, almost like it wasnt going to start, then after it started it sounded like it was staying engaged while the car was running. sounded like an electric fan. then the last one was the final straw. waited till it cooled and still nothing at all. checked the wiring and all still good. pulled the starter and jumped it with cables and nothing happened. going to get a replacement one tomorrow morning and see how that goes. still want to get it cooler near the starter and open to ideas that has worked for people. i was thinking header wrap, ceramic coating, internal ceramic coating from eastwood, all three together? then I was messing with the laser thermometer it was reading about 450 to 500 on the ones near the starter. starter blanket was about 160-215 when I was checking. couldnt hit the starter its self
riddick75- G3GM Member
- Street Cred : 6
Limey SE likes this post
Re: 75 el camino project.
![]() by 77camino Mon 27 Jun 2022 - 10:12
by 77camino Mon 27 Jun 2022 - 10:12

77camino- G3GM Enthusiast
- Street Cred : 8
Re: 75 el camino project.
![]() by g3chevy / Mr Pontiac Mon 27 Jun 2022 - 11:29
by g3chevy / Mr Pontiac Mon 27 Jun 2022 - 11:29
https://www.ebay.com/itm/282536477391?hash=item41c87c82cf:g:AikAAOSwZ8ZW6kNj
g3chevy / Mr Pontiac- Donating Member
- Street Cred : 35
Re: 75 el camino project.
![]() by zucchi Tue 28 Jun 2022 - 8:27
by zucchi Tue 28 Jun 2022 - 8:27
riddick75 wrote:…the starter fried.
…open to ideas that has worked for people.
I dare say we can all agree that reducing a starter's external heat is beneficial. In my observations, many folks seem to disregard the effect of internal heat, i.e., heat generated when the starter is not only energized but also working to crank the engine.
According to Ohm's law, voltage equals current times resistance, or V=IR. Resistance is falsely assumed to be constant when it's actually not. It changes depending on temperature. The higher the temperature, the higher the resistance. Current flowing through a circuit generates heat because of resistance. The greater the resistance, the more heat generated. The calculations for current demand, load, etc., done by engineers are "adjusted" by executives to result in "good enough to work for a few years" and reduce costs so as to increase profits. As a fun exercise, think about how many feet of wire are used in one car. Next, imagine if by going just one size (gauge) smaller, you could save (for the sake of argument) one-cent per foot. Now imagine that savings over your entire production run. All circuits are just barely on this side of the edge of working satisfactorily to meet safety standards, not all foreseeable real world conditions.
As this applies to starters and other electrical systems throughout an automobile, in my observations, the wires installed by the builder to deliver current to (and from, like for point ignitions) starters are simply not thick enough. Increasing the size of the wire reduces resistance thus reduces heat generated in the circuit. On most circuits in my cars, I've gone one size larger when replacing wires. I go two sizes larger with battery cables. This, of course, assumes I haven't installed accessories that draw lots of current. Anyway, in the years before I upgraded my wires, I was going through starter solenoids every couple of years, so much so that I kept a spare solenoid in my car for when it would happen again. After I upgraded the battery cables and other wires, AND made sure I had redundant grounding (never ASSume the ground is good), I haven't had a starter or solenoid failure resulting from heat.
To summarize, what worked for me was upgrading to heavy gauge battery cables, a heavy gauge solenoid wire, and redundant grounding. Your mileage may vary.
zucchi- G3GM Member
- Street Cred : 4
Re: 75 el camino project.
![]() by riddick75 Sat 9 Jul 2022 - 5:00
by riddick75 Sat 9 Jul 2022 - 5:00
[Mr Pontiac] I'll look into that starter. Maybe keep it on hand just in case. Maybe it will at least be lighter than the stock of any. And I looks like the picture I won't have to modify the inspection cover. All the other mini starters looked like you would have to cut.
[zucchi] when I re did the engine bay I re did almost all the wires. Old ones were pretty toasted so I ran new 14 guage all back to the fuse block. Battery cables were also bumped a guage. Might be why the started worked as long as it did.
One thing I did notice since the alignment is that the passenger side seems more even with the driver side temp wise. So either with less lean if there is pooling of fuel in the intake it's not dumping all over there, or I am getting closer to getting the carb dialed in. Which on I have been dialing back as well.
riddick75- G3GM Member
- Street Cred : 6
Re: 75 el camino project.
![]() by g3chevy / Mr Pontiac Sat 9 Jul 2022 - 11:45
by g3chevy / Mr Pontiac Sat 9 Jul 2022 - 11:45
A new conventional starter will work fine. When you're running headers and the temp outside is in the triple digits like it is here today in Houston, that's when you'll notice a stock starter will struggle to start a hot car. Look forward to more updates.
g3chevy / Mr Pontiac- Donating Member
- Street Cred : 35
Re: 75 el camino project.
![]() by zucchi Sat 9 Jul 2022 - 15:04
by zucchi Sat 9 Jul 2022 - 15:04
I used jack stands, strings, straight edges, clamps, measuring tapes, a couple of traditional spirit levels and a bubble level/protractor app I downloaded onto my smartphone. One more thing; I used LOTS of patience. The job took almost all day. In the end, I finally got the results I wanted. No more "professional" shops for me.
zucchi- G3GM Member
- Street Cred : 4
Re: 75 el camino project.
![]() by riddick75 Today at 10:25
by riddick75 Today at 10:25
When running hazards they work fine, but when foot is on break they all stay steady, front included. I did wire in a third brake light from the brake light switch. Is that common for everyone else for the hazards to stay on steady and stop flashing when the break is applied or is that just because of the third brake light that I wired in?
And second, original for 75 what was the choke action. Was it electric or was it a hot air. I'm getting tired of the electric choke closing within 5 minutes and then cranking forever to fire up. Never had a problem with my old truck which was an 85. But the engine might have been from the '70s. Which had the hot air choke. If anyone has the original '70s intake with a hot air choke, what is the intake casting number so I can start looking for one. Thank you.
riddick75- G3GM Member
- Street Cred : 6
Page 11 of 11 • 1, 2, 3 ... 9, 10, 11

 Similar topics
» MY DAILY DRIVER/PROJECT 73 EL CAMINO SS
» Classic Car Restoration Club: 1977 El Camino Project Car-Overview
G3GM :: Media :: G3 Project Pictures
|
|
|
» 75 el camino project.
» Roll Call and Car showcase
» vinyl top removal
» Things are looking up
» Central Texas Noob
» Limeys Shirt House yes its me Doing a Sale on Custom Shirts
» I have posted on here for info and help
» Life & Back On The Radio
» fuel gauge malfunction?