


'74 El Camino "Project Badass"
G3GM :: Media :: G3 Project Pictures
Page 3 of 7 •  1, 2, 3, 4, 5, 6, 7
 ![]()
Re: '74 El Camino "Project Badass"
![]() by builtnotbought Tue Feb 09, 2016 3:24 pm
by builtnotbought Tue Feb 09, 2016 3:24 pm
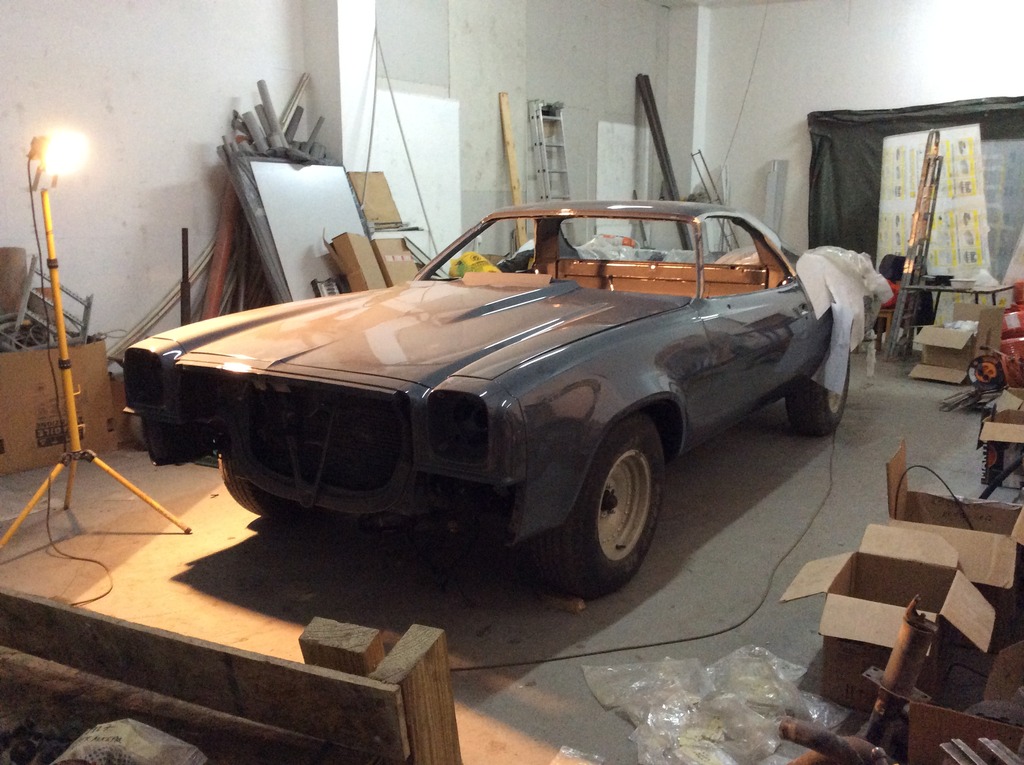
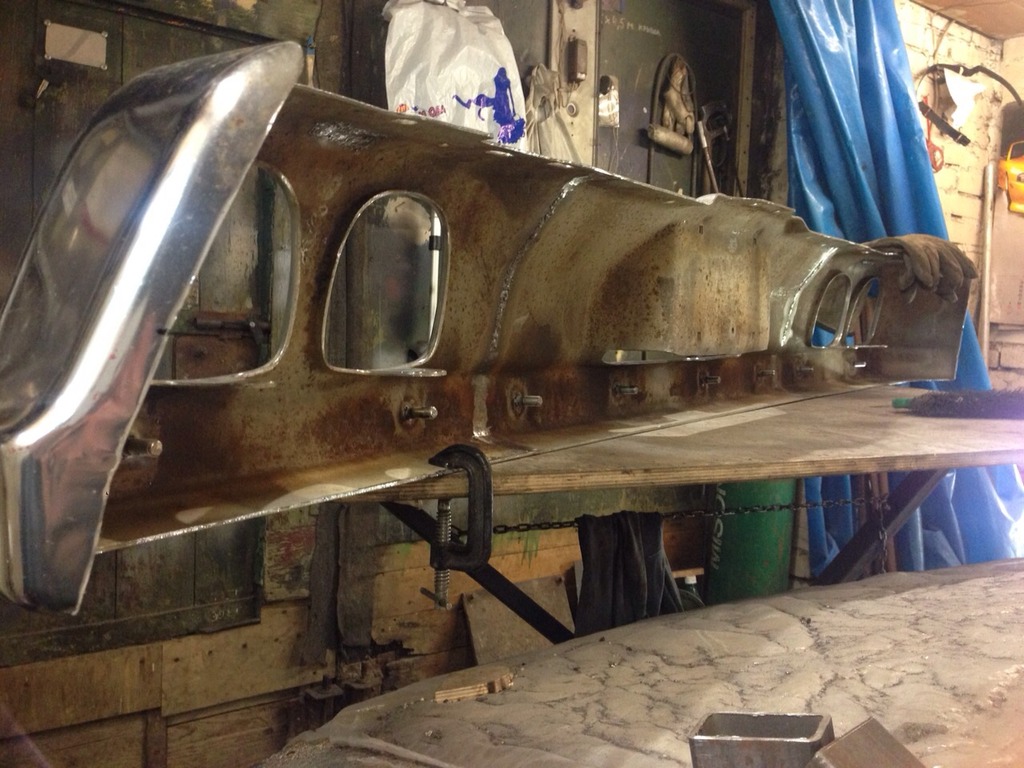
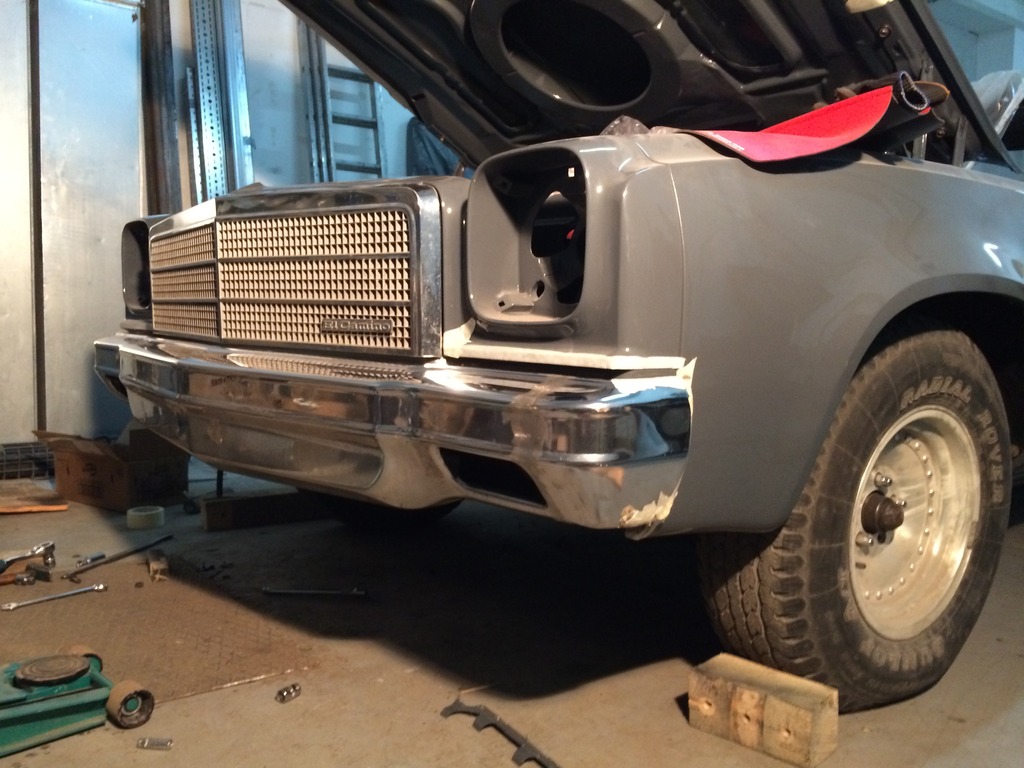
It was time to assemble the rest of the parts together to make a body look like a car again.
I was taught here on forum a new abbreviation - p.i.t.a, so it was a real pita to make door fenders and hood be aligned together.
We worked in six hands, first re-aligned doors to the body because they were not aligned well in the paintshop. Then fenders. They didn't want to stay in the right place to make perfect same clearences with doors. I don't know why, may be because of new body bushings + new radiator core bushings, may be because body has a lot of room to move each side on bushings...After million attempts of moving them we had some succesful result.
The hardest part was the welded hood. It was welded with all rules with saving it's geometry while cutting but it didn't want to fit anyway in the front between the fenders and clearences of both sides going to doors became larger and larger.
In the middle of the fenders on each side hood had a real bend causing lardge gaps with fenders. A lot of playing with hood hinges that came out to be very flexible and it took it's place on car. The flexure on the hood in the middle along the fenders still exists when it's hold with the latch because hinges are trying to open it always. Hinges are turned to their lower position on the rear side. If moving rear side of hinges up, the flexture I think will dissapear but the gap on the rear part of the fenders and hood will grow.
Besides that I bought all new rubber hood bushings but if installing any of them (side, rear) gaps on sides of the hood become enormous. I think all new reproduction bushings are very big comparing to stock. Now I have only two front bushings in.
How did any of you guys solve this bushing problem? I don't have most part of old bushings to reinstall them.
One more strange thing is that front part of the car (lights housings and upper part of grill) don't want to align with grill perfectly.
So that's what I got in the end of a nightmare.
builtnotbought- G3GM Member

- Street Cred : 3
Re: '74 El Camino "Project Badass"
![]() by Mcarlo77 Tue Feb 09, 2016 6:02 pm
by Mcarlo77 Tue Feb 09, 2016 6:02 pm
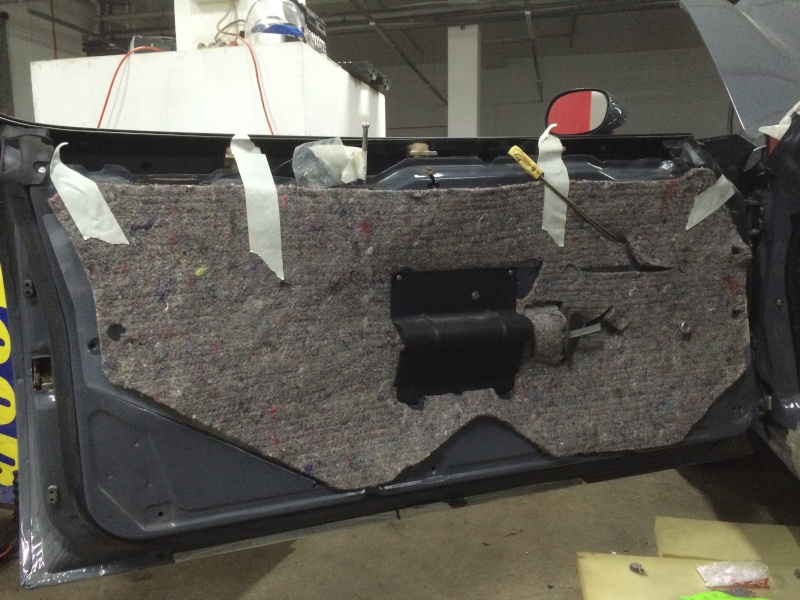
thatfnthing wrote:IIRC the door panels had a waxed kraft paper layer over the metal door frame, then a padded jute (kind of like thick felt) layer over that, then the interior door panel. The first layer (paper or plastic) would be a moisture barrier to keep water out of the padding.
Little late to the party, but found this photo of the factory door insulation you guys were talking about. As described, it was a kraft paper glued to the backside of the padding.

Mcarlo77- Donating Member

- Street Cred : 77
Re: '74 El Camino "Project Badass"
![]() by builtnotbought Wed Feb 10, 2016 6:21 am
by builtnotbought Wed Feb 10, 2016 6:21 am
Mcarlo77 wrote:thatfnthing wrote:IIRC the door panels had a waxed kraft paper layer over the metal door frame, then a padded jute (kind of like thick felt) layer over that, then the interior door panel. The first layer (paper or plastic) would be a moisture barrier to keep water out of the padding.
Little late to the party, but found this photo of the factory door insulation you guys were talking about. As described, it was a kraft paper glued to the backside of the padding.
Not late, right in time! Thank you
I think it's the only one photo in web of this insulation on door )
builtnotbought- G3GM Member
- Street Cred : 3
Re: '74 El Camino "Project Badass"
![]() by Hs1973 Wed Feb 10, 2016 3:30 pm
by Hs1973 Wed Feb 10, 2016 3:30 pm
Also i start by aligning the doors first and put in the glass and hardware, and put the weather strip in. And get them to close right. If you align everything with empty doors you get in trouble, the glass and hardware is heavy and will make the doors sag a little, so they need reajusting after installing. Then you risk to have to reajusting fenders again.
The doors are a Real pita to ajust so they close right. And the glass is even worse. So i always install the doors glass and all wetherstrip and ajust it so everything works right. Then i install the frontend sheetmetal.
Is also always restore the door hinges with new bushings and make sure there is no slack in them that will make the doors sag.
I actually considered removing the side impact bar to save some weight, cause the doors are freakin heavy and would open and close more easy If lighter.
Its looking Real good keep it coming.

Hs1973- G3GM Enthusiast

- Street Cred : 14
Re: '74 El Camino "Project Badass"
![]() by builtnotbought Wed Feb 10, 2016 4:08 pm
by builtnotbought Wed Feb 10, 2016 4:08 pm
Yes i rebuilt door hinges with new studs kit, no movement in them.
Yes, shims make alignment easy, the strange thing is that i used less number of shims than car had before restoring )))
Hood hinges are in good shape.
The only problem i have now is new reproduction hood bushings that are too lardge to save alignment as it is.
builtnotbought- G3GM Member
- Street Cred : 3
Re: '74 El Camino "Project Badass"
![]() by builtnotbought Tue Mar 01, 2016 2:48 pm
by builtnotbought Tue Mar 01, 2016 2:48 pm
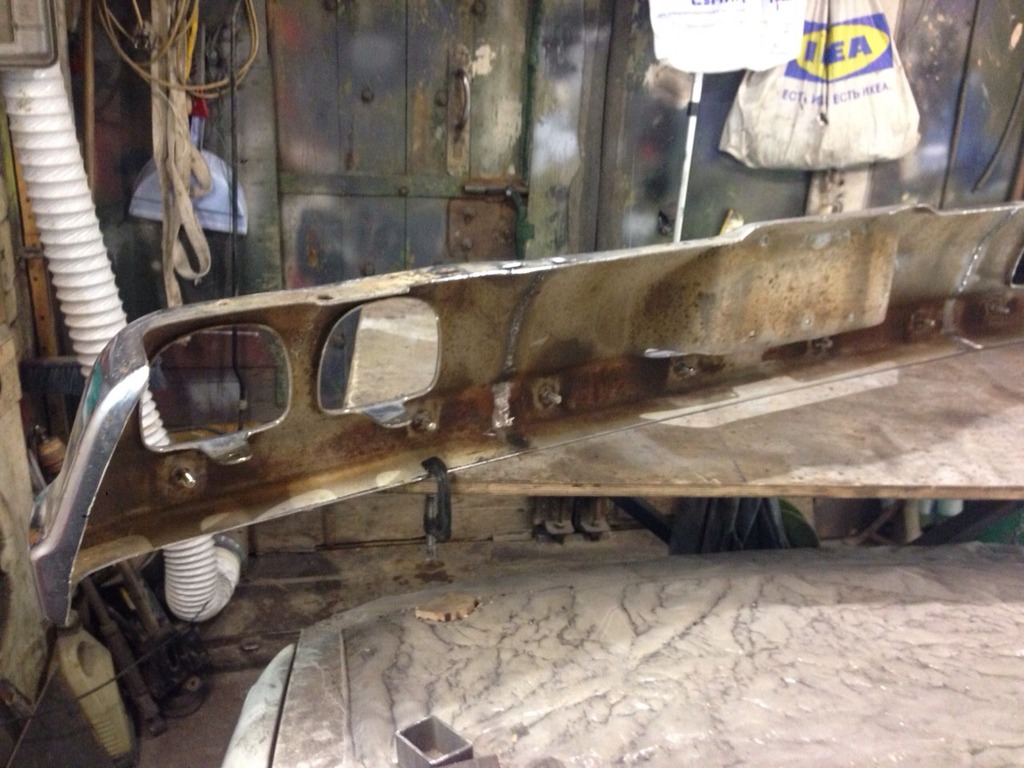
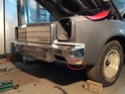
Anyone knows that safety laws played not the best game with bumpers design of this Gen of El Camino.
Sometimes earlier I searched web for solving this problem. Saw several photos where people cutted and welded bumper shocks to push it in but it was no my way.
Saw Holley '74 wagon with modified cutted and welded bumpers, but there were no build photos at all, only one with already welded parts.
I decided, we will try to do better and best. I didn't want to delete bumper's reinforcement and didn't want to cut and weld shocks so after some measurments/fitting bumpers and their reinforcements drove away to my metal man while I sat down with PC and start designing new front bumper holders.
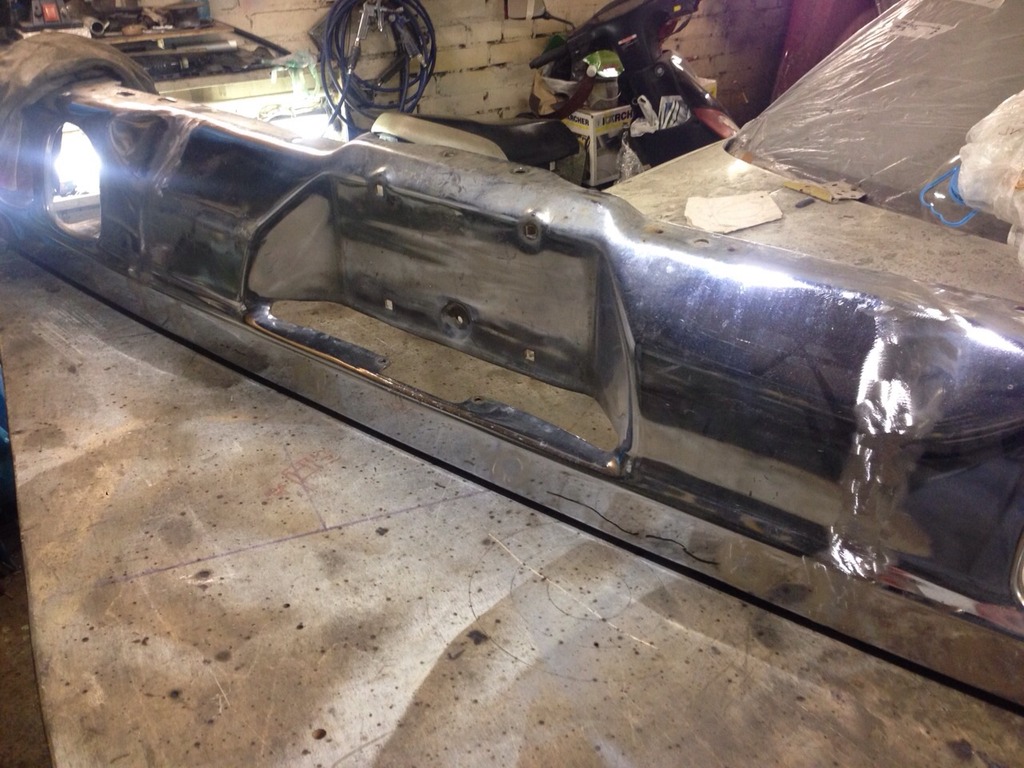
Bumper's covers were sliced in pieces and then welded together in new way, loosing all different holes. Mounting system was changed to welded in studs. An unexpected find after shaving was that factory jack system used small oval holes in bumper
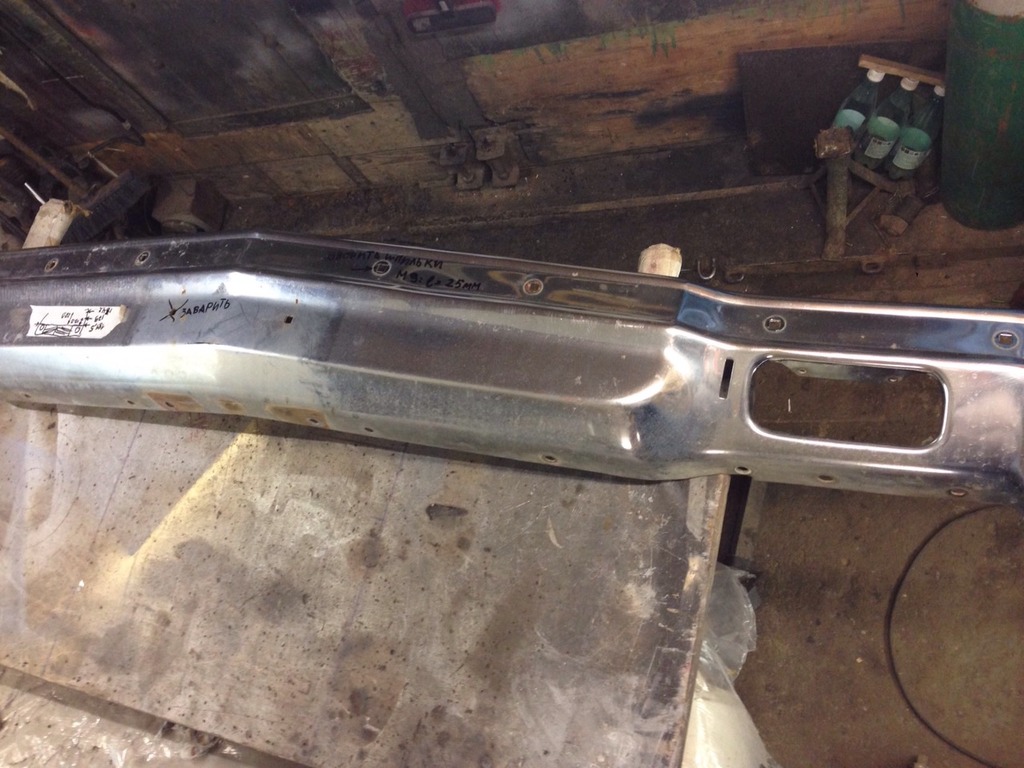
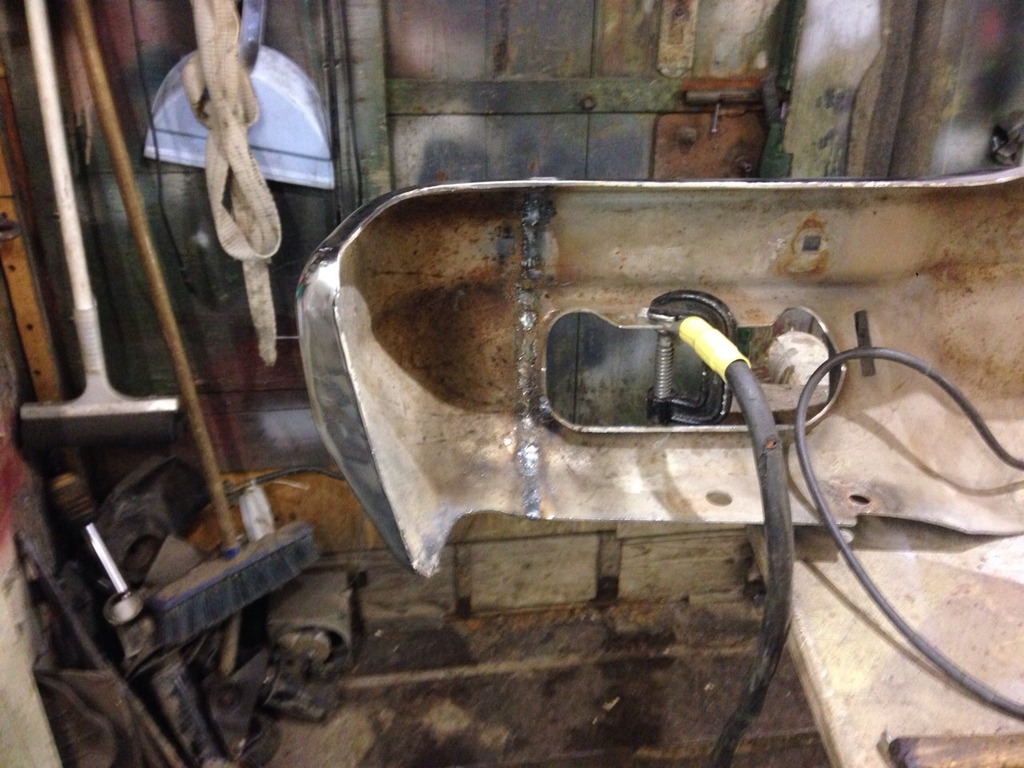

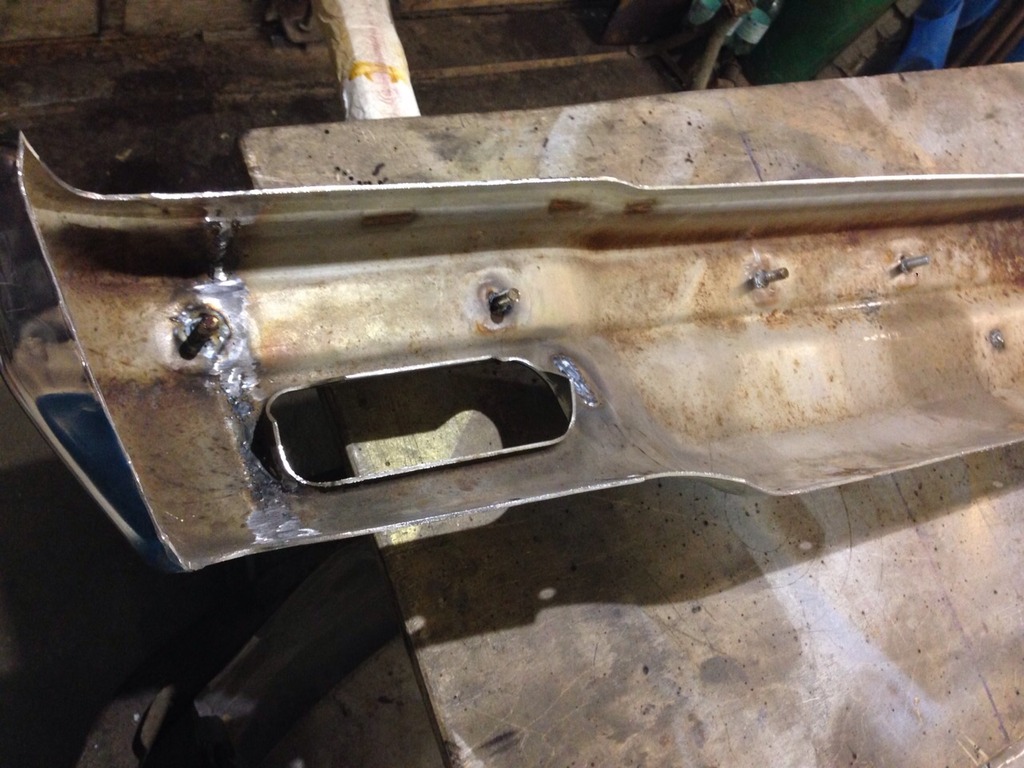


Trying to fit new width.

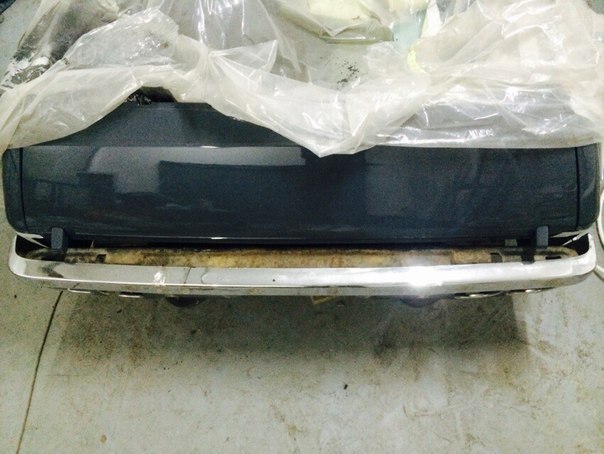
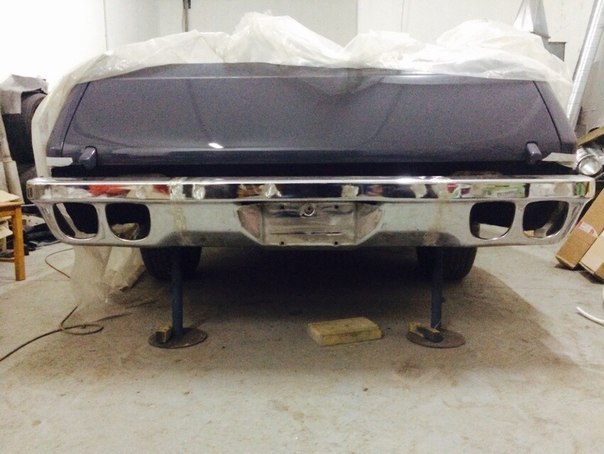
New front holders were laser cutted and welded toghether with the help of my friend, now they are about 11-12 cm length from flange to flange.

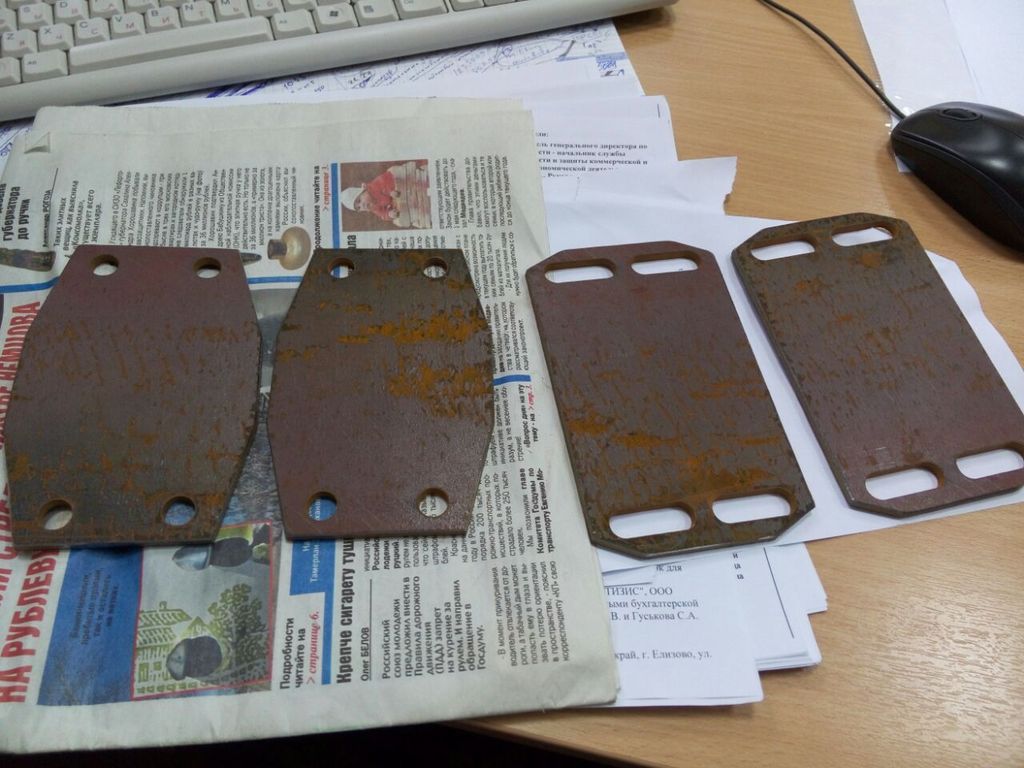
Rear bumper holders got new longer bolt grooves to push bumper in.
F/R bumper's reinforcements lost their corners to fit new covers.
Plastic bumpers inserts were cutted a little to fit.
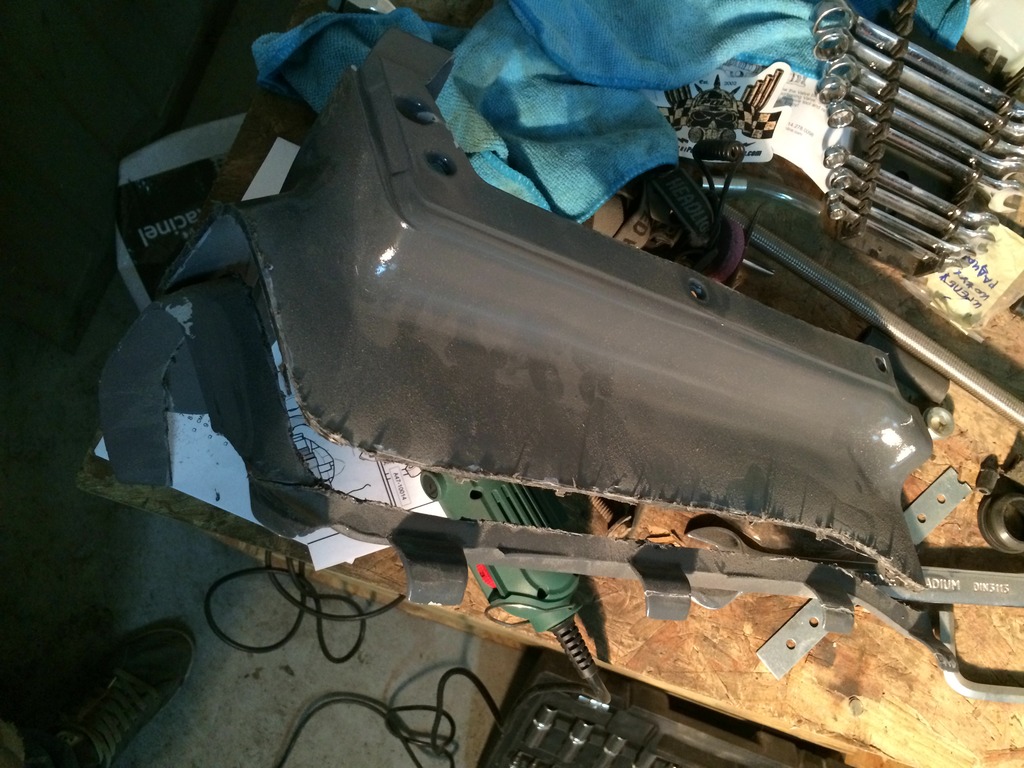
Metal inserts were not touched for now.
I don't remember now but I think rear bumper was narrowed about 2.5cm on each side, front I think about 1.5cm on each side.
First I thought of shaving USA plate place but then gave up this idea. Too many shaved panels on car is not good too.
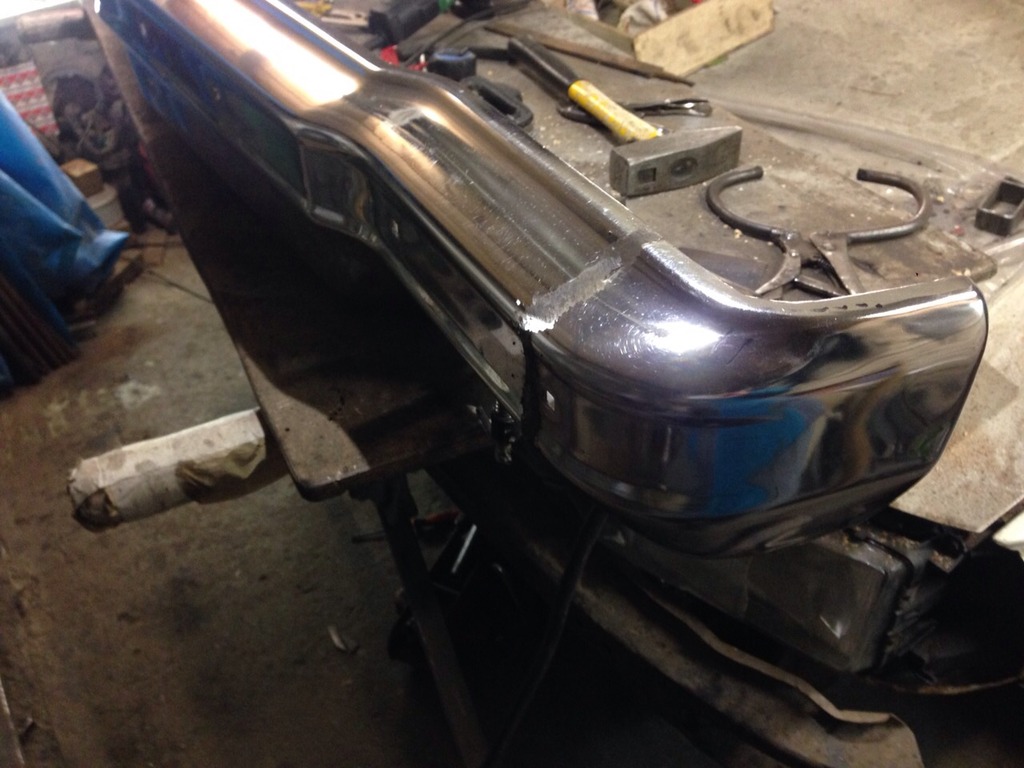
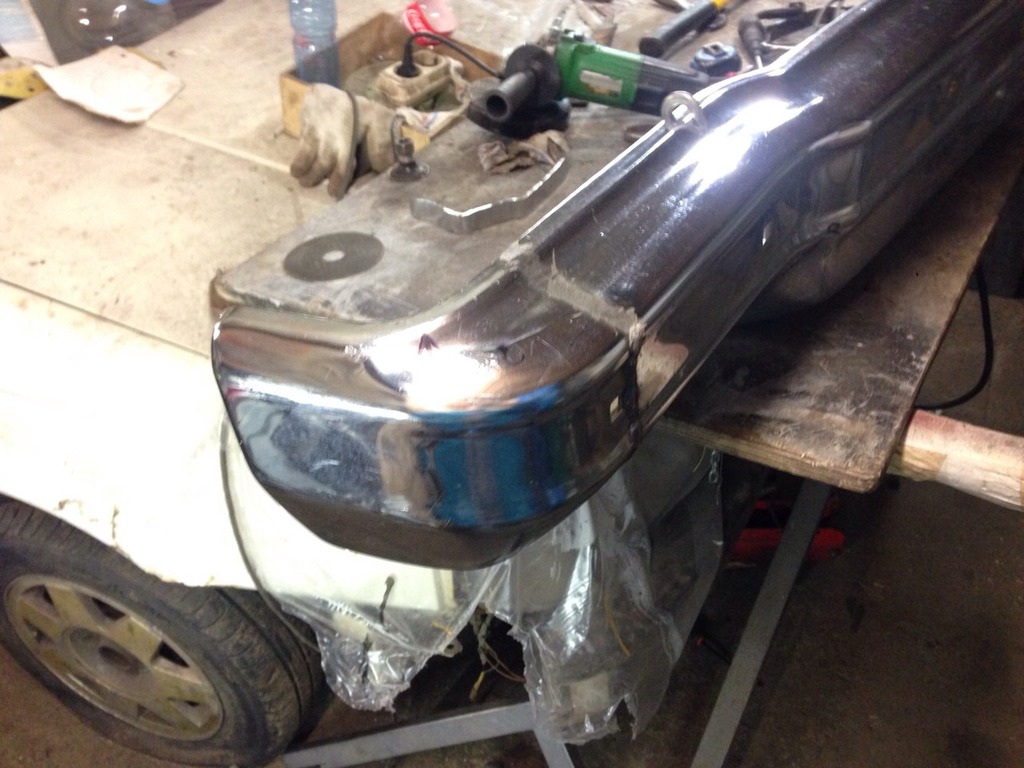
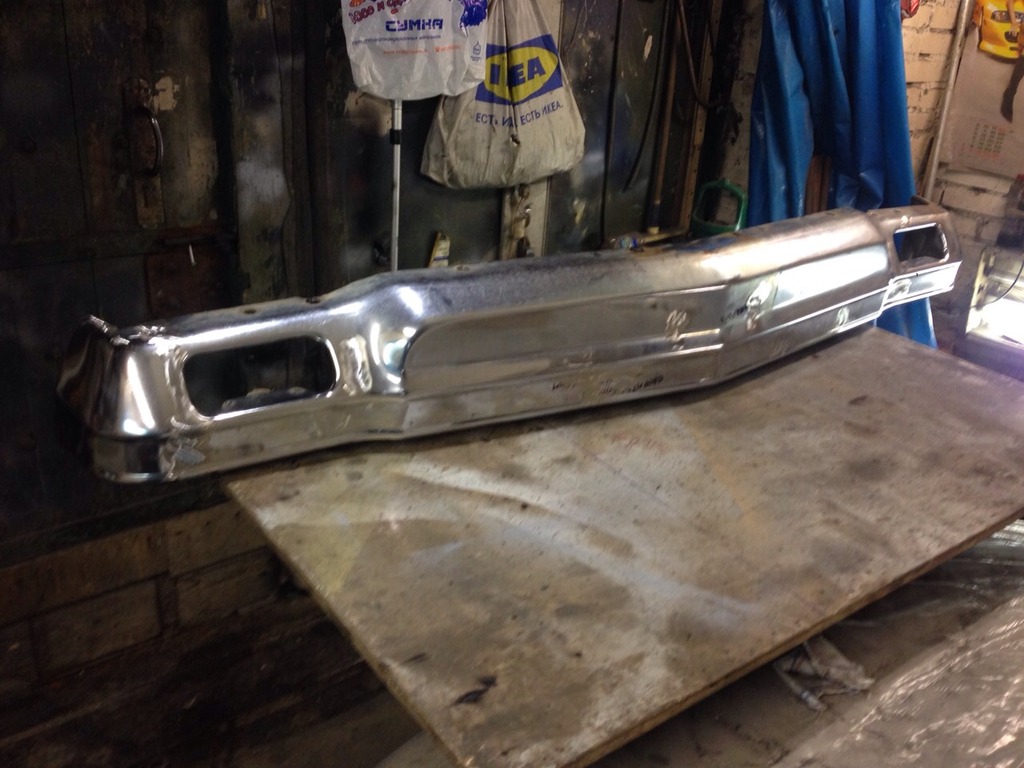
Fitment with new F/R holders
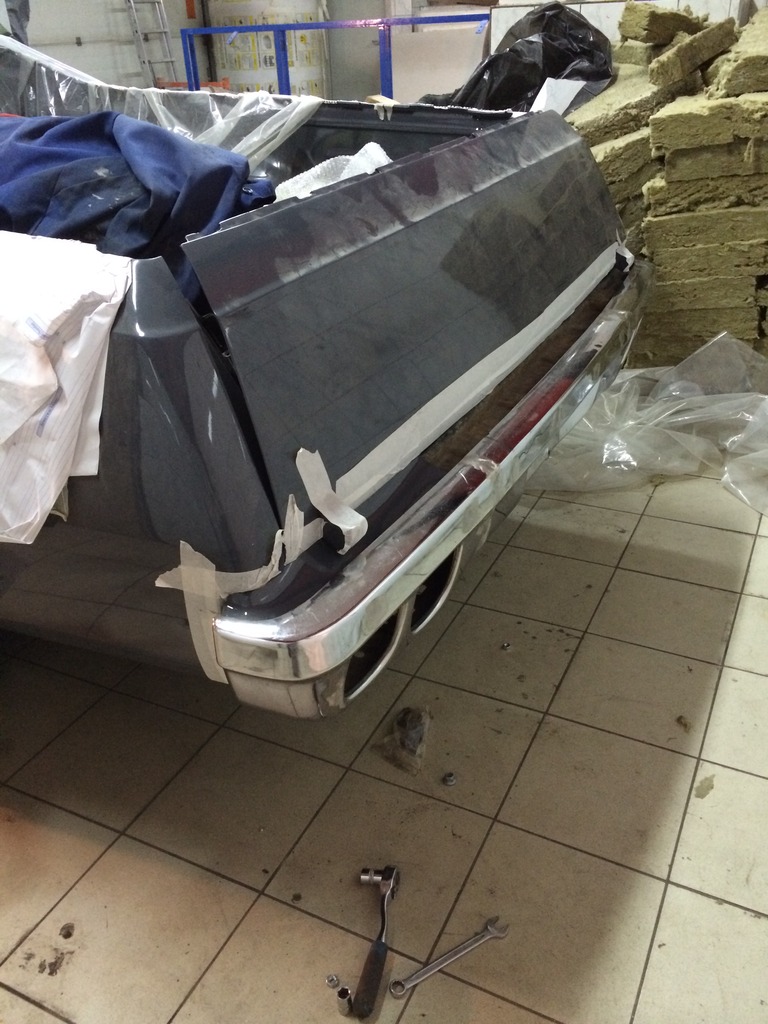
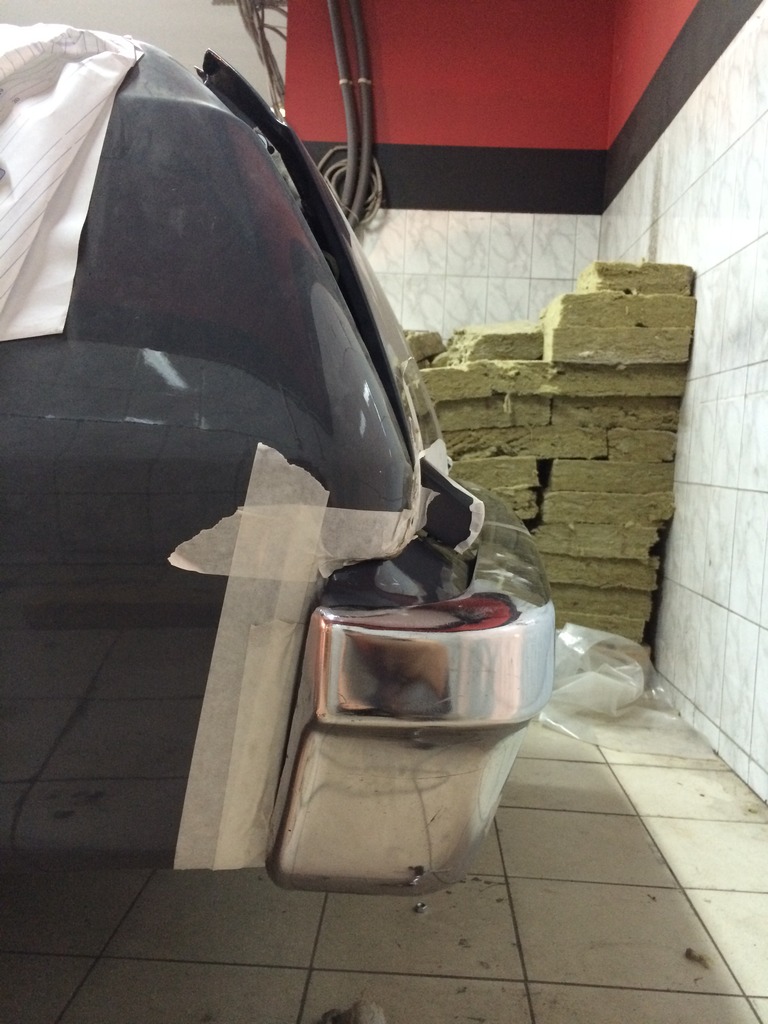

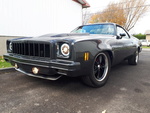
Liked a lot as front bumper came out, ideal fitment and gap along the whole car. Side's wings of the bumper end now directly where the fenders start. The same thing with the rear bumper, but in this position it still sticks out more than the front.
It's pleasure to think that may be this attempt of pressing in the bumpers is somewhere near the unsafe design of the car that may be existed on the factory as sketches
Plus in the near future I will buy front spoiler from Randy's spoilers to complete the front part.
Now everything is waiting for sandblasting and colormatching to body.
I didn't go stock with chrome because several reasons.
First reason I didn't find any rechroming service, frankly speaking we don't have any, only if trying to get in touch with some Army plants but with unpredictable result.
Second reason is that the surface must be prepared and shaved to ideal to make real good chrome coating and I don't know who will do this for me.
Third reason is the price of this process.
Fourth reason is that chrome doesn't fit my car project style in my mind.
I don't know how everything will look like in reality in the end but I hope my car style taste won't fail.
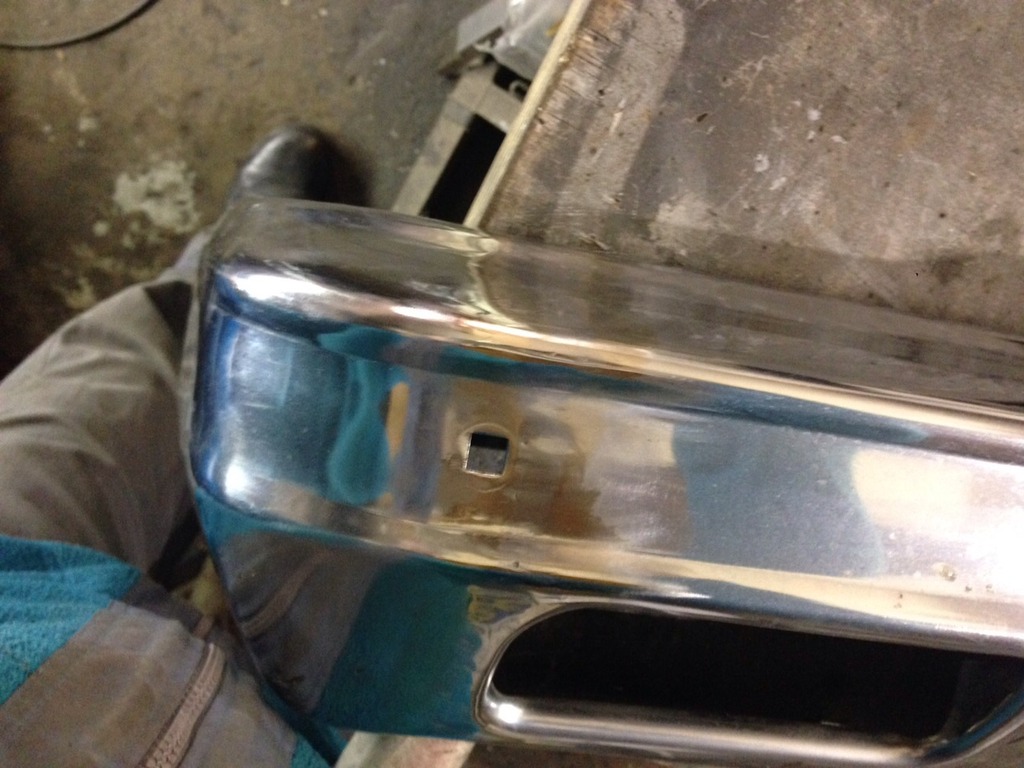
Have a question to the forum. Anybody knows why they made so narrow height front bumper as you can see from photos and so wide height fender that stretches down and ends much lower that the bumper and bumper fillers? There are free mounting holes on the lower part of the fenders one on each right behind the wheel. May be some models haв any spoilers or plastic parts that join lower part of the fender and bumper?
builtnotbought- G3GM Member
- Street Cred : 3
Re: '74 El Camino "Project Badass"
![]() by Joe73 Tue Mar 01, 2016 2:57 pm
by Joe73 Tue Mar 01, 2016 2:57 pm

Joe73- Donating Member
- Street Cred : 83
Steering Column
![]() by testpilot61 Tue Mar 01, 2016 4:11 pm
by testpilot61 Tue Mar 01, 2016 4:11 pm
On my 76 Malibu Classic I loosened the two bolts directly under the dash just enough to allow me to move my column from side to side until it suited what I wanted to do. Trial adjustments will help you determine what's right for you. Be sure to tighten bolts securely once you've settled on the right position.
Really like what your doing with bumpers. I've always disliked how the bumpers seemed to be an after thought, they didn't fit the rest of the cars design as well as all the additional weight of this design.
Keep up the Great work. I'm anxious to see the final results.
Jerry,
testpilot61
testpilot61- Donating Member
- Street Cred : 3
Re: '74 El Camino "Project Badass"
![]() by tropdeprojet Tue Mar 01, 2016 7:14 pm
by tropdeprojet Tue Mar 01, 2016 7:14 pm
tropdeprojet- Donating Member
- Street Cred : 5
Re: '74 El Camino "Project Badass"
![]() by builtnotbought Wed Mar 02, 2016 7:29 am
by builtnotbought Wed Mar 02, 2016 7:29 am
Yes, plastic inserts F/R were made especially for what you told. But I was talking about this difference, circled redJoe73 wrote:I think it was an attempt to allow the bumper to compress without damage to any panels. At low speeds of course hence the name 5 mph bumper.
And now when I saw tropdeprojet avatar again I understood that fenders were designed to fit Laguna nose
testpilot61 wrote:The 73 to 77 chevelles were built from the factory with the columns out of alignment. Not sure why this was done but sure that some engineer had one of those "Brilliant" ideas.
On my 76 Malibu Classic I loosened the two bolts directly under the dash just enough to allow me to move my column from side to side until it suited what I wanted to do. Trial adjustments will help you determine what's right for you. Be sure to tighten bolts securely once you've settled on the right position.
Really like what your doing with bumpers. I've always disliked how the bumpers seemed to be an after thought, they didn't fit the rest of the cars design as well as all the additional weight of this design.
Keep up the Great work. I'm anxious to see the final results.
Jerry,
testpilot61
Thank you!
As I remember under dash bolts allow only forward/backward movement. I still didn't solve this problem, I will look.
I tried to fit single bucket seat and saw this strange disposition on the column.
I will look at it after installing oem bench, may be column was installed this way all it's life.
tropdeprojet wrote:I really like your project. It really see my project in yours!
Thank you
builtnotbought- G3GM Member
- Street Cred : 3
Re: '74 El Camino "Project Badass"
![]() by bigredlaguna Wed Mar 02, 2016 11:54 pm
by bigredlaguna Wed Mar 02, 2016 11:54 pm
bigredlaguna- G3GM Senior Member

- Street Cred : 53
Re: '74 El Camino "Project Badass"
![]() by Hs1973 Sat Mar 05, 2016 10:14 am
by Hs1973 Sat Mar 05, 2016 10:14 am
Point Being that these cars have had a rough life before we Got them. I know mine has been trough alot of owners and a lot of abuse in the 40 years prior to it landing in my garage. They was nothing more than an old Junker in the 80s and most did not care for them.
Hs1973- G3GM Enthusiast
- Street Cred : 14
Re: '74 El Camino "Project Badass"
![]() by riddick75 Wed Apr 13, 2016 10:31 pm
by riddick75 Wed Apr 13, 2016 10:31 pm
 , wish I had the space you have to work in, and the pictures overhead looked awesome. keep up the good work, and as a side note, the welds on the frame were actually done by a machine, mine look just as crappy.
riddick75- G3GM Member
- Street Cred : 6
Re: '74 El Camino "Project Badass"
![]() by builtnotbought Sat Apr 16, 2016 12:06 pm
by builtnotbought Sat Apr 16, 2016 12:06 pm
Good idea, don't think about that.bigredlaguna wrote:I think the column offset in relation to the driver was an attempt by design to reduce or prevent impaling the driver with the steering shaft in a head on collision.
I can't see any mechanical damage. I will make a scheme with interior photo in future to show what I meant, and of coarse I will check myself when bolt in bench to it's place.Hs1973 wrote:Or maybe someone tryed to steel it at some point and twisted the steering column in an attempt to break the steering lock. And you dident notice before you took it apart.
Point Being that these cars have had a rough life before we Got them. I know mine has been trough alot of owners and a lot of abuse in the 40 years prior to it landing in my garage. They was nothing more than an old Junker in the 80s and most did not care for them.
Thank you very much! Wow can't even imagine that they had welding robots half a century ago!riddick75 wrote:I like your project
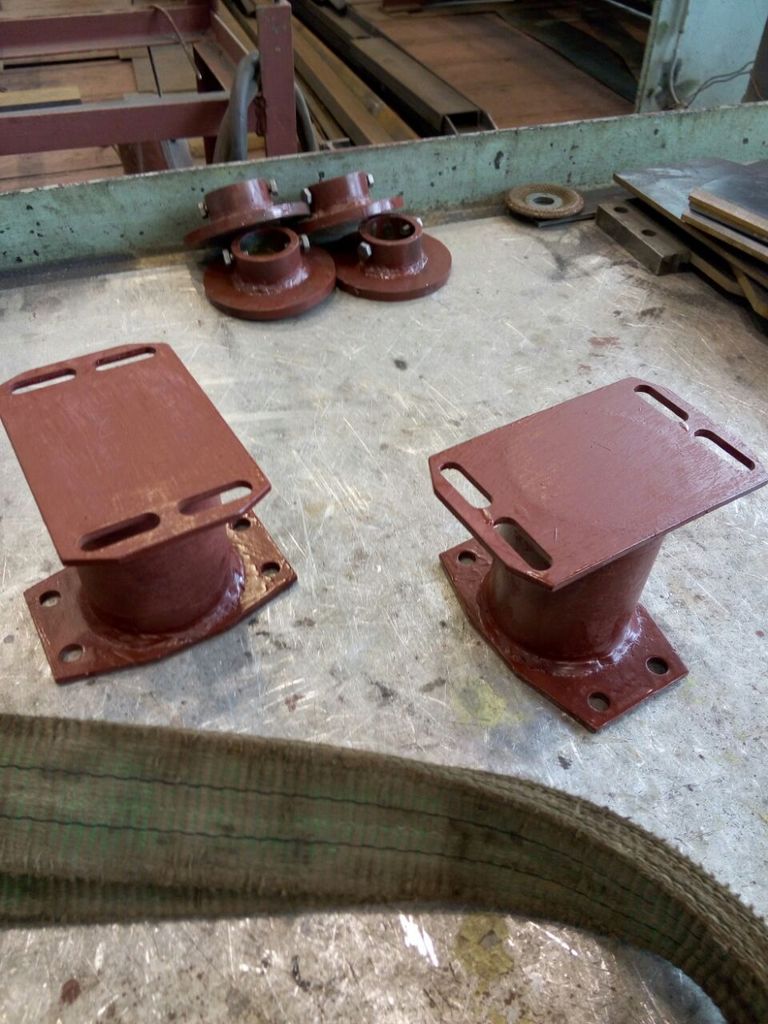
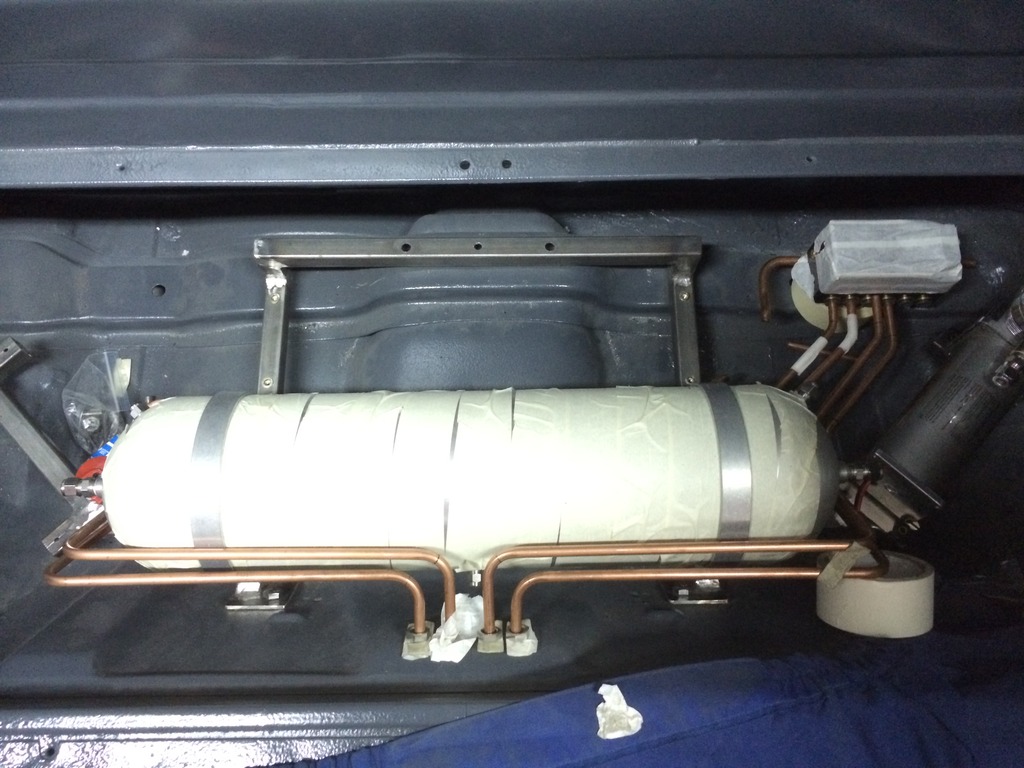
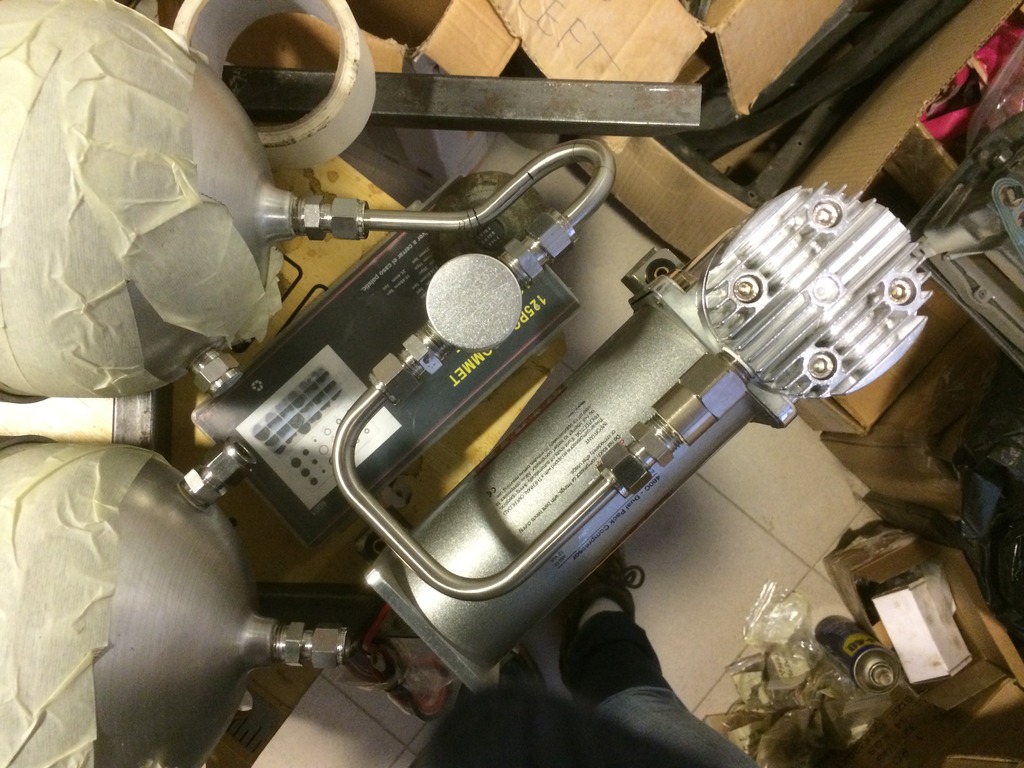
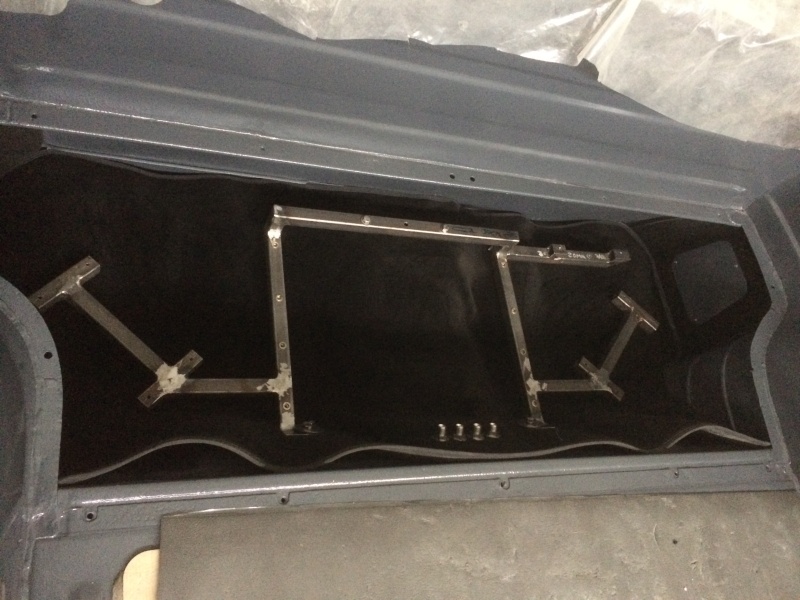
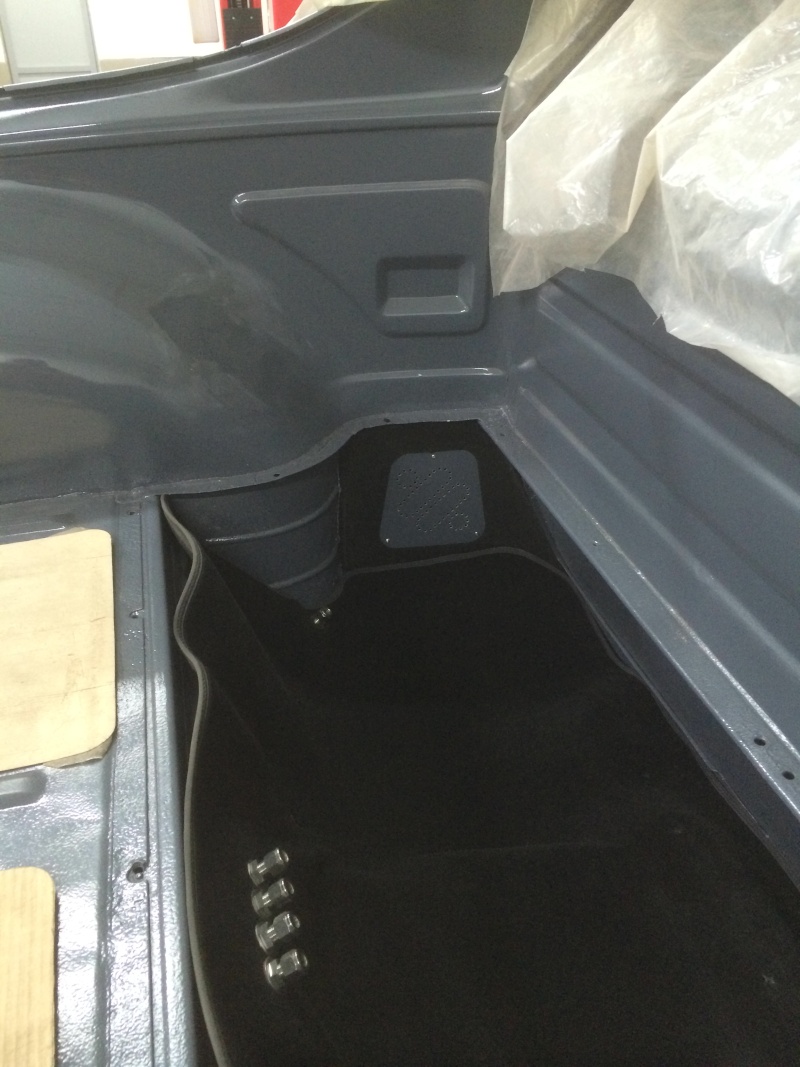
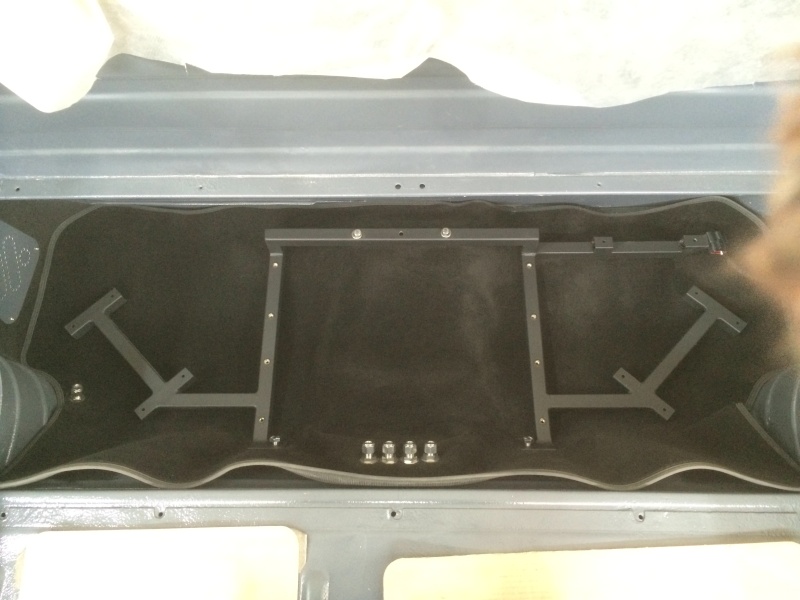
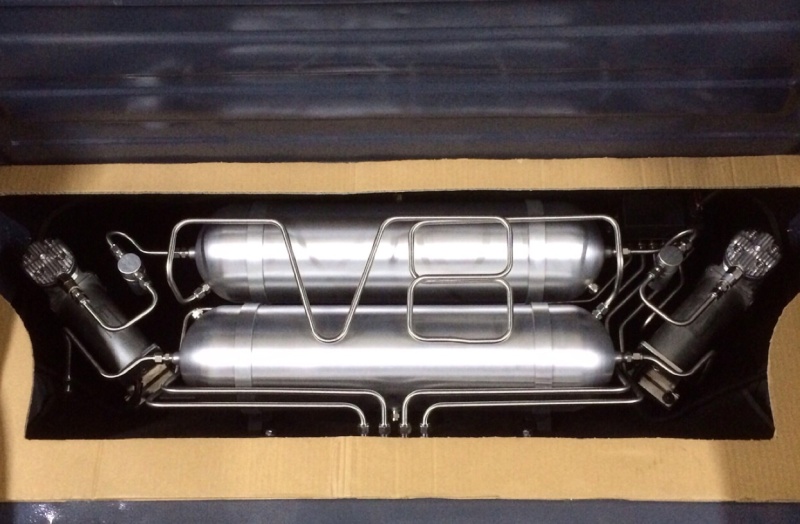
So as for the smugglers box and section behind the cabin. As I told above I always wanted to have air suspension, but usual hidden setup was too boring and besides that I had a enormous wish to try making smth extraordinary.
So where is the best place in Elcamino to place the airride management? Of coarse in the bed under floor behind the cabin! Less talk - more work!
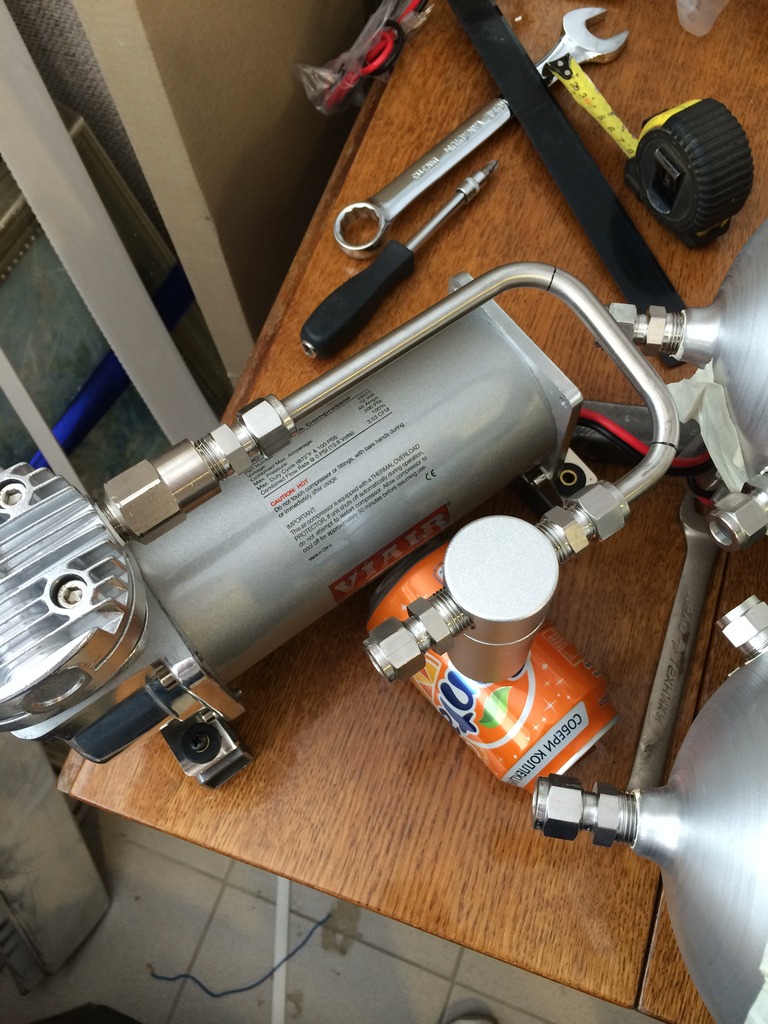
Measured air tank in place where I designed in my head. Went out cool but smth was wrong. Why should I use one tank and one compressor if I have place for twice both?
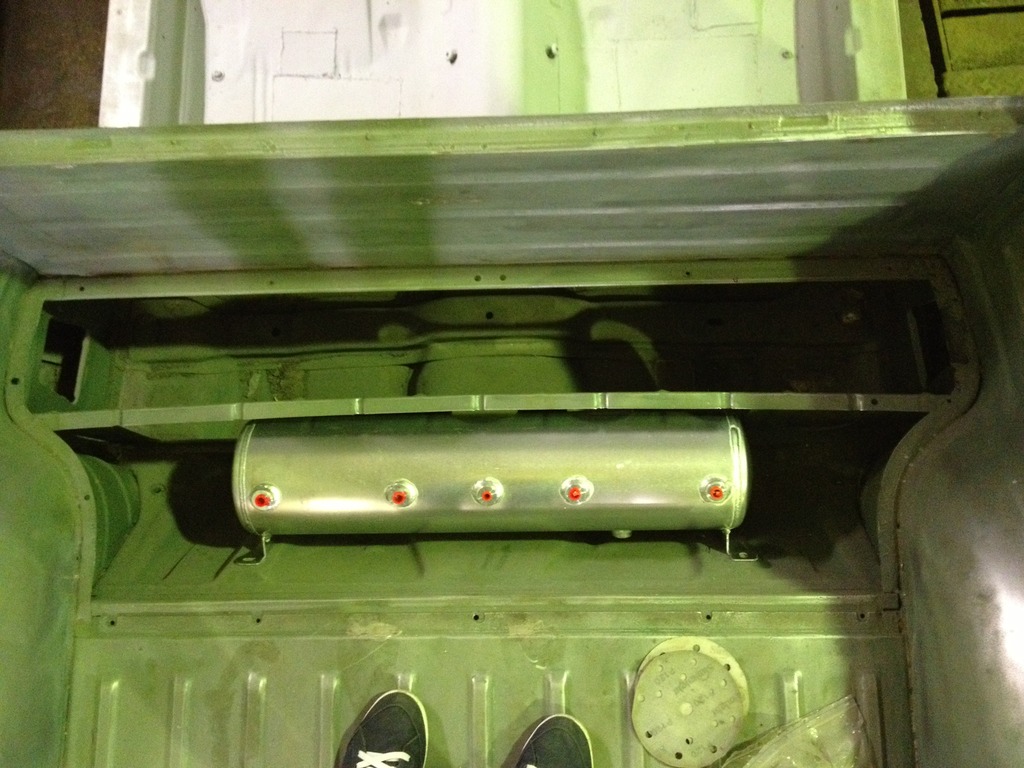
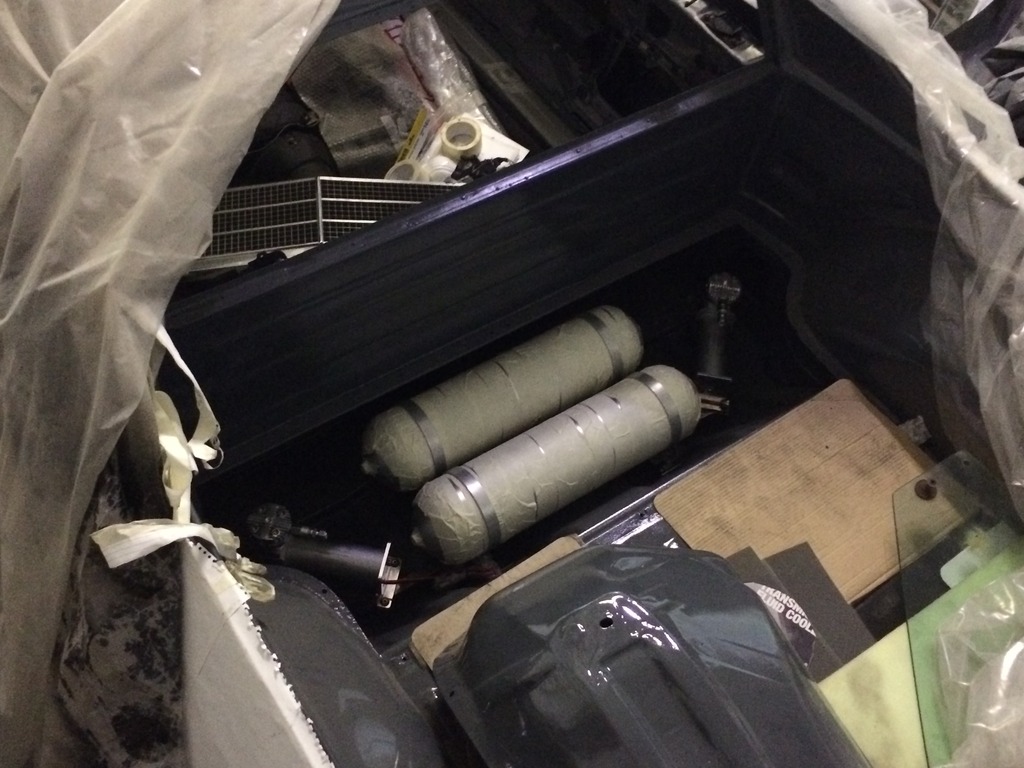
Glovebox hole in the rear cabin panel behind the driver was welded and partition that held the section cover was removed. Now two 20 gallon tanks with two compressors could fit my bed compartment. Ridetech ugly tank was sold and two Speciality suspension seamless tanks had taken place.
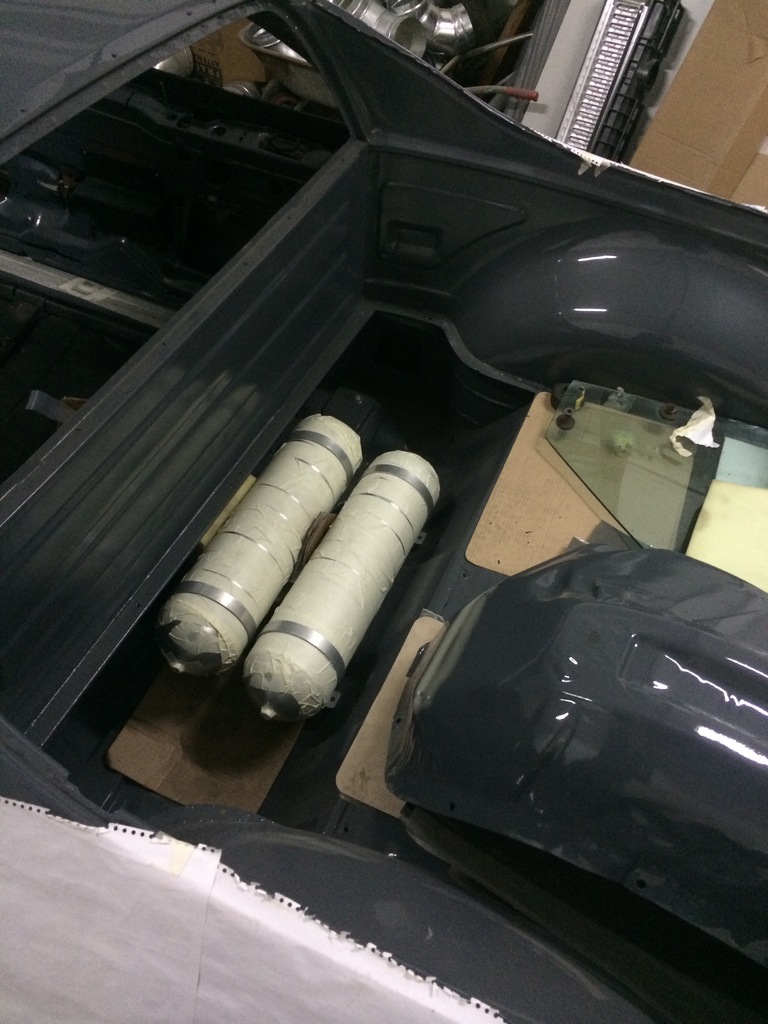

As for the smth extraordinary why should I go with boring flexible plastic lines and hide everything under cover if I can go hardlines and make a transparent cover to show everybody my system?
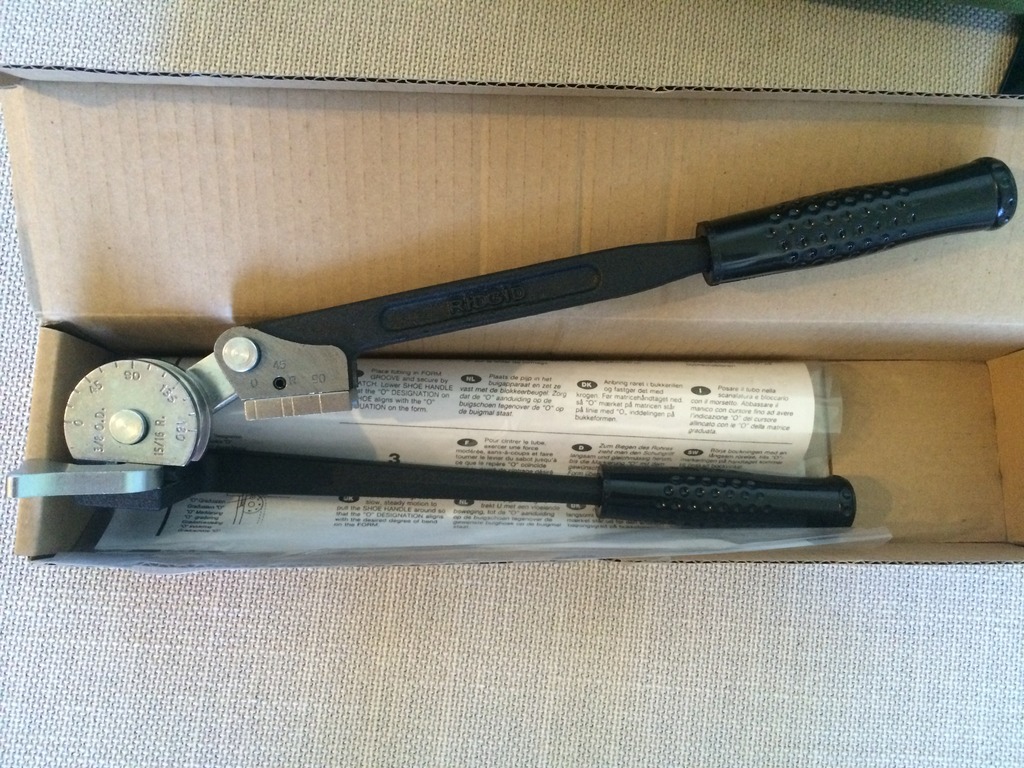
I never made any hardline before, no tools, no experience, knew nothing about fittings/tubing.
So the time went on and I was learning more and more about hardlines. I bought Ridgit bender, REms tube cutter, 12m of stainless 3/8 tubing, Hy-lok compression fittings and started designing the system. Luckely ordered tubing and fittings from Moscow after weeks of searching right spare parts.

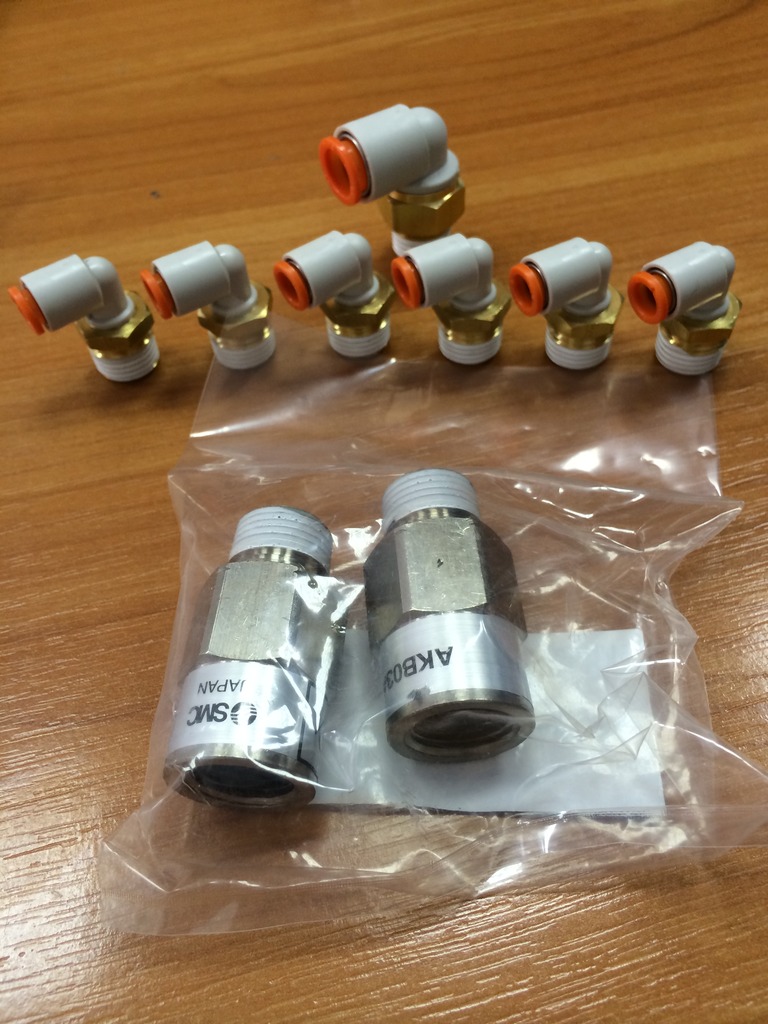
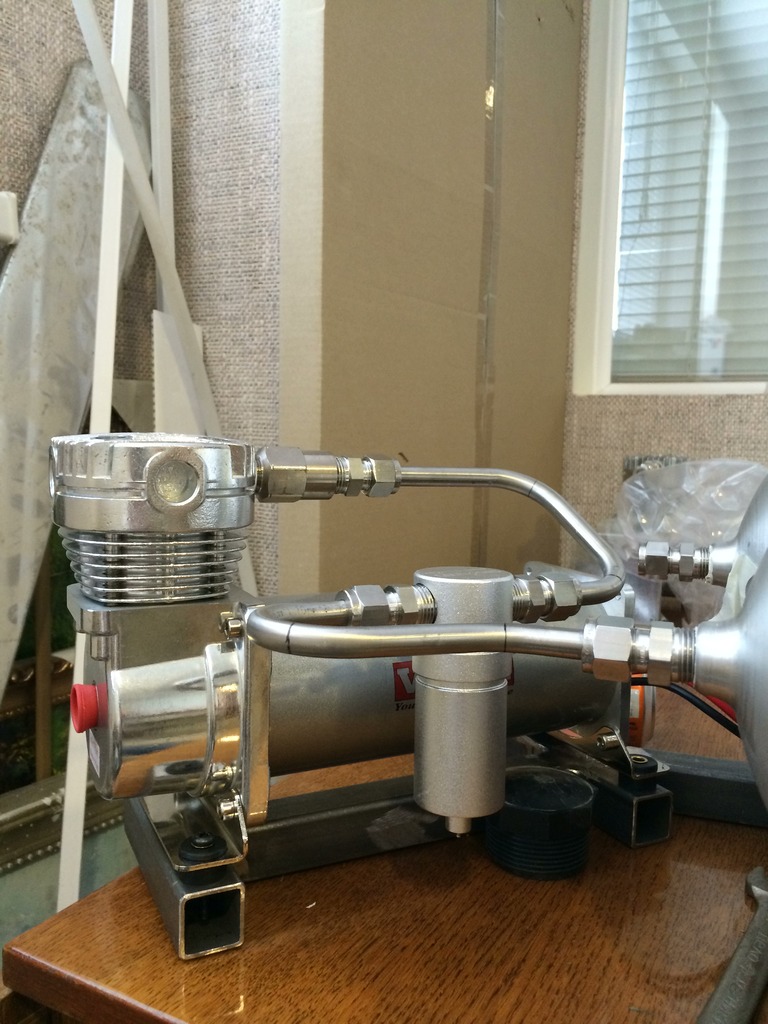
Besides that I bought 480C Viair's to feed the system, SMC check calves and elbows, AVS water traps, and 175psi safety valve to finish the system.

I designed in Acad a holder for all the management and gave drawing to my metal man.
First variant of tubing was designed in Acad too. As the basis of design of coarse V8 letters were taken

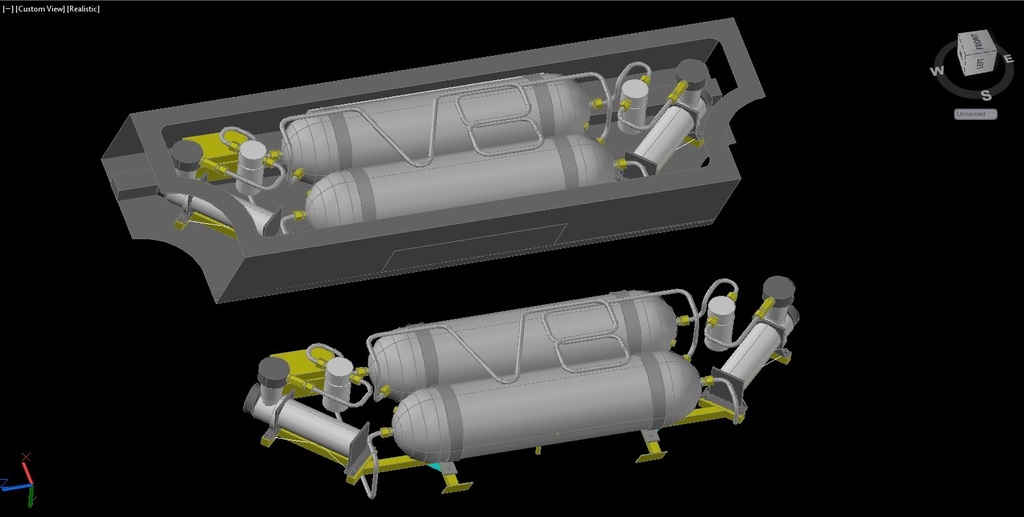
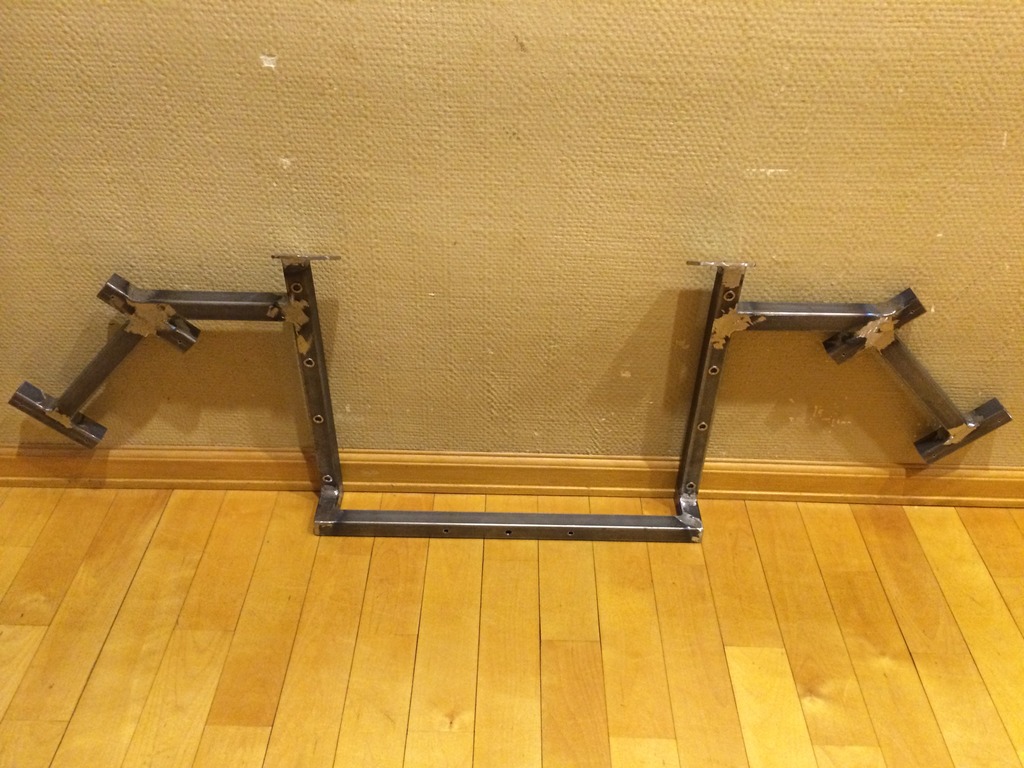
Sometimes later first variant of holder was ready!
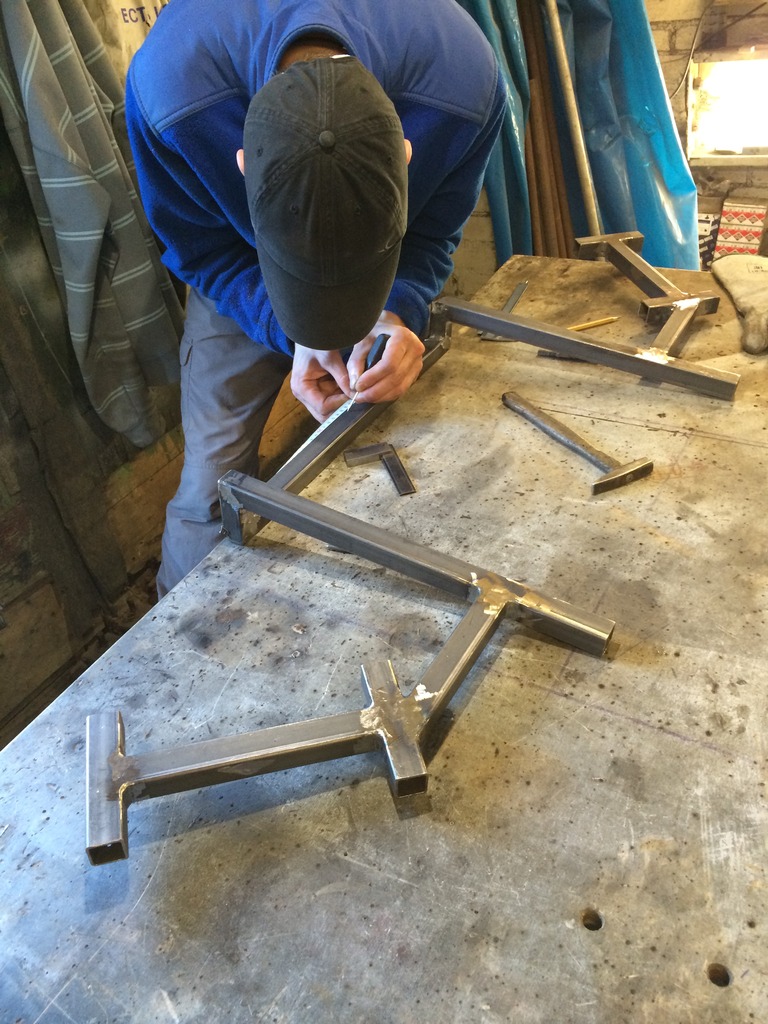

We have a national proverb, it sounds like an - "eyes are afraid to look on but hands are doing" - with this thought I began to bend tubing. First attempt was half a luck but result impressed me.


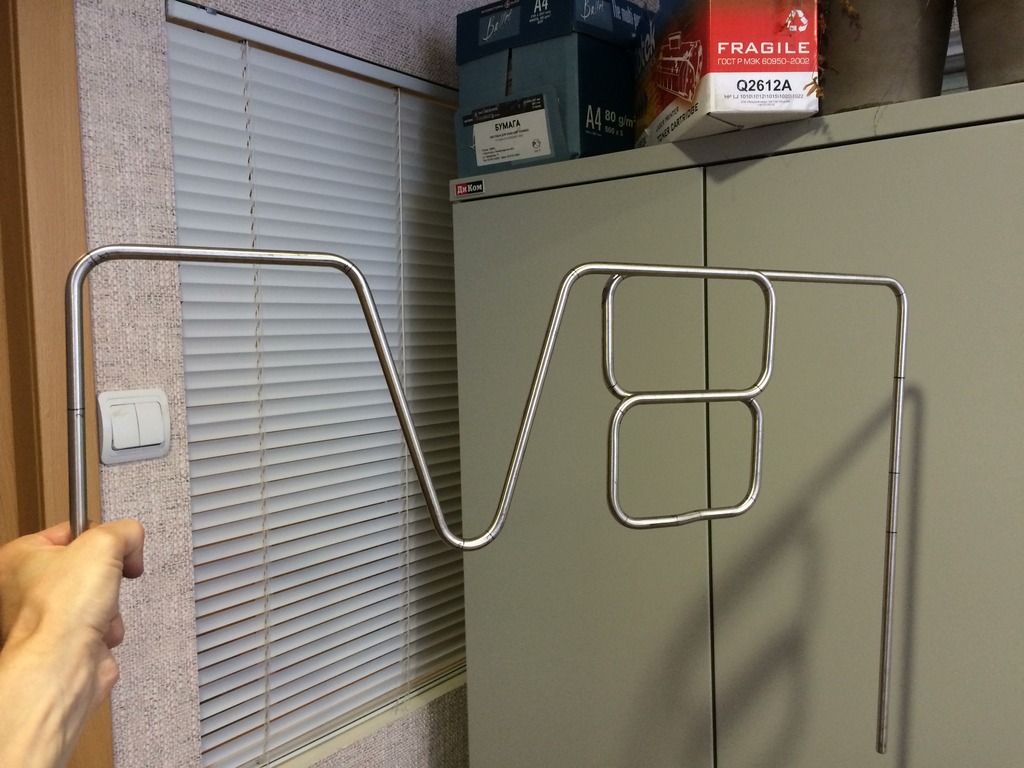
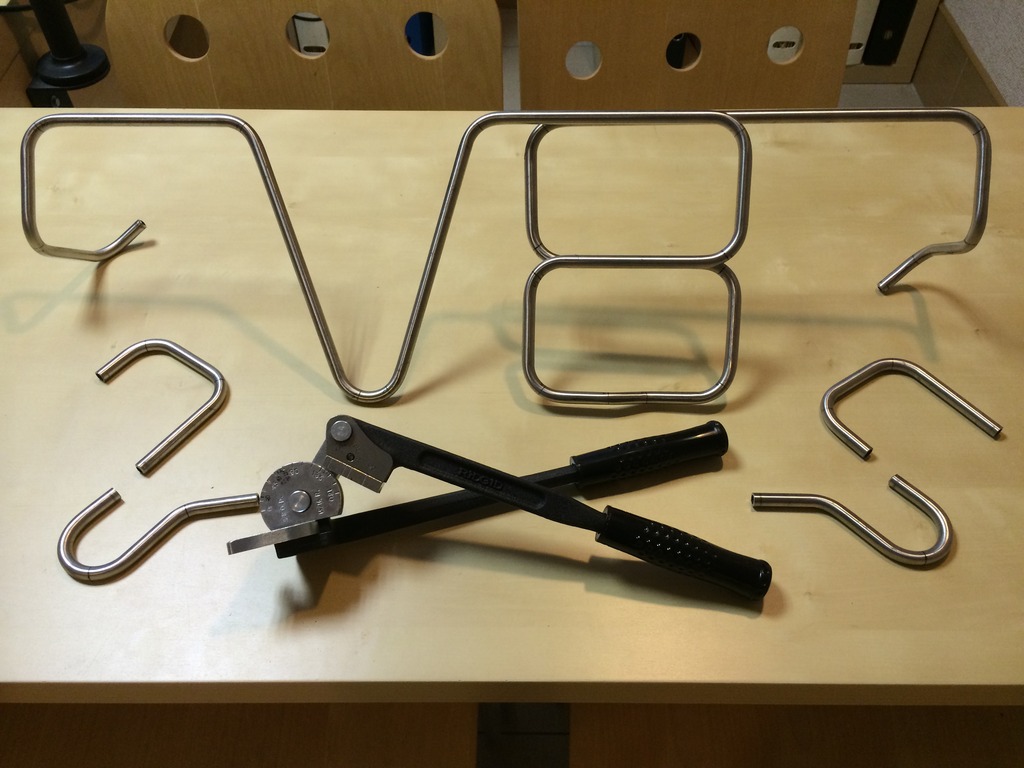
First attempt of assembling the lines. Was restyled after final assembly.

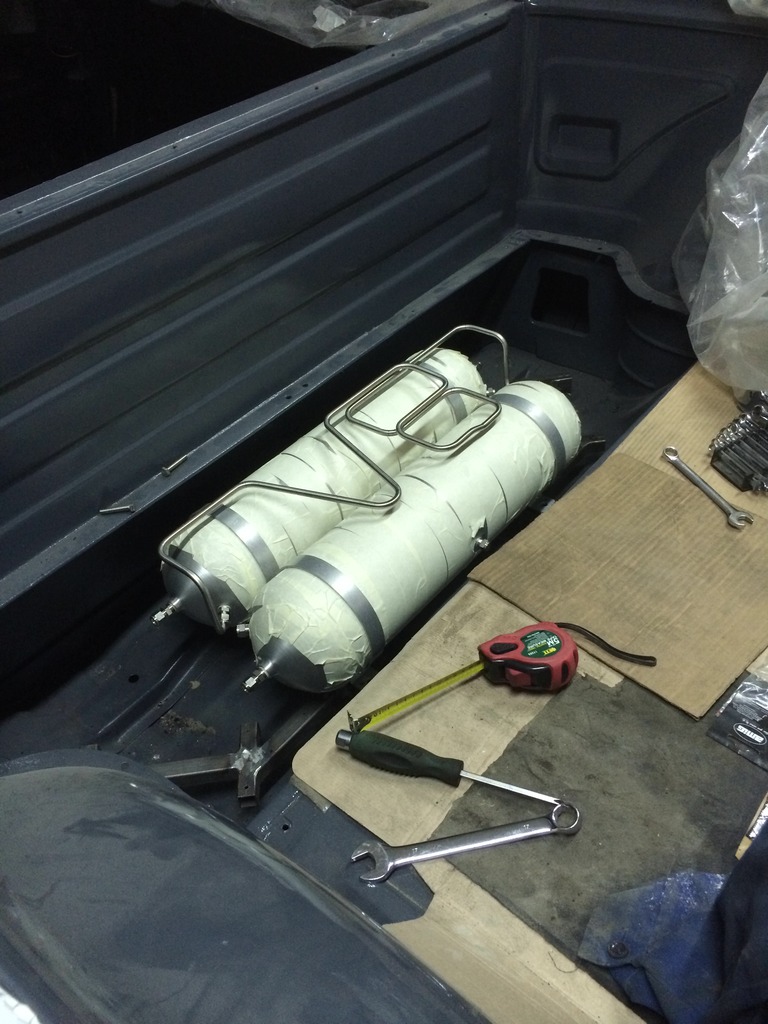
During the process I bought some brass tubing to made examples of bends and routes not to ruin expensive inch stainless steel tubing. It was hell =))
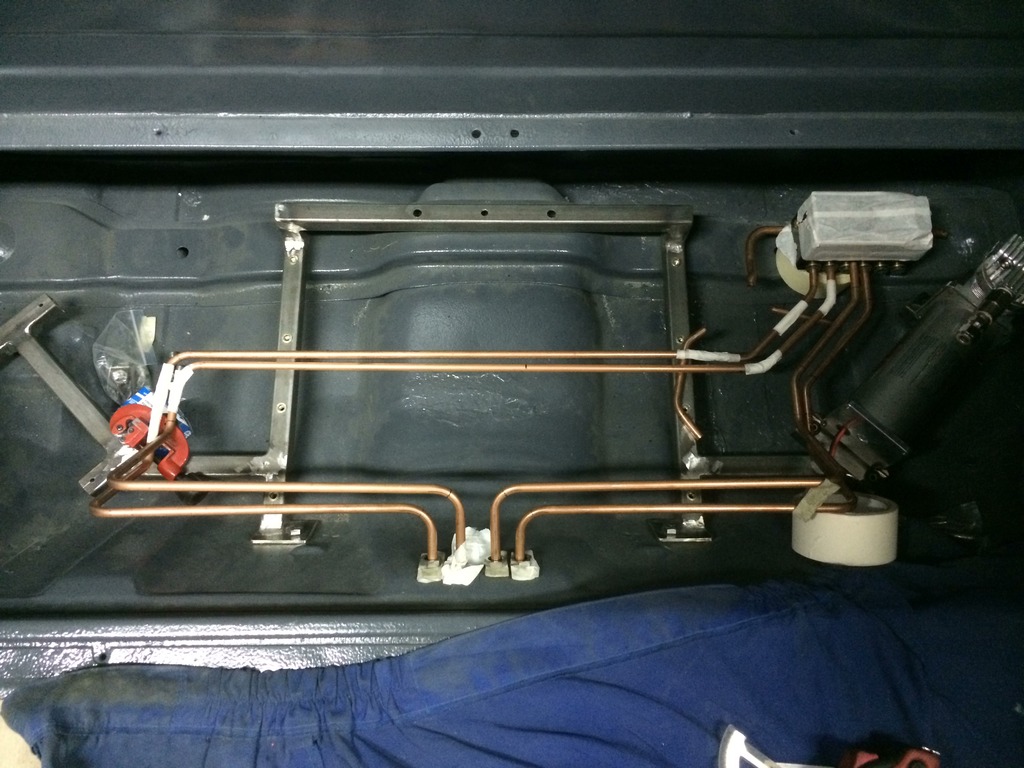

It took me about seven months to made all tubing, restyle some tubing, made connections, bulkheads, management holder restyling several times and wiring, working in free time.
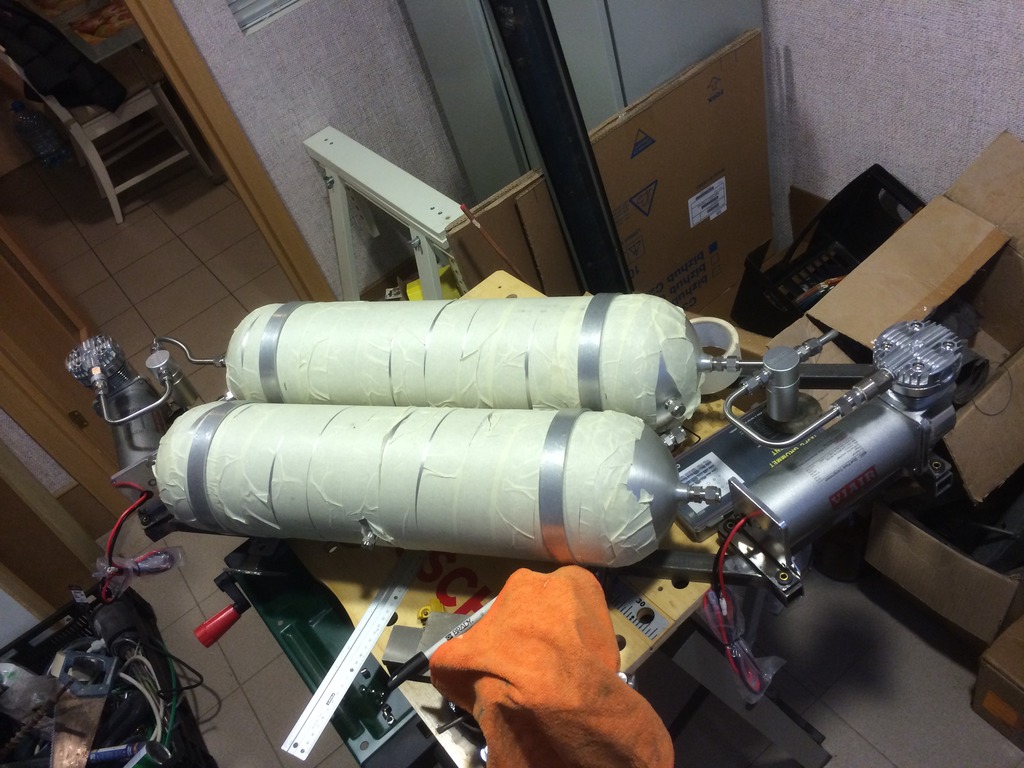
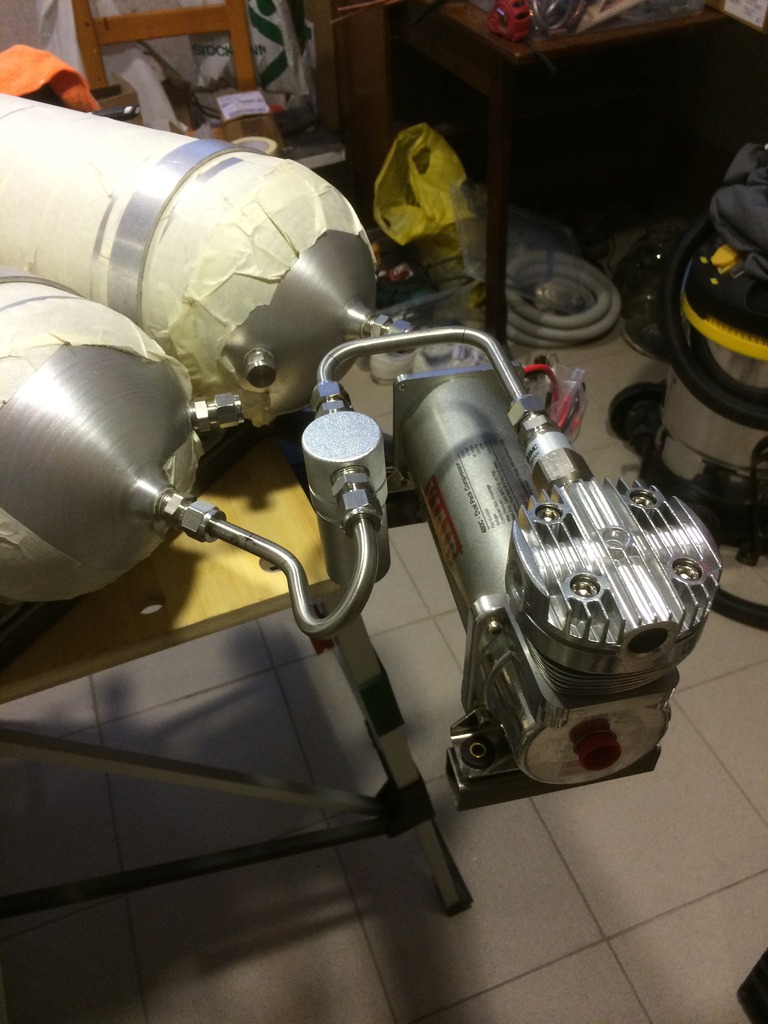
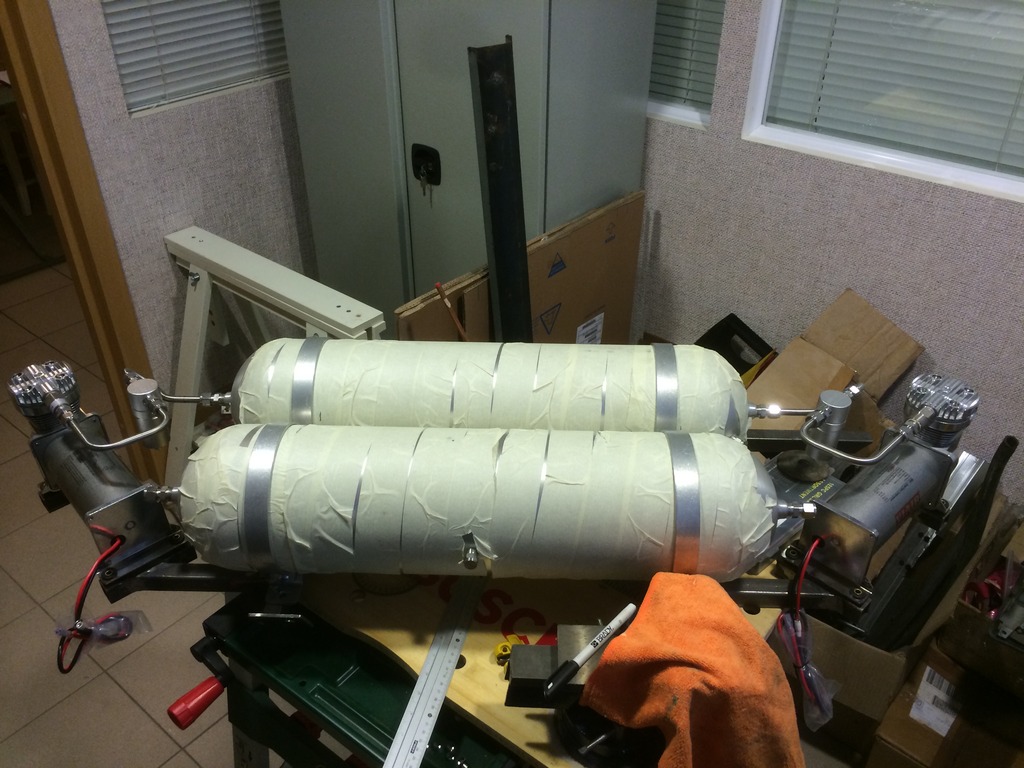


It's not the final result.

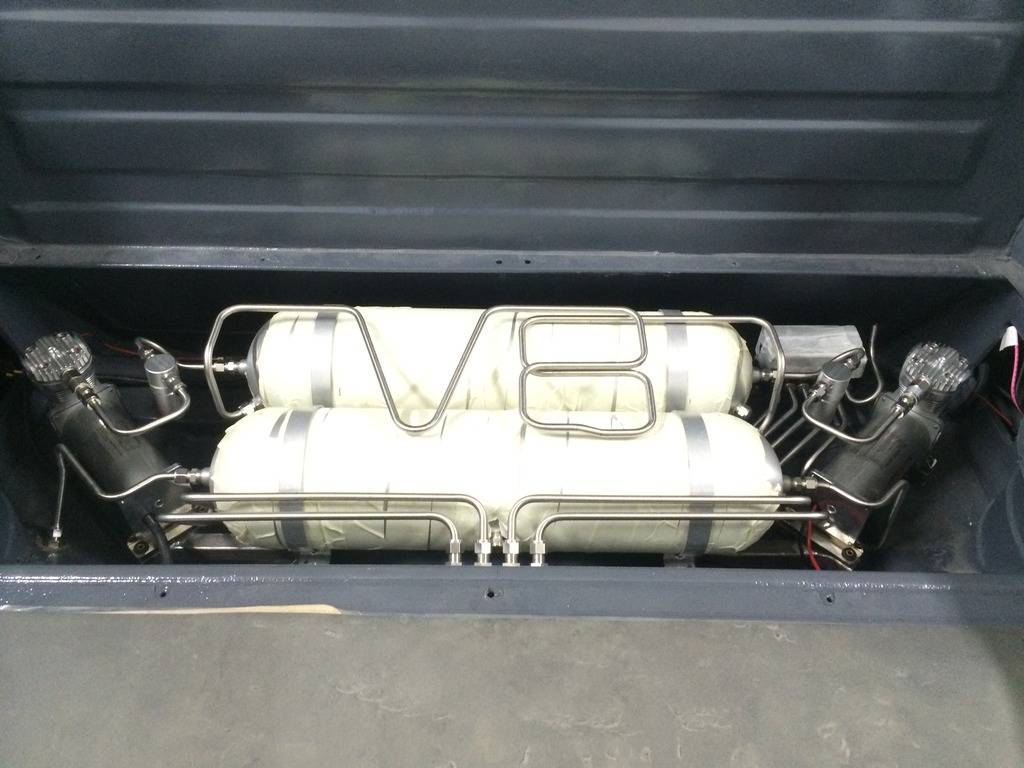
I'm planning to run Hornblasters train horn, so made an exit to it's valve but need to buy horns now.
Transparent cover now is under designing, so I need to clean all the tubing, sandblast and paint holder, put some carpet in the compartment and make everything work together!
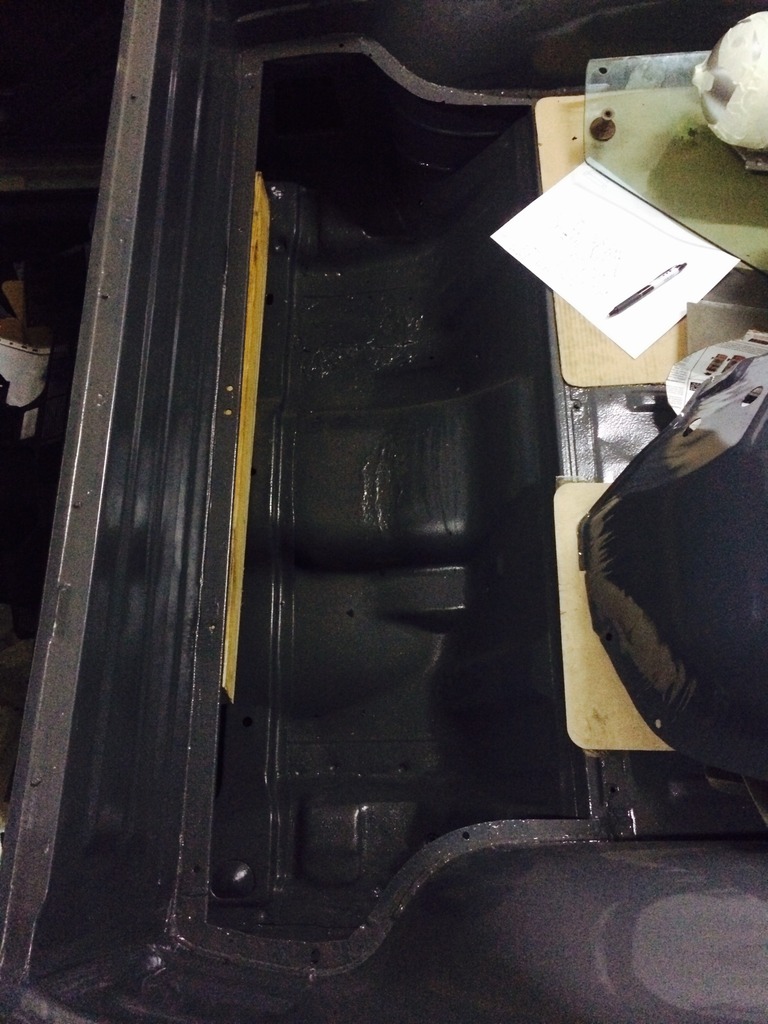
The only question that worried me all this time was - water draining. As I know the bed is inclined to the cabin and all water from the bed flows to the rear wall of the cabin and underneath the cover of compartment.
My car had a lardge rusty hole in the rear wall of cabin as you saw in the beginning of the thread because of water containing in bed and it had selfmade drain holes in the floor of compartment, now they are welded.
Does anybody know how the factory water draining was designed and what can I do now to prevent water containing if I sealed close compartment cover? Thank you
builtnotbought- G3GM Member
- Street Cred : 3
Re: '74 El Camino "Project Badass"
![]() by alowerlevel Sat Apr 16, 2016 11:47 pm
by alowerlevel Sat Apr 16, 2016 11:47 pm
alowerlevel- G3GM Member
- Street Cred : 6
Re: '74 El Camino "Project Badass"
![]() by thatfnthing Mon Apr 18, 2016 9:01 am
by thatfnthing Mon Apr 18, 2016 9:01 am

thatfnthing- Donating Member
- Street Cred : 65
builtnotbought- G3GM Member
- Street Cred : 3
Re: '74 El Camino "Project Badass"
![]() by pila Mon Apr 18, 2016 11:31 pm
by pila Mon Apr 18, 2016 11:31 pm
Bill
pila- Donating Member
- Street Cred : 43
Re: '74 El Camino "Project Badass"
![]() by 74Malibu383 Tue Apr 19, 2016 12:30 pm
by 74Malibu383 Tue Apr 19, 2016 12:30 pm
74Malibu383- Donating Member
- Street Cred : 26
builtnotbought- G3GM Member
- Street Cred : 3
Re: '74 El Camino "Project Badass"
![]() by Limey SE Wed Apr 20, 2016 2:25 pm
by Limey SE Wed Apr 20, 2016 2:25 pm
pila wrote:That's some outstanding work & craftsmanship you have doneVery impressive !!
Bill
x2
___________________________________________
1977 Chevelle SE x2
One Mild original
one Wild NON original
Anthony

Limey SE- Management

- Street Cred : 97
Re: '74 El Camino "Project Badass"
![]() by DaveFury Wed Apr 20, 2016 2:53 pm
by DaveFury Wed Apr 20, 2016 2:53 pm
Limey SE wrote:pila wrote:That's some outstanding work & craftsmanship you have done
Bill
x2
X3
Dave W.

DaveFury- G3GM Member
- Street Cred : 5
Re: '74 El Camino "Project Badass"
![]() by builtnotbought Sat Apr 23, 2016 6:22 pm
by builtnotbought Sat Apr 23, 2016 6:22 pm
Let me please repeat my question about bed from the post above:
"The only question that worried me all this time was - water draining. As I know the bed is inclined to the cabin and all water from the bed flows to the rear wall of the cabin and underneath the cover of compartment.
My car had a lardge rusty hole in the rear wall of cabin as you saw in the beginning of the thread because of water containing in bed and it had selfmade drain holes in the floor of compartment, now they are welded.
Does anybody know how the factory water draining was designed and what can I do now to prevent water containing if I sealed close compartment cover? Thank you"
Have a little more photos.
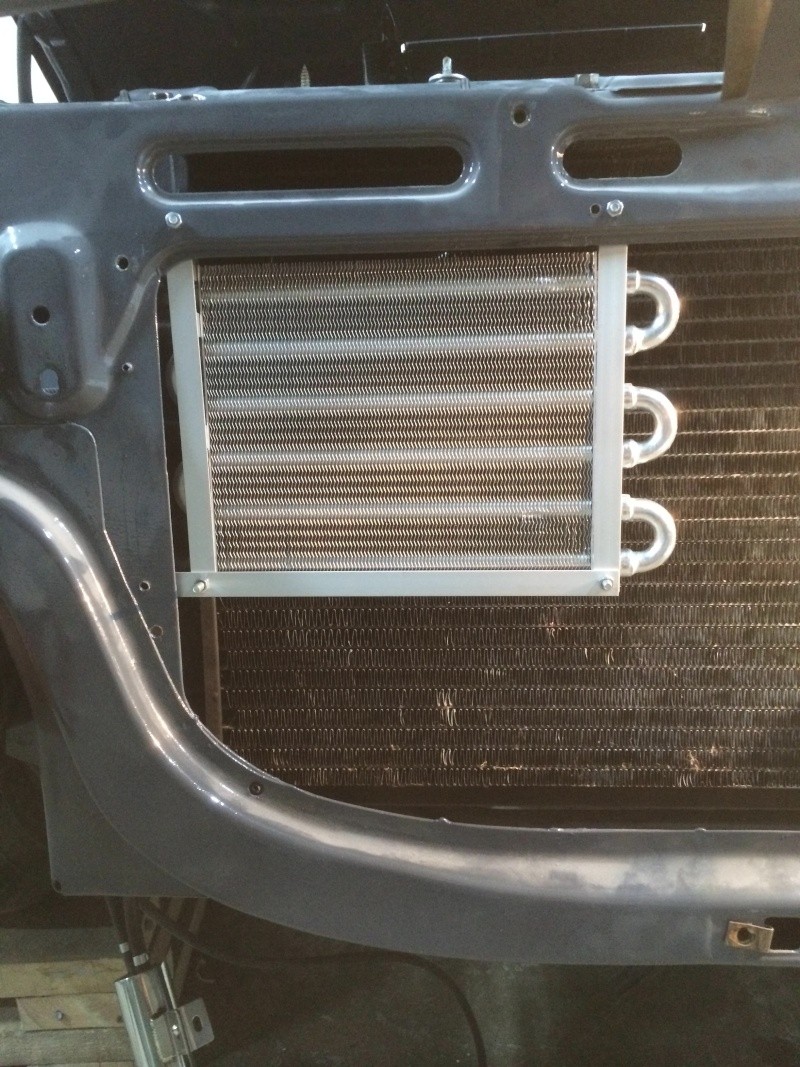
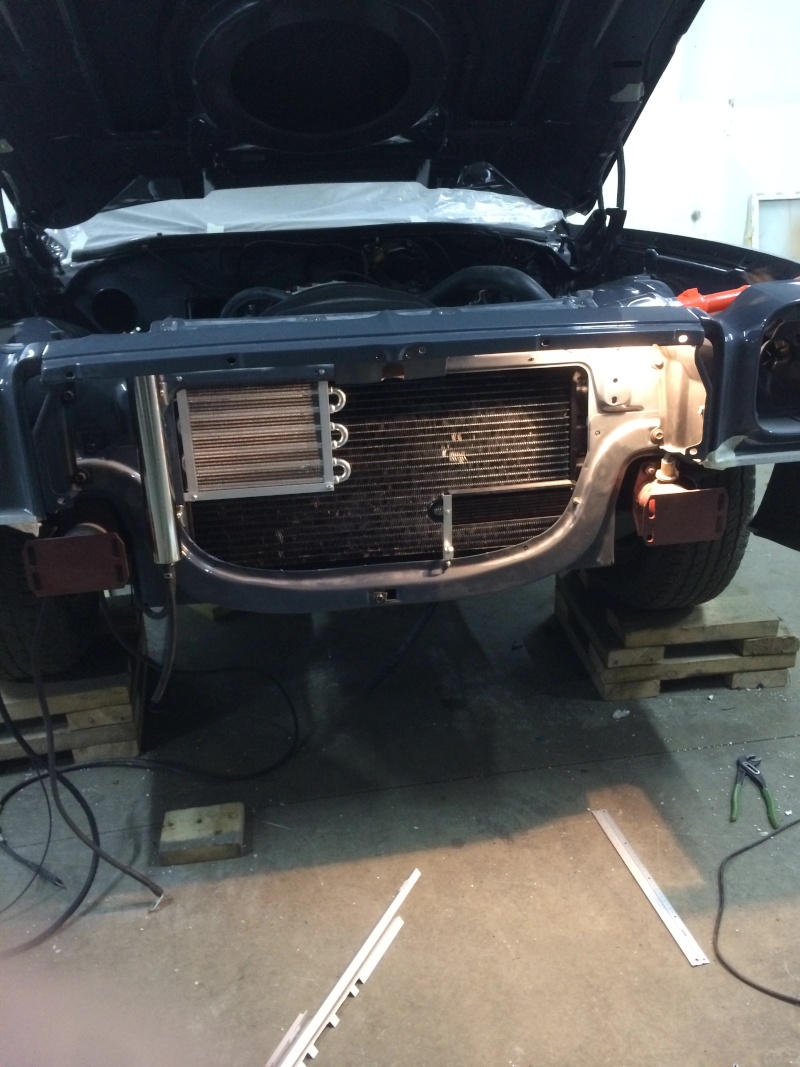
Fabricated a frame for tci trans cooler and derale power steering cooler. Need to connect trans cooler to lines.
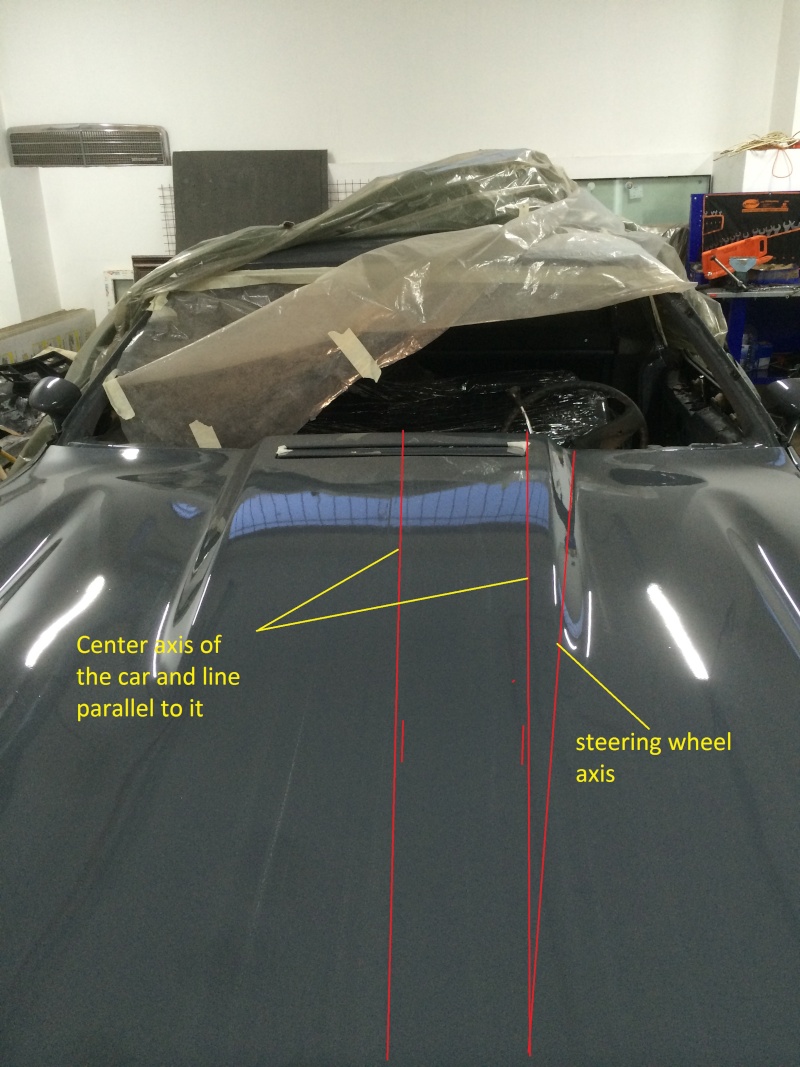
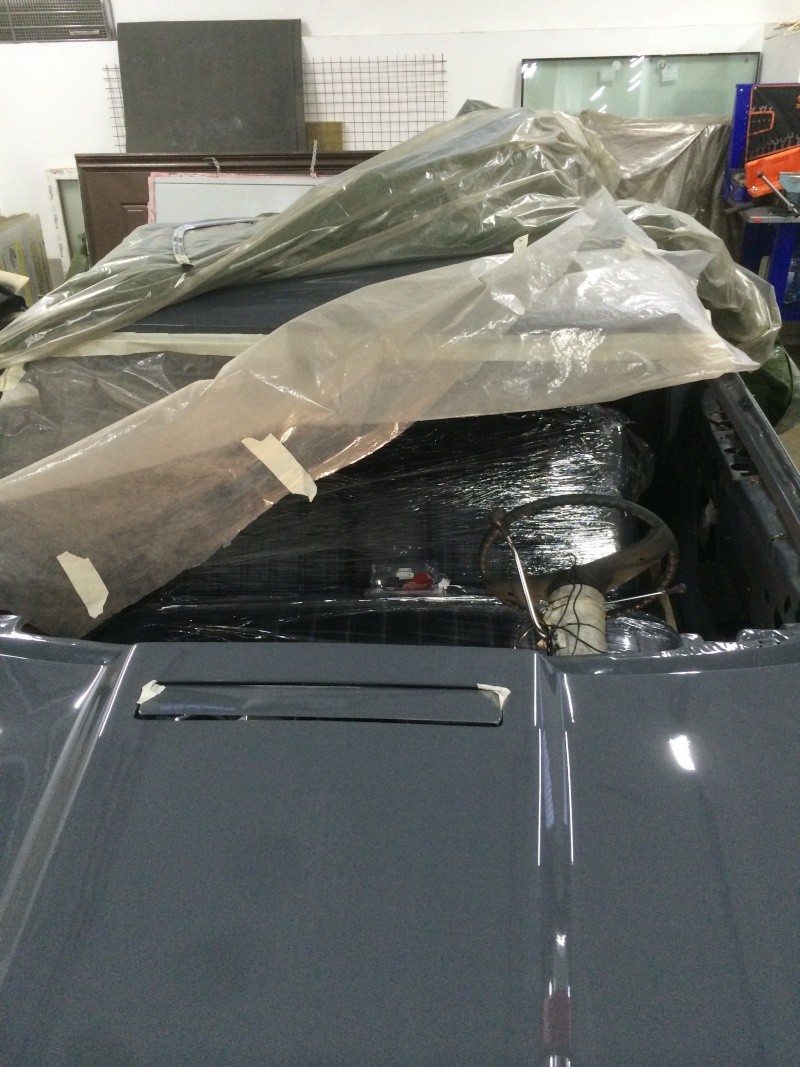
Tried to fit some modern seat from passat. Lookes very cool without headrest. While fitting I noticed that steering column is turned to the drivers door and it can't be moved in other position - I checked. So I don't know how people drive in bucket seats.
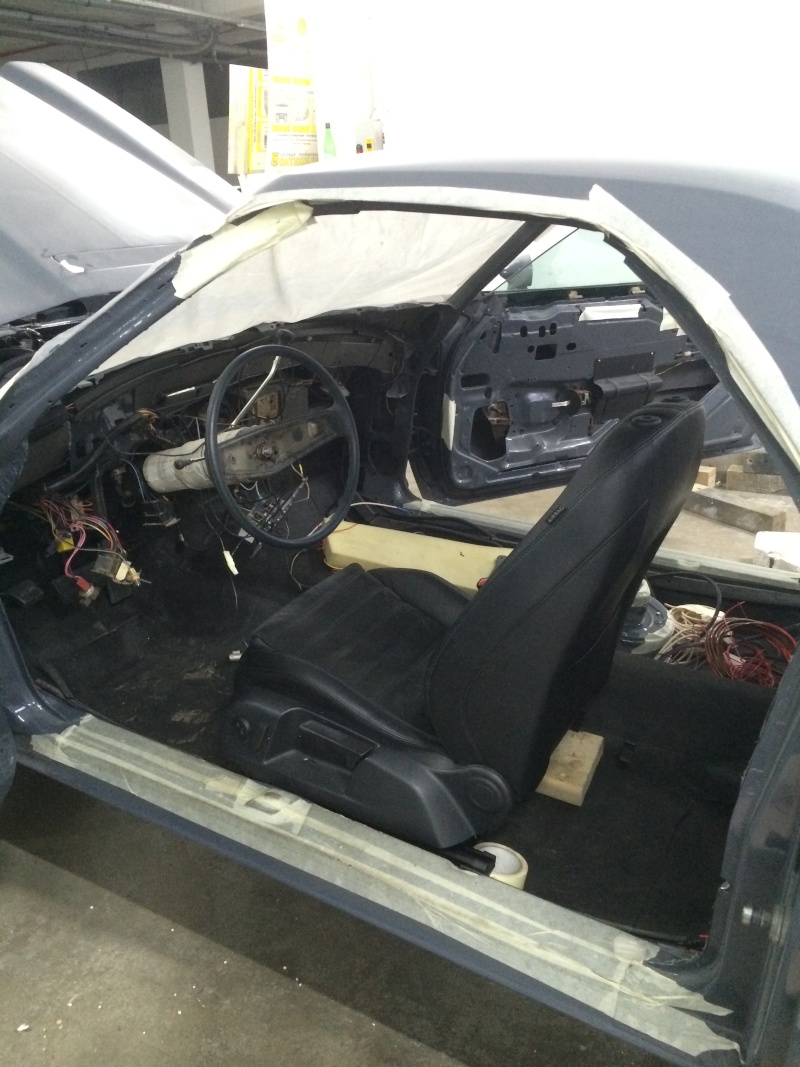
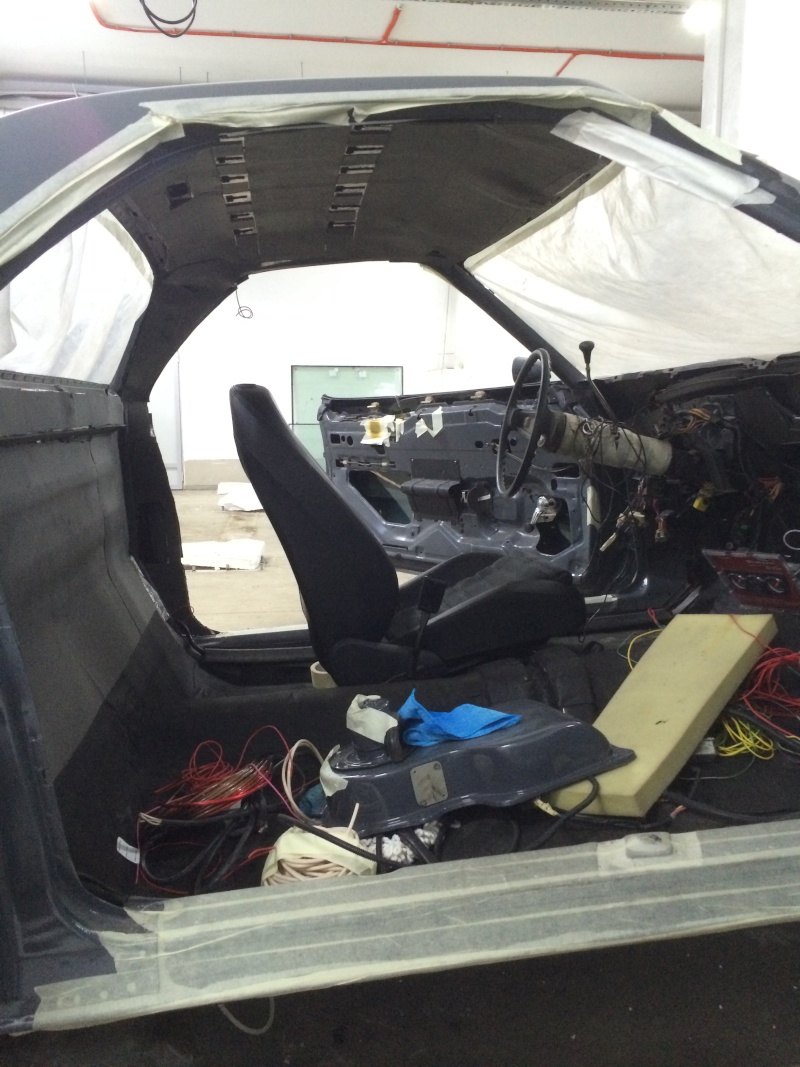
I tried to draw an angle that's steering column has. With bucket seat it's very noticible. With bench - far less, because it's flat and you can seat more closer to door.
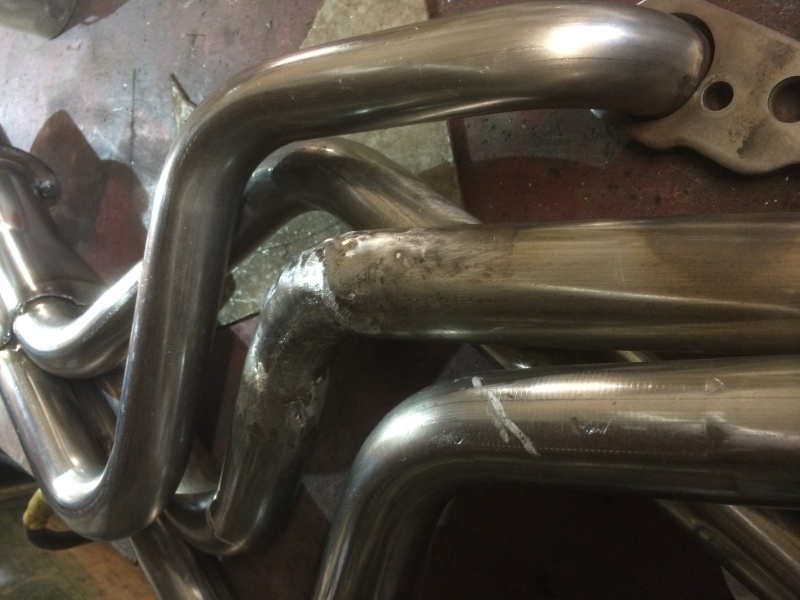
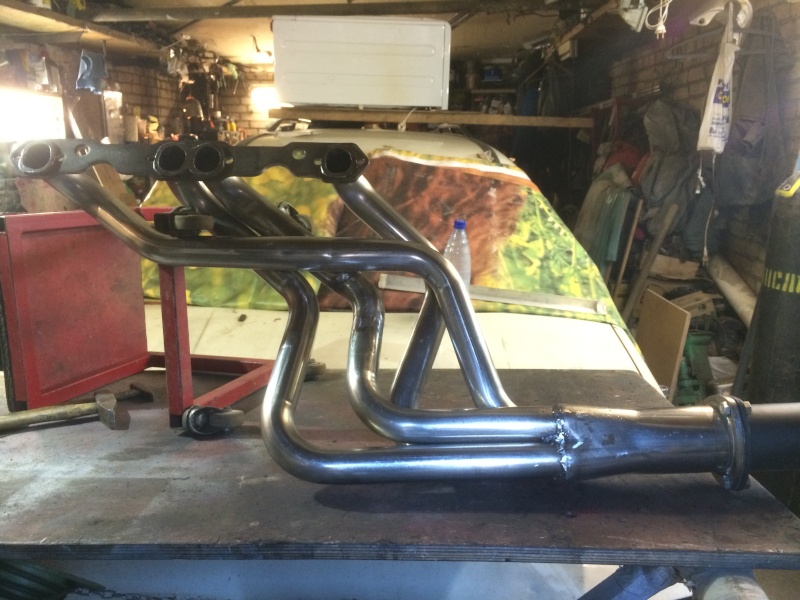
Re-welded my right "bolt-on" Hooker header plus change the direction of lower 3" piece of pipe.
Cutted an example of my bed cover to see where will be paint/transparency border.
Bought new glove box cap and oem battery tray from one really nice guy from Canada.


Bought front side frame reinforcement from monte carlo but they didn't fit at all, headers and even didn't fit frame mount holes. Tried to fit several times.


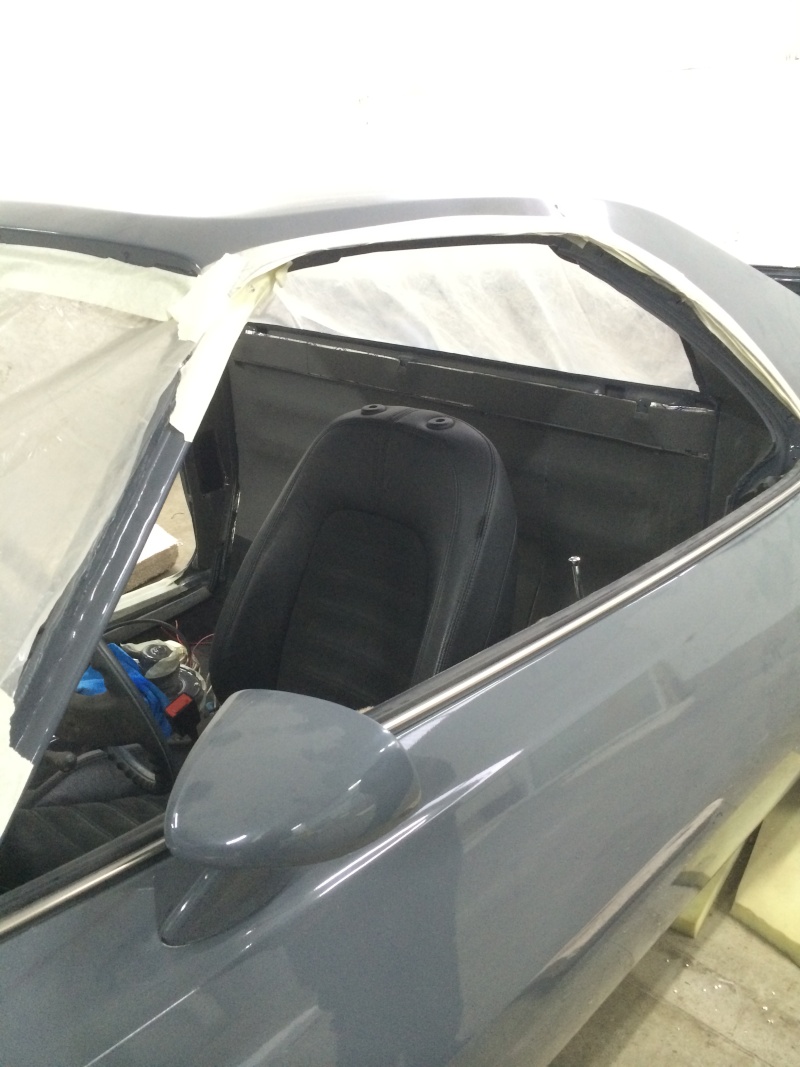
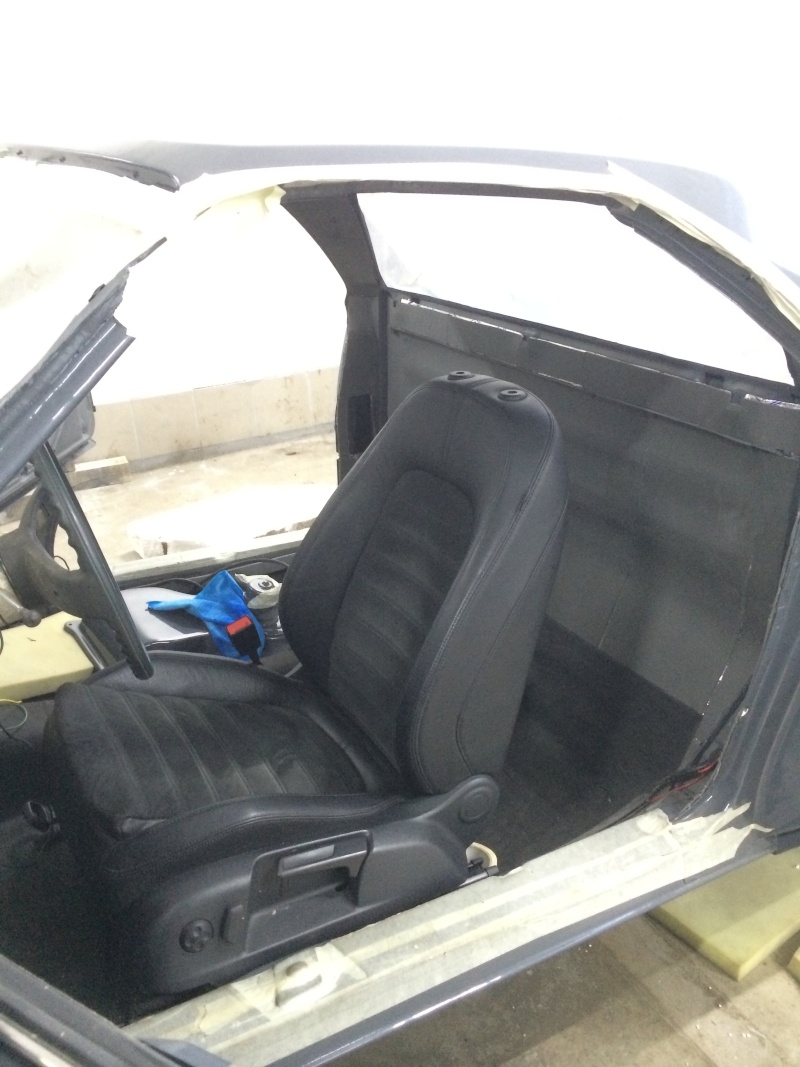
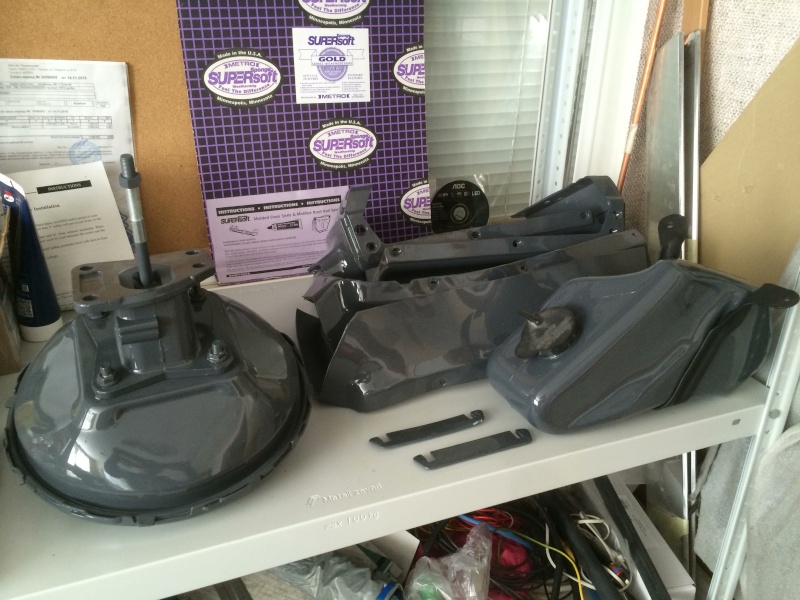
Took back full interior from trim shop. Everything is re-trimmed in black leather/alcantara. Most of the metal interior elements are saved from painting and are sanded by hand to look like brushed aluminium. It was a surprise for me that most of the pieces are from stainless steel
Photos will be after everything will be mounted in place.
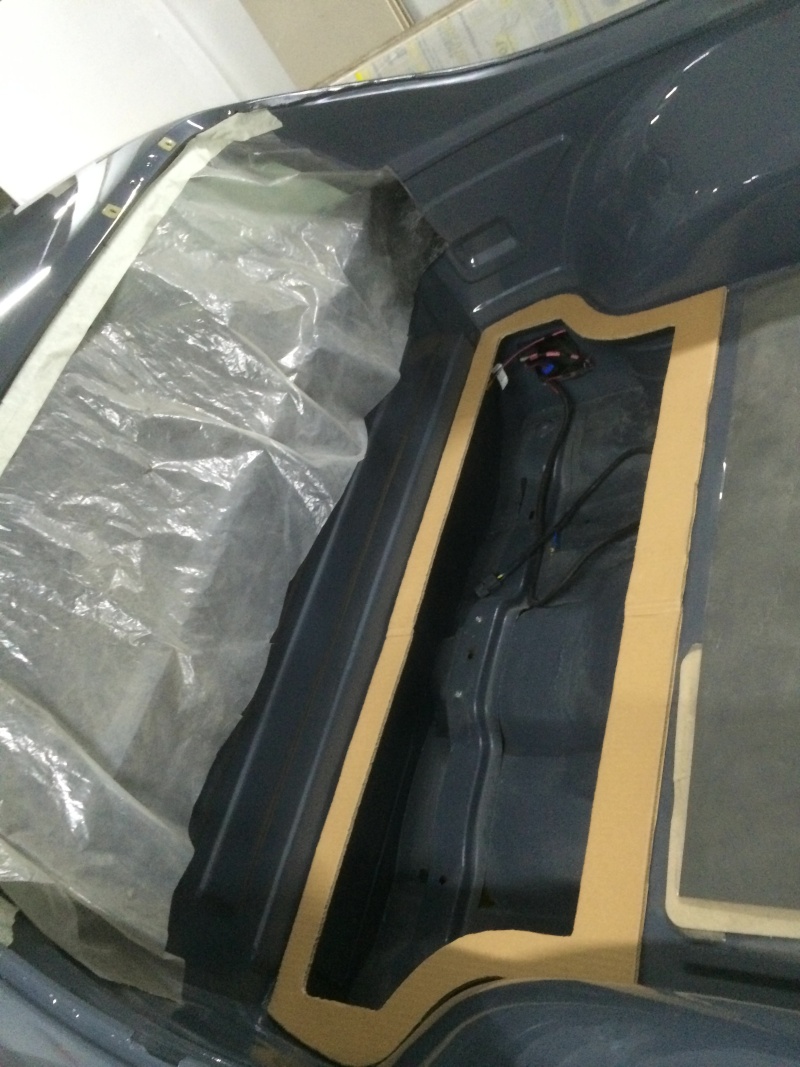
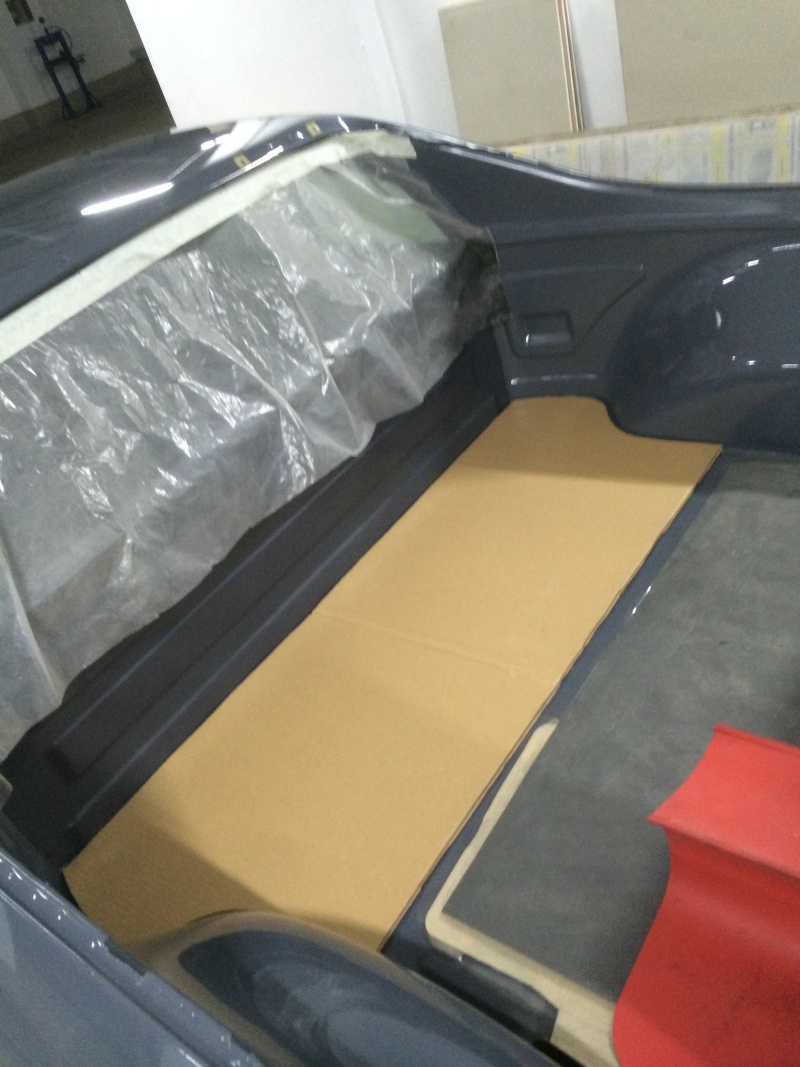
Besides that trim shop made new 6 pieces carpet including rear wall carpet + new floor mats.

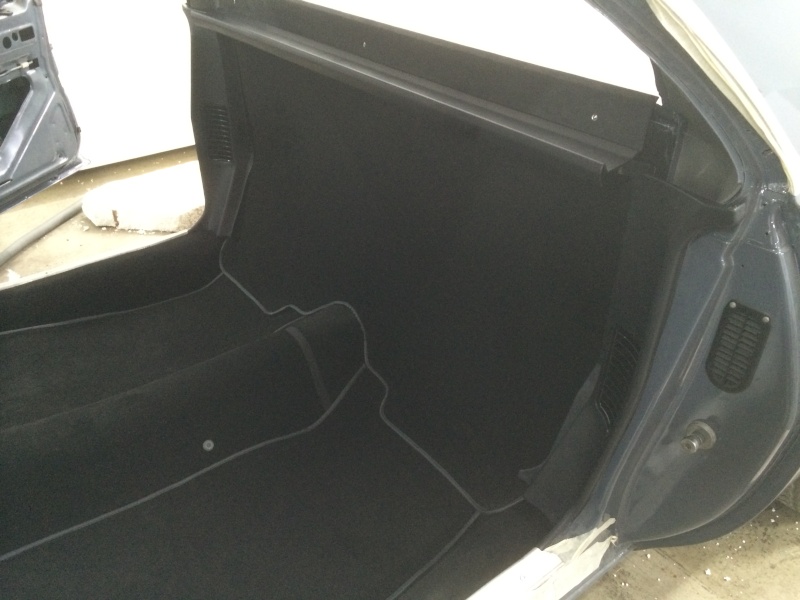
And a little piece of carpet in the bed. Didn't fit well, but this waves won't be seen under painted part of the cover. Don't want to drill bed to screw carpet.
Drill some fun staff, Ridetech logo in the caps.
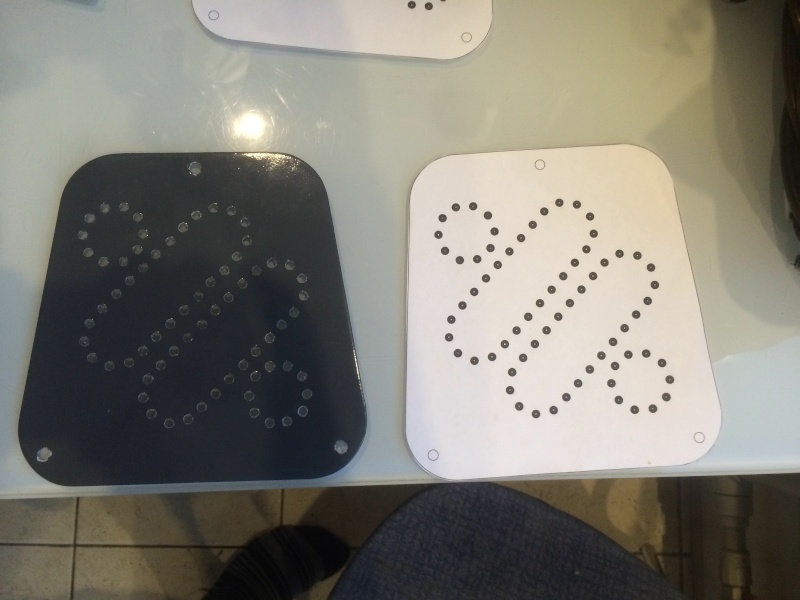
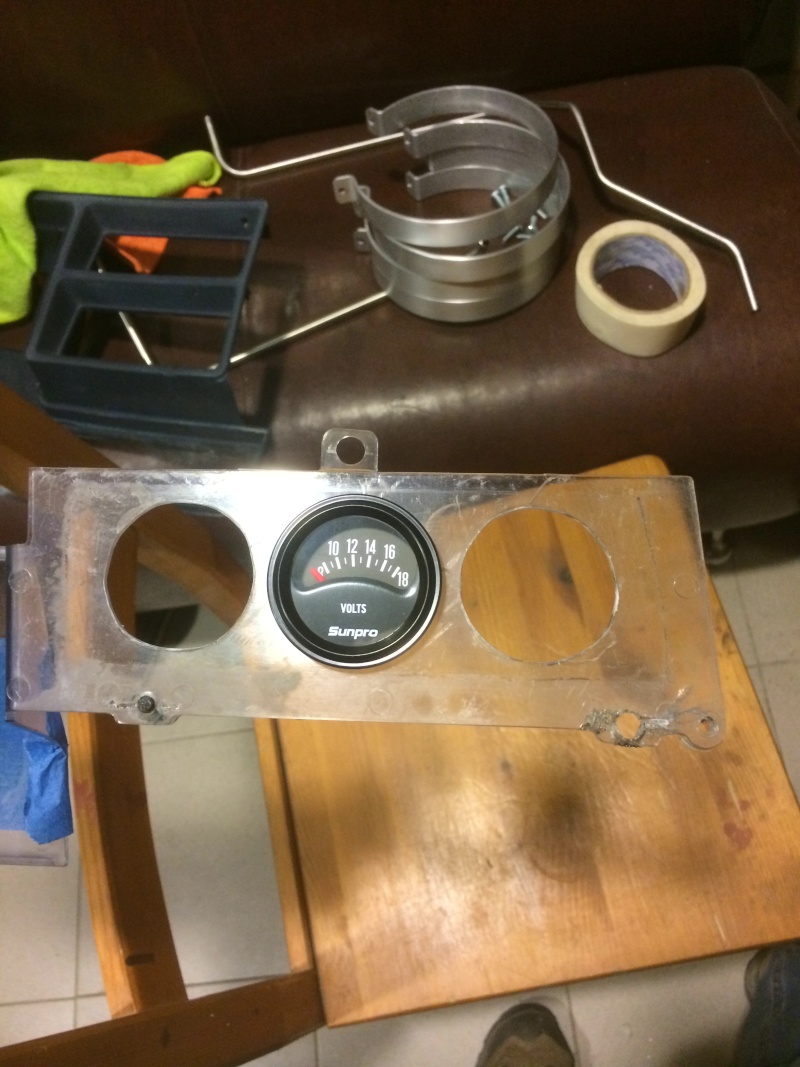
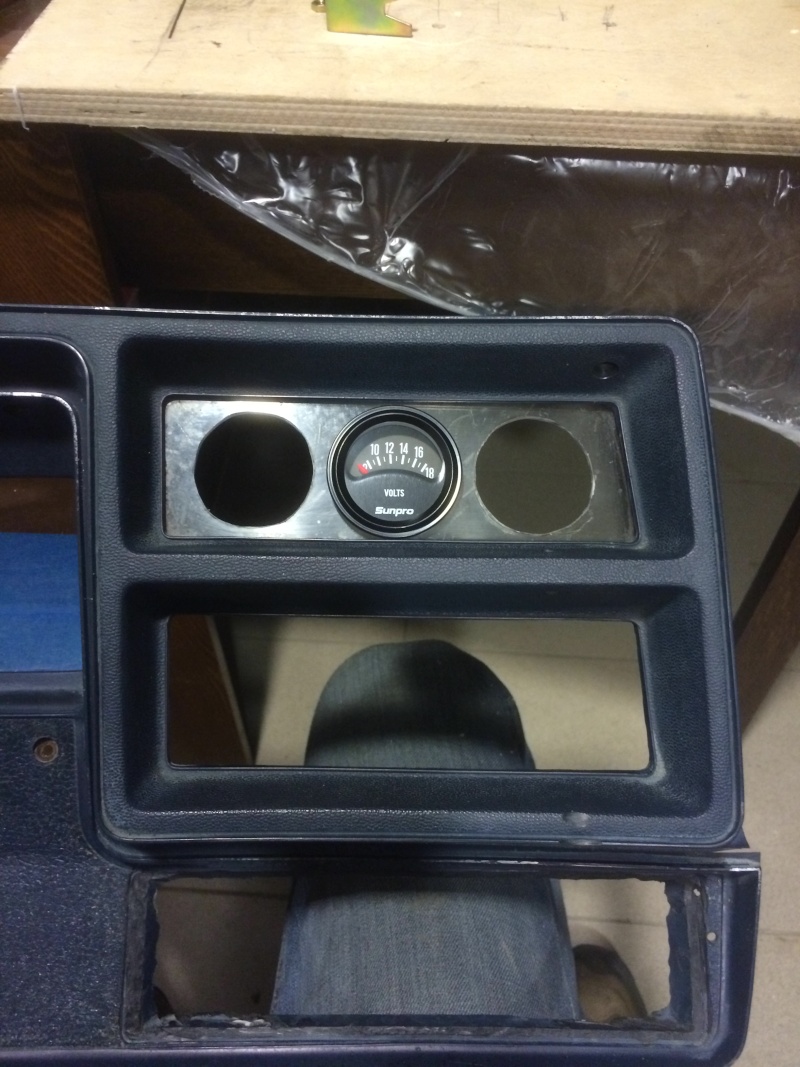
Decided to make custom cluster overlay. Made a stencil from paper and draw it in Acad. Now I plan to trim it from a piece of stainless steel and sand it to match all brushed pieces.
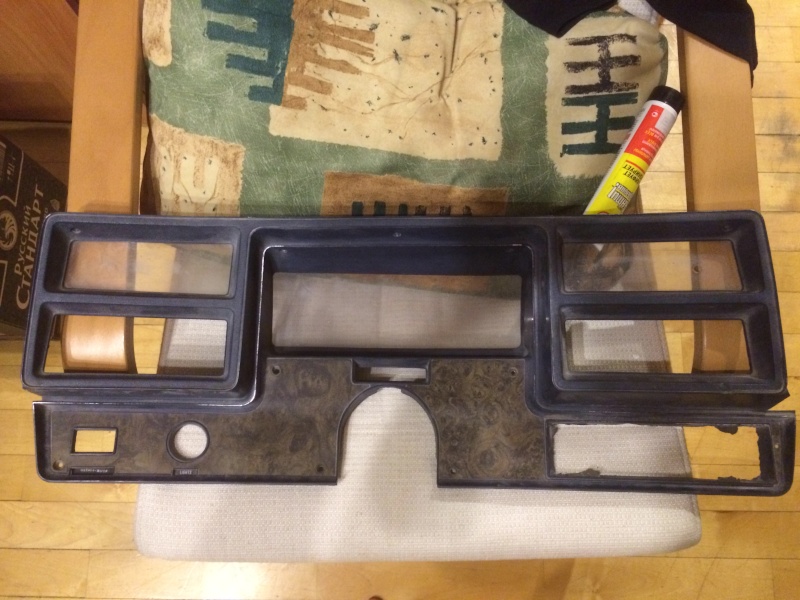

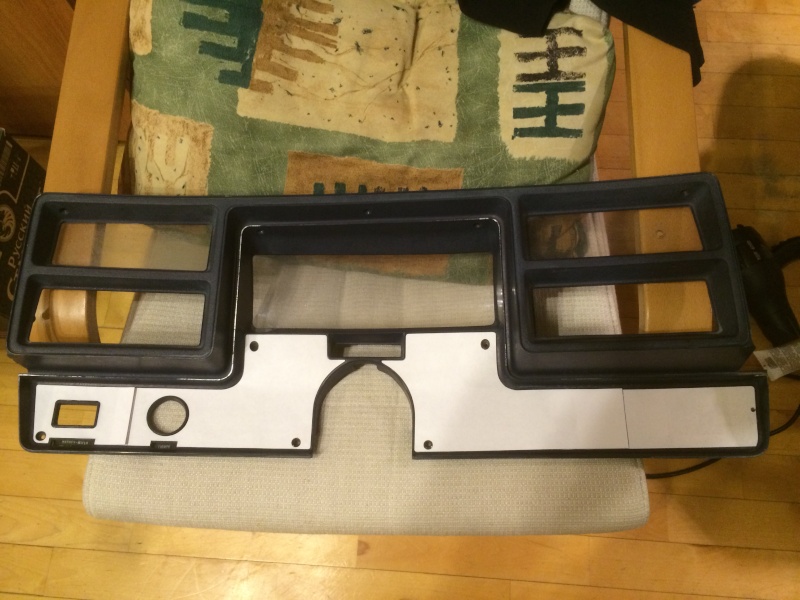
Drilled holes for Sunpro gauges, fitted like they are from factory. Need only to refinish the glass.
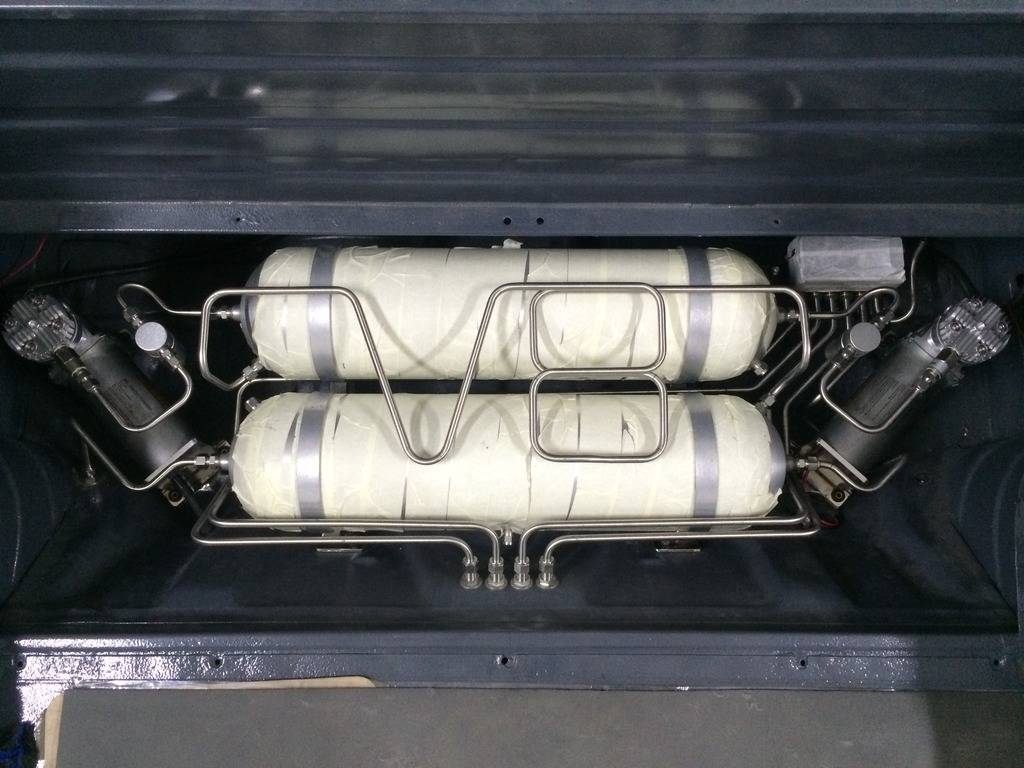
And the near final result of hardlines without cover.
builtnotbought- G3GM Member
- Street Cred : 3
Re: '74 El Camino "Project Badass"
![]() by builtnotbought Mon Apr 25, 2016 2:37 pm
by builtnotbought Mon Apr 25, 2016 2:37 pm
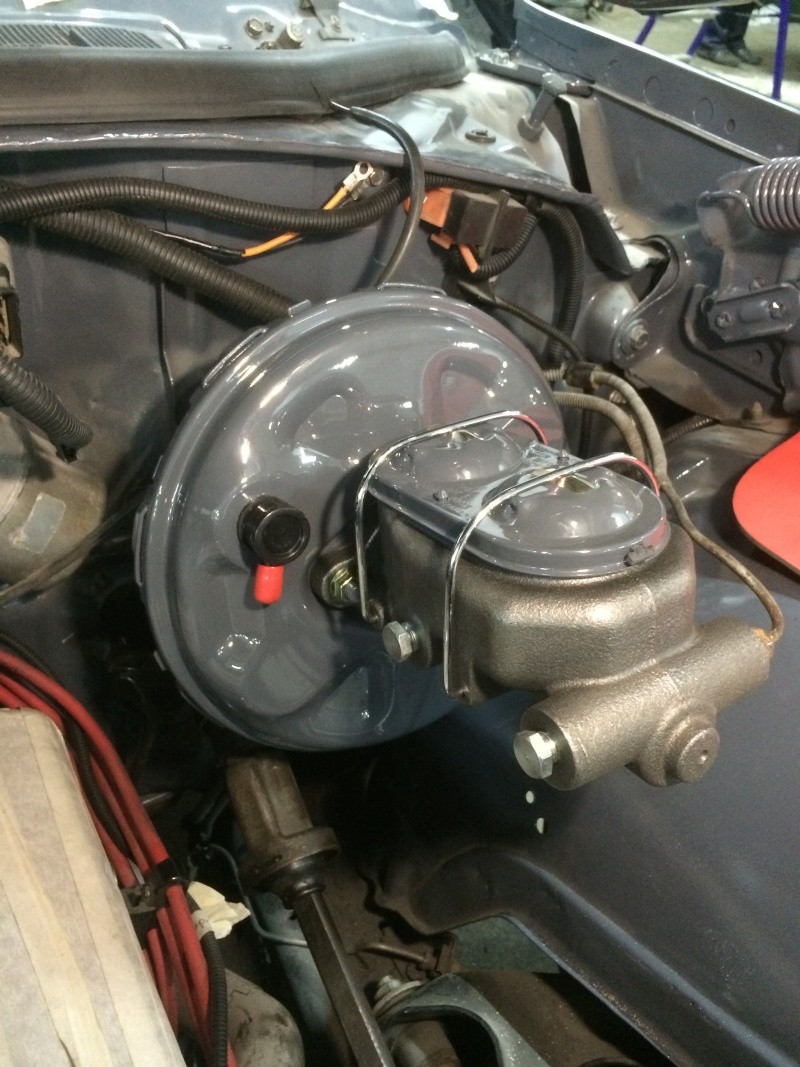
Installed booster+ master cylinder
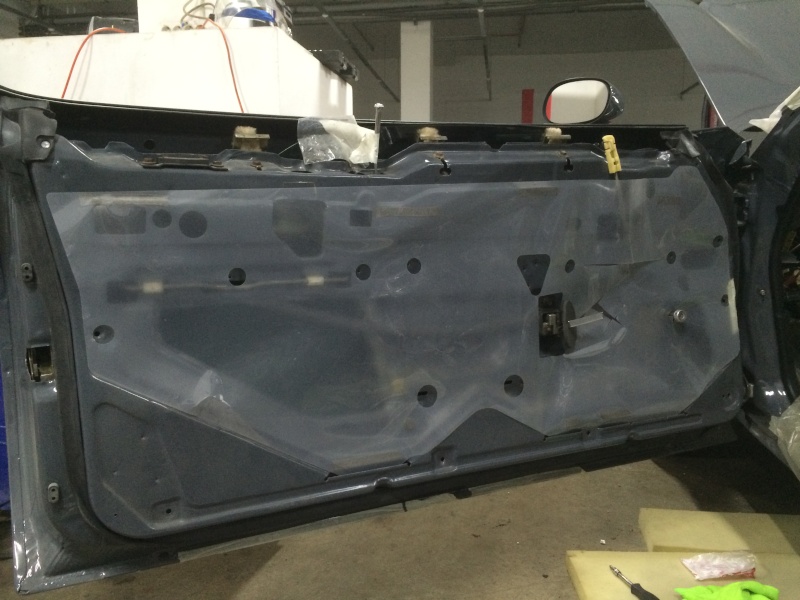
And tried to put on door water shields. PLastic shields are ok with 3m tape on door, but insulation...any ideas of the best way to glue it?
Any thoughts about water drainage in bed of elco?
Appreciate any help
Thank you!
builtnotbought- G3GM Member
- Street Cred : 3
Re: '74 El Camino "Project Badass"
![]() by bigredlaguna Mon Apr 25, 2016 3:17 pm
by bigredlaguna Mon Apr 25, 2016 3:17 pm
I've never messed around with an El Camino, but I do not think they had any drainage capacity near the cab. You may want to make your own drains. Otherwise, just make sure the cover is watertight.
bigredlaguna- G3GM Senior Member
- Street Cred : 53
Page 3 of 7 • 1, 2, 3, 4, 5, 6, 7 ![]()

 Similar topics
» MY DAILY DRIVER/PROJECT 73 EL CAMINO SS
» Classic Car Restoration Club: 1977 El Camino Project Car-Overview
G3GM :: Media :: G3 Project Pictures
» Painting Interior Plastic
» Anyone good at photoshop?
» El Camino/Sprint LH Aftermarket Quarter Panel FOR SALE
» 1973 chevelle four speed console
» dashes
» Used OEM Hood 73-77
» 76 Laguna parked in 2002
» Thanks for having me
» 77 elco SS