1973 Chevelle SS, 350, 4spd. build
+41
zucchi
76 Malibu
Joe73
76Chevelle2Tone
S3TPI
Sinister
77camino
Flywheel
crice63
bracketchev1221
73ss
clanceman427
thatfnthing
Limey SE
fasrnur
g3chevy / Mr Pontiac
Roadcaptain S3
Mcarlo77
Hawk03
ant7377
1975 S3
77mali
jerry46765
Jeff-45
1cheapshot
dynchel
JF74chevelle
Tom Kochevar
Hs1973
dine73ss
Damon23
alowerlevel
driveit
chevellelaguna
RossK73
marks454ss
impalamonte
Dinomyte
Wallyuph
BK-75
1973montec
45 posters
G3GM :: Media :: G3 Project Pictures
Page 11 of 17
Page 11 of 17 •  1 ... 7 ... 10, 11, 12 ... 17
 Re: 1973 Chevelle SS, 350, 4spd. build
Good point. The rockers came with poly locks. How do I measure the girdles for correct fitment ? Havent run into that.

Joe73- Donating Member

- Street Cred : 83
 Re: 1973 Chevelle SS, 350, 4spd. build
Measure the diameter of the base of the poly lock where it contacts the rocker. You’ll find it at .550 or .600. If you need anything Jomar can help you out with what you need.
bracketchev1221- G3GM Enthusiast

- Street Cred : 15
 Re: 1973 Chevelle SS, 350, 4spd. build
I have the girdles already. I actually had everything for this engine all in storage for about 3-4 years. Except the heads which I bought a few days ago. Any idea how to measure the girdle itself? Of is it just a trial fit ? Thanks

Joe73- Donating Member

- Street Cred : 83
 Re: 1973 Chevelle SS, 350, 4spd. build
Ok, just blew the dust off and opened the box of girdles. They come with the long polylocks. I measured the upper diameter and it well over .700 and they fit very snug in the girdle itself. The base of the long poly locks is much narrower and would not fit the girdle.
I also measured the poly locks that came with the rockers and they are .595 diameter.
I also measured the poly locks that came with the rockers and they are .595 diameter.

Joe73- Donating Member

- Street Cred : 83
 Re: 1973 Chevelle SS, 350, 4spd. build
Joe superb work as always! Loved seeing the progress pics!
clanceman427- G3GM Enthusiast

- Street Cred : 16
 Re: 1973 Chevelle SS, 350, 4spd. build
Thank you. Just waiting for the new pushrods to be delivered. Hope to install on Monday.

Joe73- Donating Member

- Street Cred : 83
 Re: 1973 Chevelle SS, 350, 4spd. build
Ok measure the base of the girdle poly that seats on the rocker. It should be .600 like the polys supplied with the rockers.Joe73 wrote:Ok, just blew the dust off and opened the box of girdles. They come with the long polylocks. I measured the upper diameter and it well over .700 and they fit very snug in the girdle itself. The base of the long poly locks is much narrower and would not fit the girdle.
I also measured the poly locks that came with the rockers and they are .595 diameter.

bracketchev1221- G3GM Enthusiast

- Street Cred : 15
 Re: 1973 Chevelle SS, 350, 4spd. build
Ray, your right on the money again. I see what your saying and I appreciate it. Never encountered this.
Well, my rocker polys are .600 and the girdle polys have a taper at the very bottom and they are .550.
I did a bunch of internet searching about it and and the consensus was (even from Straub) that its not an issue. But I'm glad you brought it up because Im not comfortable with it. Not that this is a "max effort" engine or anything and it will not have any track time but I like to keep everything the way it should be.
Ray, sent you a PM.

Joe73- Donating Member

- Street Cred : 83
 Re: 1973 Chevelle SS, 350, 4spd. build
No problem Joe. I responded back, and I’ll put a short answer here basically if it was not an issue why would there be multiple sizes and only .050 difference. I stick with what the rocker manufacturer supplies with their rockers.

bracketchev1221- G3GM Enthusiast

- Street Cred : 15
 Re: 1973 Chevelle SS, 350, 4spd. build
I agree, get ones to match. I sent you another pm. Thanks again.

Joe73- Donating Member

- Street Cred : 83
 Re: 1973 Chevelle SS, 350, 4spd. build
Quick update.
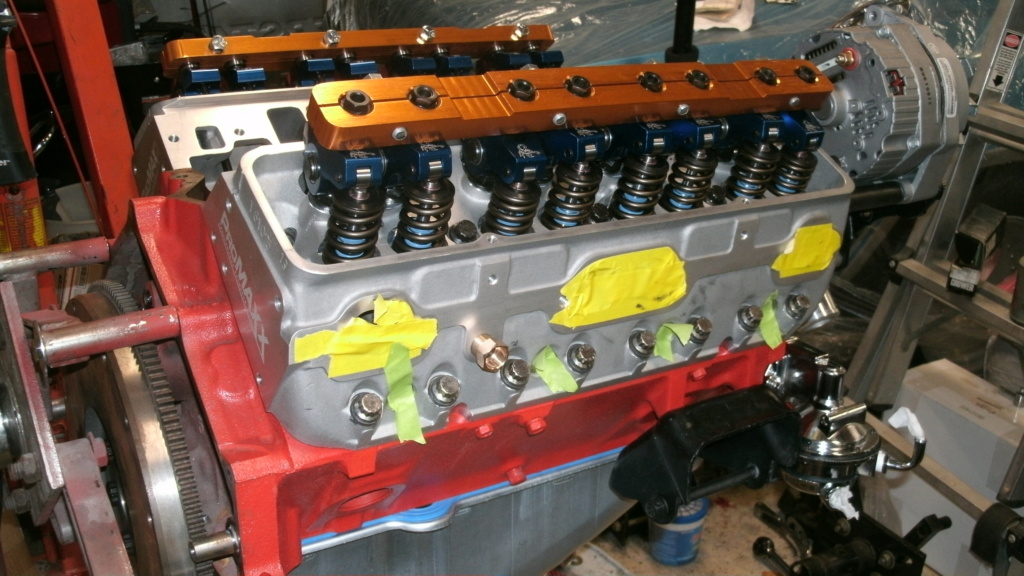
Upper end it assembled, inner valve springs removed and valve lash/preload is set. Thanks Ray for the tips.
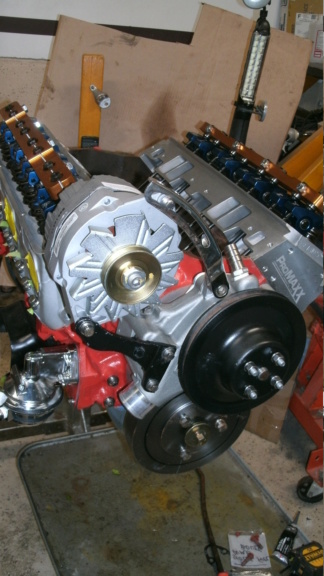
Fuel pump, alternator, balancer are all on. Pulleys line up nice even with the new parts.
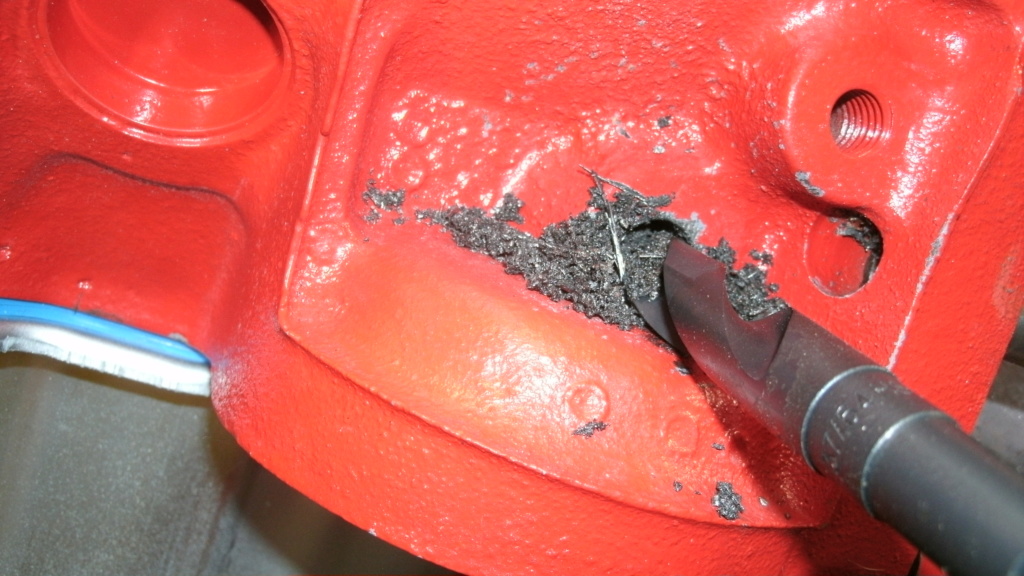
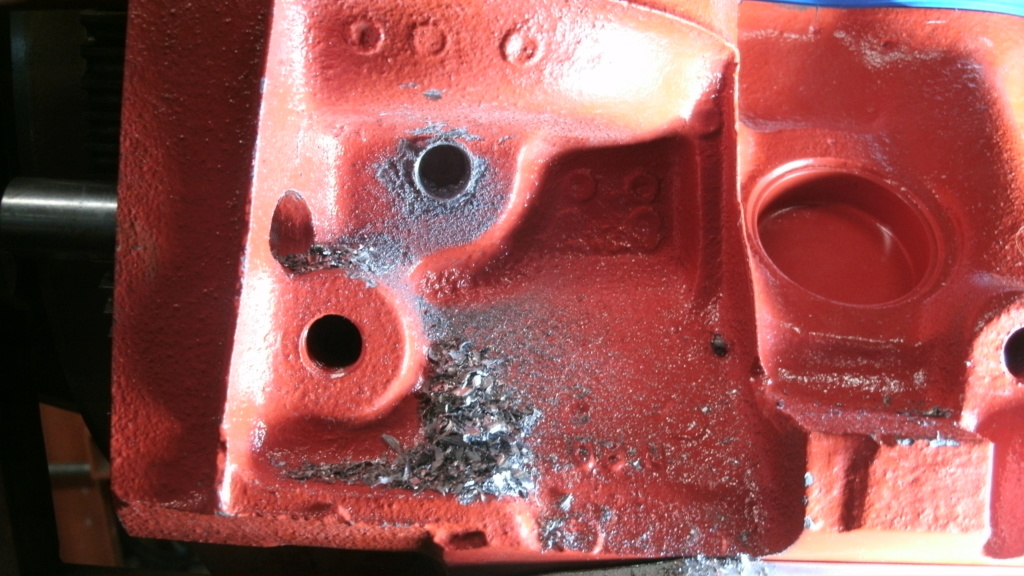
Was having second thoughts about again using a "T" for the stock oil pressure switch and mechanical gauge. Especially since I have all new harnesses under the hood. So I decided to pull and tap the port directly above the oil filter. The port is usually plugged on earlier blocks, later blocks have a square drive pipe plug in it. Its 3/8" NPT.
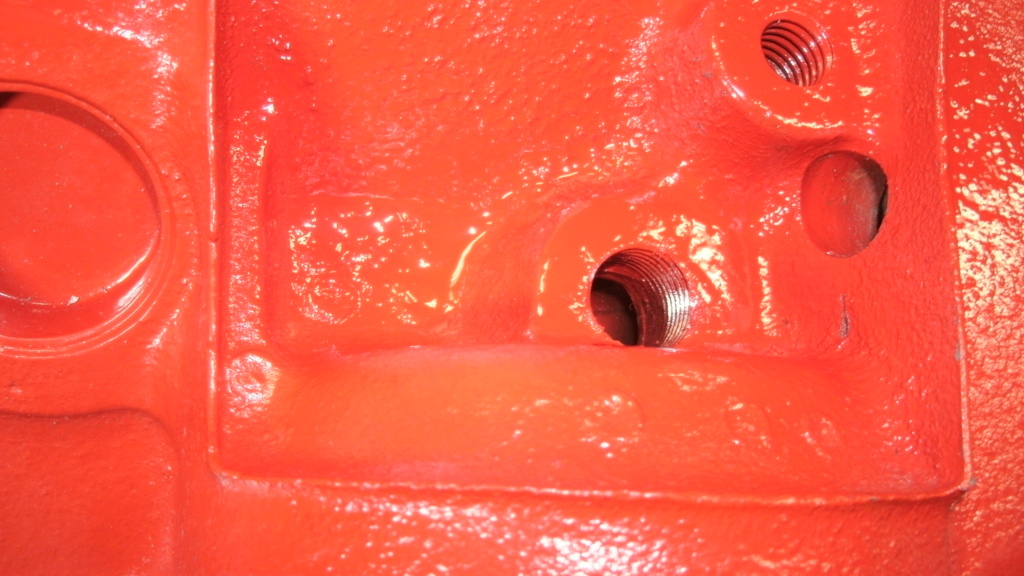
The port is only about an inch deep. Easily accessible on the stand. So I removed the oil filter and mounting boss (2 screws). You can actually stick a wire or something in the hole going to the outside of the block and touch the plug. So I packed the backside of the port with grease. Drilled out the plug which came out easy. I enlarged the hole to 37/64" (bought the bit on Amazon for $5 free ship) which is correct for a 3/8-18 NPT pipe tap. Bought the 3 piece pipe tap kit at Harbor Freight. I used the 1/4" tap to do the oil galley ports on the front of the block. Drilling went quick as did the tap. When done, I left the tap in it and cleaned the area all around. Then removed the tap and cleaned in the hole really well.
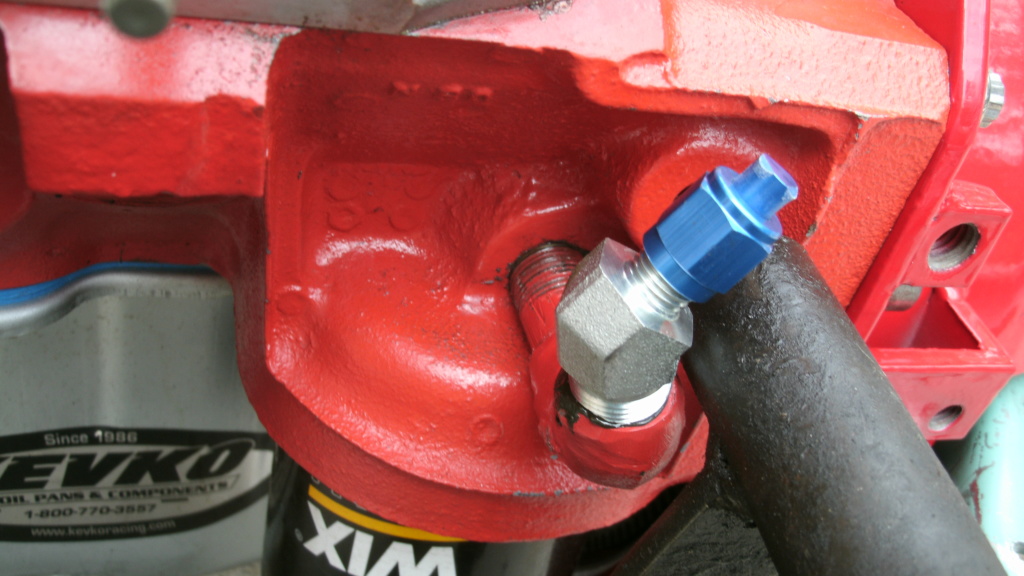
Plans are to use a 3/8" npt to -4an 45 degree adapter in this hole for the mechanical oil pressure gauge. And just keep the stock sender next to the dizzy. Probably going to have to get a short extension to move the 45 away from the block a bit since the hole is so close at the 6 o'clock position. Have to wait to see if the headers block the area.
Then onto the next item. Aluminum heads as well as later model stock heads use a 3/8" port for the factory temp sensor. Well, my 73 used 1/2" ports. I wanted to use my original temp sensor on the drivers head but it doesnt fit. And an adapter would bring it out too far. So I ordered a Sierra TS25101 (200 degree) temp switch that looks stock and will fit the 3/8" port. Sierra TS25101 is the same as Stewart Warner 83304 but way cheaper. Stewart Warner does have a 83305 that is a 220 degree switch but they want over $40 bucks for it. Dont think it was worth that. I'll be running a 180 stat so a 200 degree kick on of my factory light would be extra visual insurance for temp.
Same issue on the Passenger side aluminum head. 3/8" port again. Autometer mechanical sender for water temp has an odd thread. Autometer makes an adapter but I found a better deal with Equus 9851 which gives you 4 adapters for $10. And one of them is the 3/8" npt for the head and 5/8" on the female side. Issue solved. So I'll have oil and water mechanical gauges and the factory dash lights as visual backup.
Thought I'd post those part numbers for people who need senders for 3/8" ports. I didnt want to put the water temp sender in the manifold because I'll probably run the water bypass system on the manifold. And it would be a cleaner look.


Joe73- Donating Member

- Street Cred : 83
 Re: 1973 Chevelle SS, 350, 4spd. build
Negative. Flat Tappet I purchased in 1988. Been stored a long time. Sold the lifters from it. Going with Crower cam saver that have the .0005 flat edge on it for extra lube on the cam lobes.

Joe73- Donating Member

- Street Cred : 83
 Re: 1973 Chevelle SS, 350, 4spd. build
good idea. Do they have the little hole on the base of the lifter for extra oil?

73ss- G3GM Enthusiast

- Street Cred : 11
 Re: 1973 Chevelle SS, 350, 4spd. build
Negative. The ones with the hole at the bottom are Howards lifters. I like that idea as well and if I were buying a cam I'd get it from them. I was a bit leary of the hole on the bottom for some reason. I kept thinking that if some dirt got caught in there it wouldnt work since the hole is so tiny. I liked the idea of the Crower with the tiny slice on the side of the lifter. I figure yes there has to be a minute loss of oil pressure but not noticeable. And a lifter rotates in the bore while running. So oil would be lubing the lifter bore / and its whole circumference while oil is dropping on the the cam.

Joe73- Donating Member

- Street Cred : 83
 Re: 1973 Chevelle SS, 350, 4spd. build
Broke in the flat tappet a couple days ago. Used Lucas 30 weight break in oil. Set the timing to 10 degrees BTDC, filled the carb bowls, placed a large fan in front of the rad, filled the rad with distilled water. BTW, cam is a Comp Cams 292 duration which I have been saving since 1988. Lifters are Crower cam saver with the .005 flat edge on the side for extra lobe oiling. I also primed the engine prior to installing the manifold. I marked the lifters with a sharpie and rotated the engine 45 degrees while my buddy was priming it. Just to make sure the lifters are all rotating. Then I installed the manifold, put it in my old chassis, got everything connected, primed it again and fired it up.
Fired second revolution. Broke it in for about 8 minutes and saw water leaking from the rad hose. Shut it down, tightened the clamp and fired it up again. Did 30 minutes varying rpm. Then shut it down, changed oil and filter. Cut open filter and no filings. Filled with fresh Valvoline Vr1 10w30.
Next morning I removed the valve covers, girdles, roller rocker and springs. Reinstalled the inner valve springs, set lash, reinstalled girdle and covers. Fired it up again and ran it for 20 minutes varying rpm.
Played with the MSD 8361 with vacuum advance. Changed out the heavy springs to the silver light ones to get all my timing in by 2000 rpm. Set my total timing to 37 degrees at 2000 rpm which gave me 20 degrees initial. Hooked up the vacuum advance to MANIFOLD vacuum and now have 34 degrees at idle and 58 at 2000. Starts and idles nice with crisp throttle.
Did all the breaking in a adjustments in my original galvanized frame. Didnt want to keep leaning over my new paint job. Also used my old hooker comp headers with some duals I've been saving for this occasion. New stainless / ceramic headers will go in when the motor goes into the car which should be in a couple days.
I ended up removing the blue manifold water bypass because the passenger side 90 interfered with the vacuum advance. I might try to reinstall it at a later date. I just put some stainless 3/8" pipe plugs in the holes and removed the water neck spacer. Which I just had powdercoated.
Also, I did not hook up the fan and clutch since I wasnt running a shroud for break in. Just the large fan. I have to say, I could feel the heat coming through the backside of the radiator like crazy. But I shut the motor down and about 2 minutes later, the rad was cool as a cucumber. Its a northern rad with (2) 1" cores.
PCV valve is hidden inside the drivers side breather. Its a breather from a late model GM and does not have any ball or spring. Only a small hole in the bottom. So its a controlled vacuum leak. There are no specs on any PCV valves on the market so you dont know at what vacuum they operate or not. Best choice is the one for a '69 Z28 with a 302. If you change anything from stock you need to change your pcv. I chose to have no hassles and go for the fixed orifice GM type. Works with everything and looks exactly stock.
Used my Holley 670 avenger for the break in. Love that carb and it runs excellent and easy to tune. Once I'm done with the car it will be getting a 750 demon. With this current setup I have 11.5 inches of vacuum.
Quick video of the setup. This was shortly after the break in was done when I had a free hand. https://youtu.be/Q7MceJmtNwI

Joe73- Donating Member

- Street Cred : 83
 Re: 1973 Chevelle SS, 350, 4spd. build
Joe one thing to check with the distributor is your in gear timing. I agree to get AS MUCH initial timing in it as it will take and still start. But with the light springs, just check that when you put it in drive the engine doesn't want to stall. Sometimes with light springs it winds up into the advance at idle, and when it goes into drive the timing falls off like a rock. I had bad experiences with locked out timing on my 14:1 540, so I went back to an advancing distributor and mine idled at 30-32 and advanced to 36. Not saying a locked out distributor can't work, they are very useful. My car IDLED great with it. Just was a pain to start but that could have been my fault when I set it up. Just couldn't afford to keep breaking flexplates and starter gears to figure it out.

bracketchev1221- G3GM Enthusiast

- Street Cred : 15
 Re: 1973 Chevelle SS, 350, 4spd. build
Ray, thanks again for your expertise, I'm keeping the factory 4 speed in the car. I'm a fan of a locked out dizzy and had one in my car since the 80s. Thanks again.

Joe73- Donating Member

- Street Cred : 83
 Re: 1973 Chevelle SS, 350, 4spd. build
Duh, that's right Joe, your car is a stick. Nevermind. Then set the idle as low as reasonable and set your timing and slip the clutch to get it moving. As long as you don't lug it below idle rpm, you have no issues. I like to keep it around 850-900 minimum to keep oil splash up on the flat tappet camshaft.

bracketchev1221- G3GM Enthusiast

- Street Cred : 15
 Re: 1973 Chevelle SS, 350, 4spd. build
Yup. Stock idle on it is 900 rpm and thats where I have it now. The cam has a good lope. The car never lugs. When driving normally, I usually take off from the light in 4th gear. It doesnt lug at all with the 4.10 gears.

Joe73- Donating Member

- Street Cred : 83
 Re: 1973 Chevelle SS, 350, 4spd. build
Couple pics.
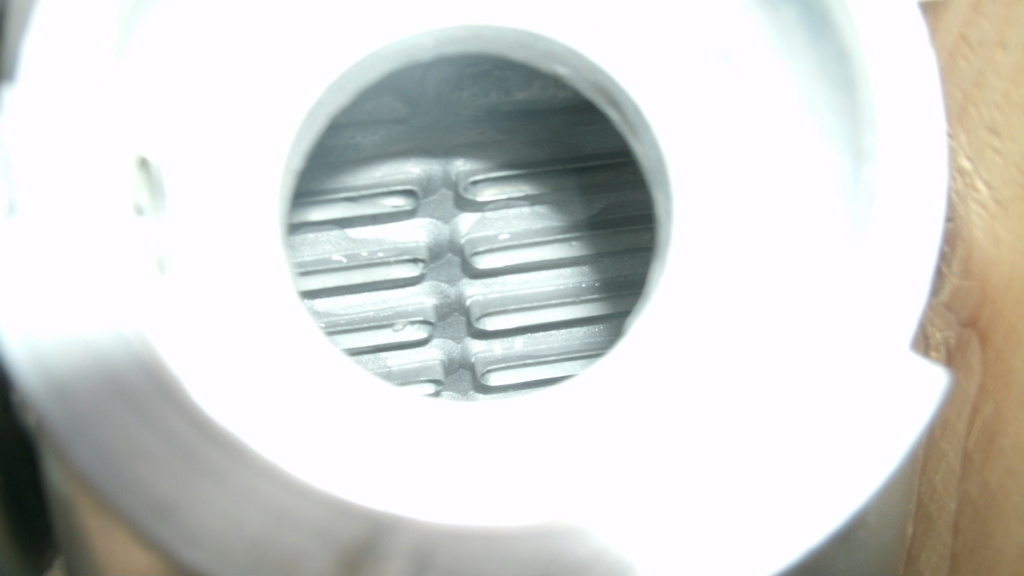
Northern Aluminum radiator for manual trans. (they have an auto one as well). Pic shows the (2) ONE INCH tubes. Much more surface area to dissipate heat than three or four row rads. Pic shows the anode I placed in the top port to catch the electrolysis of dissimilar metals. If anyone wants the part number for the anode, just let me know.
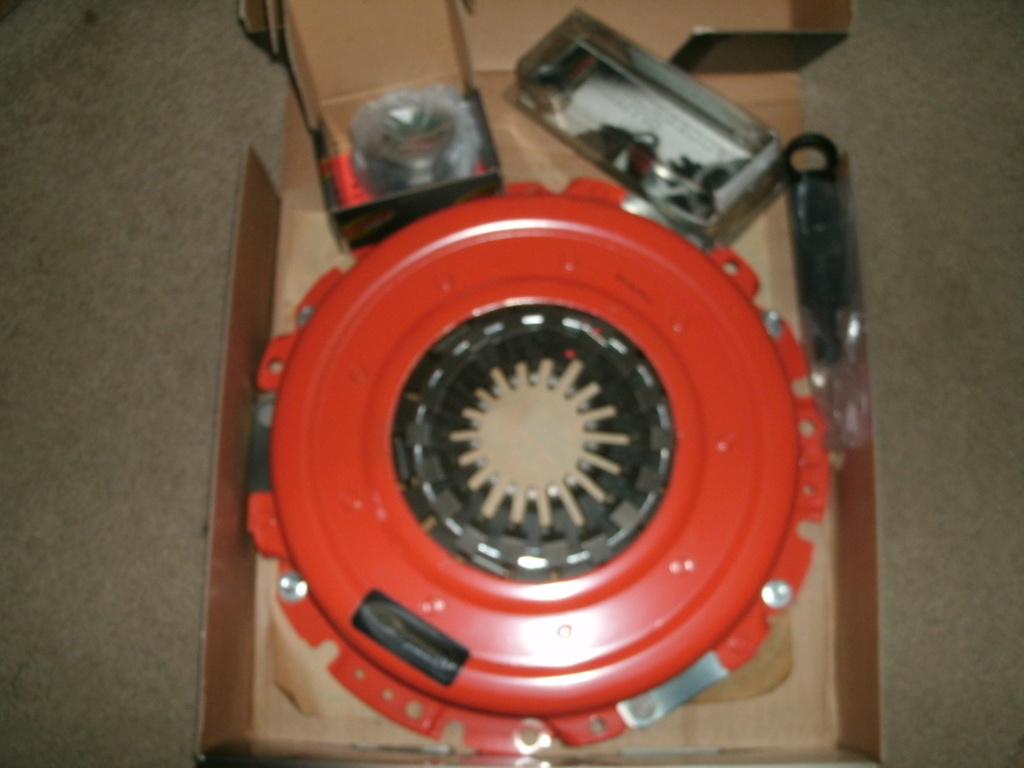
Centerforce dual friction 11" diaphragm clutch. I cut off the weights on the fingers. Dont want any issues with rust and one possibly not sliding properly causing a vibration.
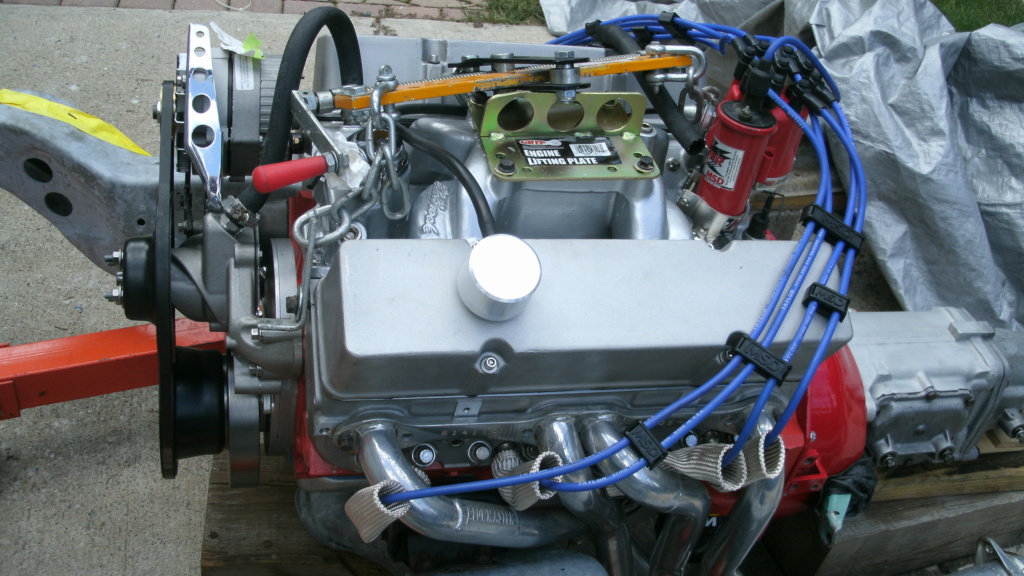
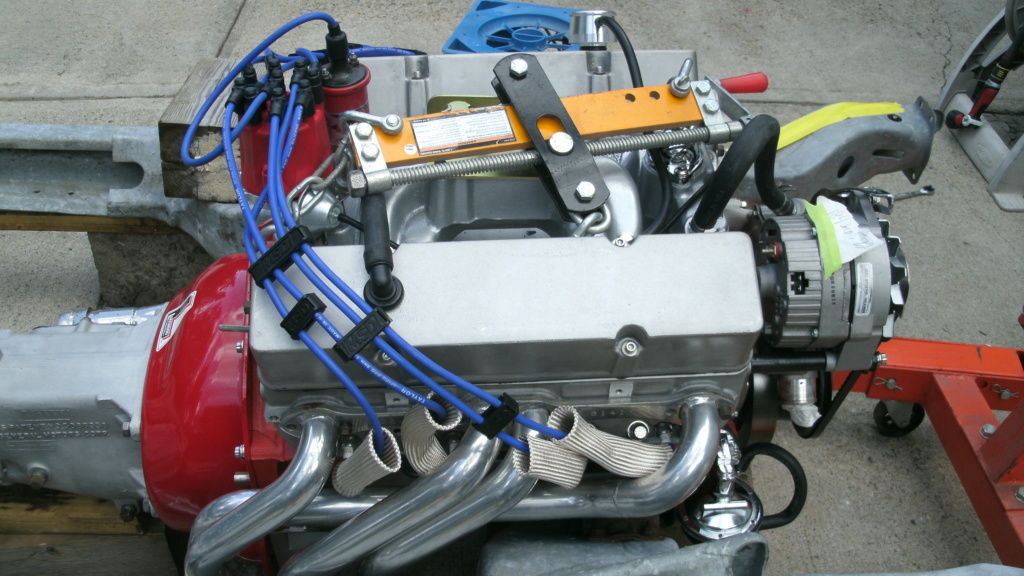
I just cut the plug wires down to their final length and routed them cleanly. Also did a trial fit of these stainless/ceramic headers. They fit well so I'll probably be going with them. I might sell my other brand new pair of Hedmans for our cars. New in box.
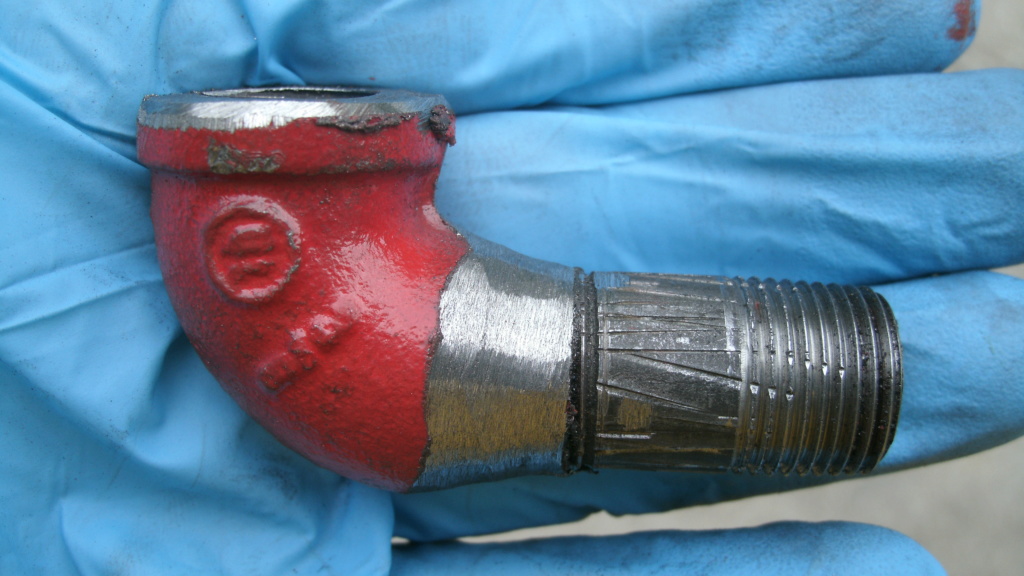
Also modded a 3/8" pipe nipple and elbow to thread into the port I drilled and threaded above the oil filter. This will be for my mechanical gauge. I'll still be using the factory idiot light sender by the distributor. I wanted a light and a gauge. At the end of the elbow I used a 3/8" npt to -4an adapter so my braided oil line could thread right on. Blue cap is on it for now so nothing falls in. I left the fitting on an angle because if its straight up it might be too close to my "Z" bar for the clutch.


Joe73- Donating Member

- Street Cred : 83
 Re: 1973 Chevelle SS, 350, 4spd. build
Nice looking setup. I like the 'no free advertising' valve covers.
It looks like you used some pipe goo on the pipe elbow?
It looks like you used some pipe goo on the pipe elbow?
crice63- Donating Member

- Street Cred : 2
 Re: 1973 Chevelle SS, 350, 4spd. build
Yes, Permatex #2 on any threads going into water or oil. Especially the manifold bolts. Permatex #2 doesnt harden.
I always want the same valve cover but the ones that said Comp Cams on them. Never located a pair and came upon these.
I always want the same valve cover but the ones that said Comp Cams on them. Never located a pair and came upon these.

Joe73- Donating Member

- Street Cred : 83
 Re: 1973 Chevelle SS, 350, 4spd. build
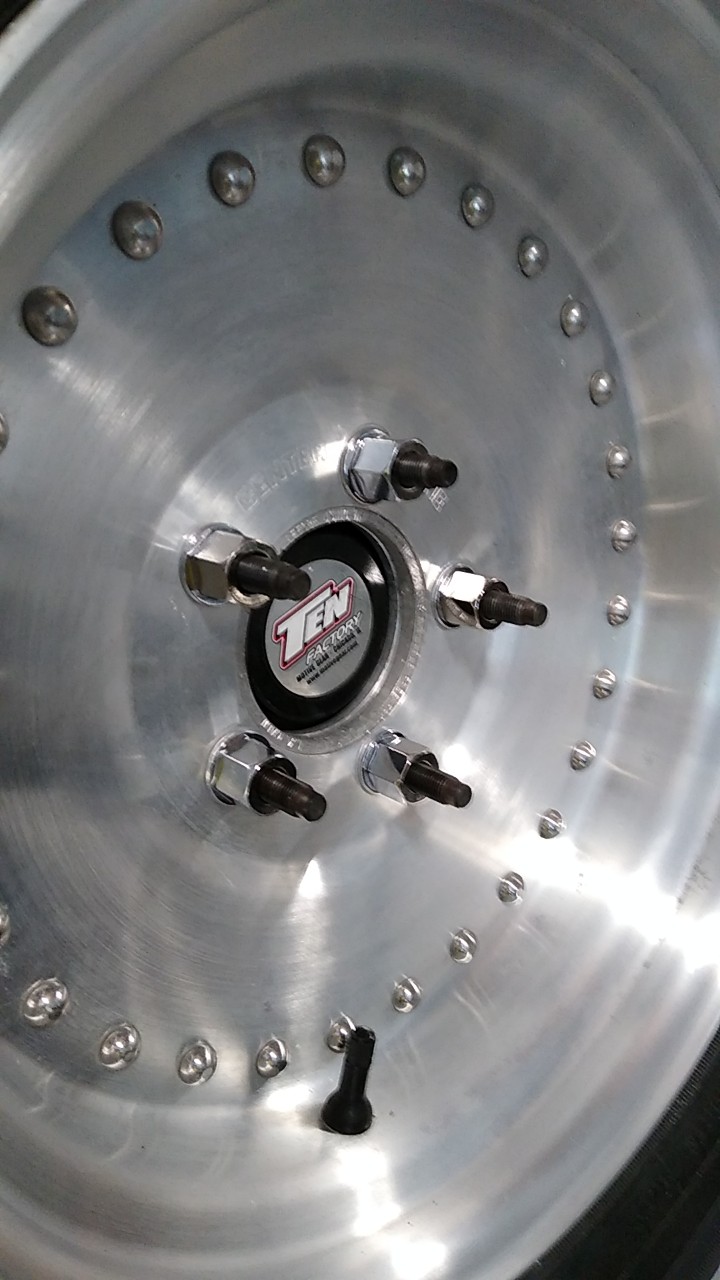
Ok, Moroso long wheel studs installed.
I received the Jegs stainless 64-72, part number 30527, for the car. Kit looks excellent. Hardware, not so much. So I'll be upgrading. Differences I've found in the 64-72 vs. the 73-77 kit. The jegs and summit brand kits are made by hearthrob exhaust. I spoke with Hearthrob about using the earlier kit for my 73 they werent quite sure about tailpipe fitment but they said I had to go with the earlier kit because I wanted to use an offset/offset muffler. Thats basically the difference between the kits. There is a diagram in the instructions that actually shows you different mufflers. I'd rather go offset/offset since it makes it a bit easier to get 2.5" pipe over the axle. The kits pipe are extra long to allow for trimming which will be needed. I like that so I can get it just right. I put a bungee in front of my lower control arms from side to side to support the muffler and a short bungee at the rear bumper to hold the tail pipe. Slide everything together and it looks good. Long, but good. Doesnt appear to be any tailpipe issues.
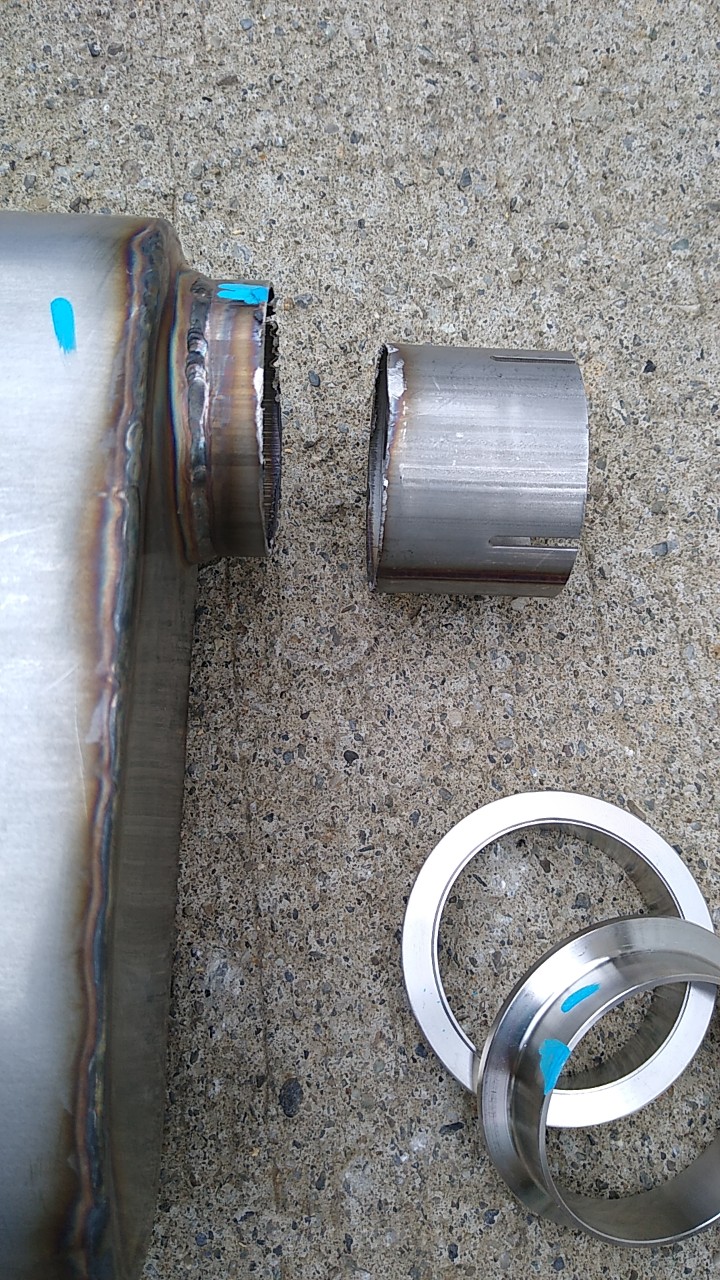
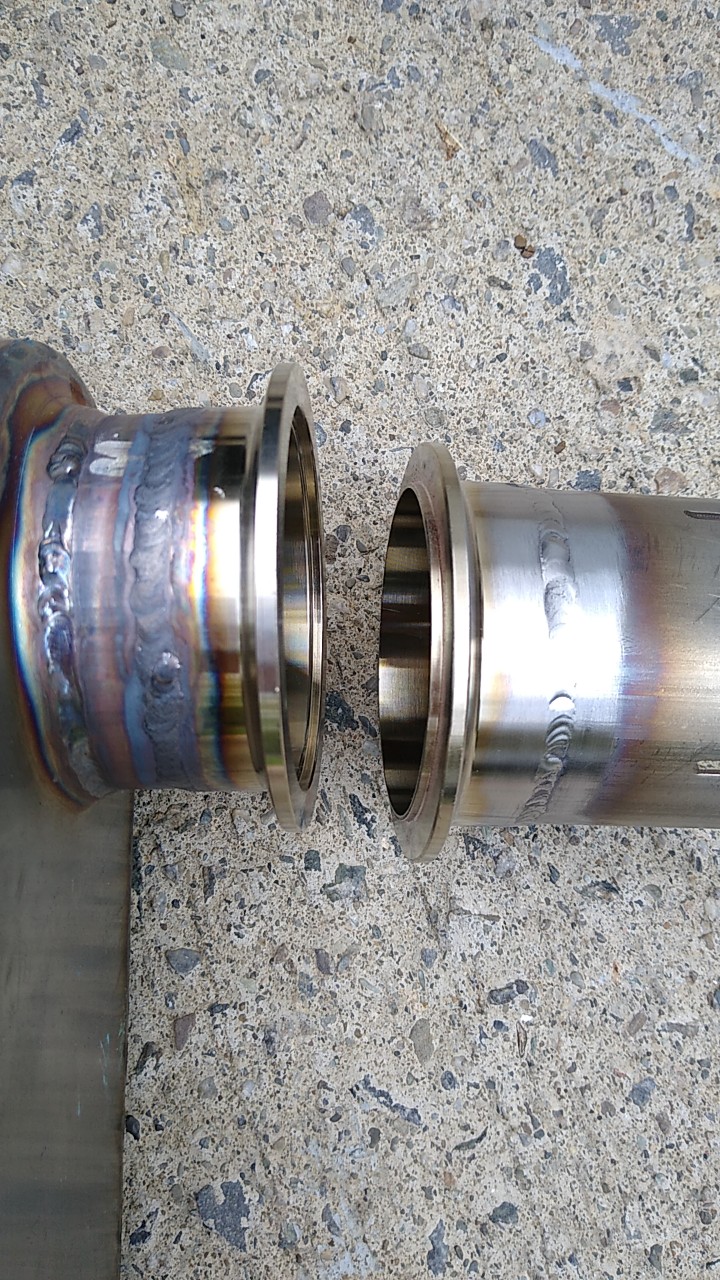
As for a hanger at the rear of the muffler. I first cut the tail extension of the muffler in half. I then had a V band clamp TIG welded in place on both sides. This will allow me to remove the muffler to the header pipe in one piece if I need to do trans work. Hanger will be at the rear of the V band clamp. Bolt hole spacing on the rear crossmember of our cars is 3 1/4". I ordered a stock hanger for a 75-77 malibu, walker part number 35181 and the isolator rubber walker 35182. Together they are about $6 each. Amazon has them. The hanger is designed with a flat slot but I'll be using a 3/8" diameter rod hanger. Should slide right in. Since I have an offset/offset muffler, the frame hanger doesnt center up like stock. So I ordered a Pypes HVH11S which is a 2.5" clamp with a long adjustable hook welded to its side. That will be an easy clamp on and be centered to go into the hanger still using the stock holes.
As for tailpipe hangers, I'll be going with Walker 36516. Summit has them for $2 each but walmart will ship them to my door for $5 each.
So, waiting for the hangers, then I'll start assembly.


Joe73- Donating Member

- Street Cred : 83
 Re: 1973 Chevelle SS, 350, 4spd. build
Joe if we ever get to NY i want to pay ya a Visit and see this car it is rightous


___________________________________________
1977 Chevelle SE x2
One Mild original
one Wild NON original
Anthony

Limey SE- Management

- Street Cred : 97
Page 11 of 17 •  1 ... 7 ... 10, 11, 12 ... 17
G3GM :: Media :: G3 Project Pictures
Page 11 of 17
Permissions in this forum:
You cannot reply to topics in this forum|
|
|


» Pate Swap Meet - Texas Motor Speedway - G3 Parts Goldmine
» '73 Laguna coupe - factory 454- SoCal $2500
» Dash Solutions
» Rusty's progress Done stuff again LOL
» 1973 4 door laguna frame same as 1973 2 door chevelle
» Anyone good at photoshop?
» '77 Monte Carlo Landau - Parting out - 61k miles on car
» Dash assembly for 73-77 Malibu/Monte/El Camino,etc.
» Window louvers