


Snowy's 74 Laguna S3 Build - The Road So Far
G3GM :: Media :: G3 Project Pictures

Snowy's 74 Laguna S3 Build - The Road So Far
![]() by Snowy Sun Jul 18, 2021 9:10 pm
by Snowy Sun Jul 18, 2021 9:10 pm

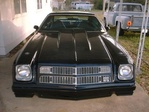
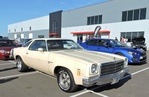
As suggested, this is the start of my build thread. The car was a total surprise to me as I mentioned in my introduction. The plan was to slowly fix it up while having fun driving it but that changed. The car sat for the last 4 years so I started by giving the car a good cleaning. Mice made a total mess of the interior and trunk. As I cleaned out the interior I discovered a lot of rust and rot in the floors so i decided to let it sit while I disassemble some of the car for de-greasing and tackling the rust from inside as well as underneath.
I have removed most of the interior, the fuel tank, rear bumper, exhaust system, and rear shocks. I adjusted the trunk lid and hood, lubricated the door lock mechanisms, installed new door strikers, installed new hood springs and hood bumpers. Inside, I removed the dash/gauge bezel and replaced all the gauge bulbs. Installed a new headlight switch and heater controls.
Ive also been searching and collecting new parts. So far I have:
- New ACDelco battery cables, thermostat, fan belts, oil filter, PCV valve, rear shocks, floor dimmer switch, headlight switch & radiator cap.
- New reproduction hood springs, door strikers, hood bumpers, fuel tank & sending unit, dual exhaust system, package tray, ACC cut pile "Essex" deluxe carpet, trunk mat, battery tray, opera window trim, Sylvania Silverstar headlights, exterior & interior bulbs, door bumpers, overflow tubing, dome light.
- NOS overflow tank, inner glove box door, rear bumper guards, grille, rear panel & fender Laguna S3 emblems, "400" fender emblems, LH exhaust manifold, & fuel tank cap.
- Eastwood's Chassis Rust Encapsulator Platinum, Eastwood's Chassis Black Satin primer & paint, Eastwood's under hood black paint, Gray & white trunk speckle paint, POR-15's trunk & floor board kit.


Last edited by Snowy on Wed Nov 03, 2021 10:00 am; edited 5 times in total (Reason for editing : Add photos)

Snowy- G3GM Newbie

- Street Cred : 0
Re: Snowy's 74 Laguna S3 Build - The Road So Far
![]() by S3TPI Mon Jul 19, 2021 7:23 am
by S3TPI Mon Jul 19, 2021 7:23 am
S3TPI- G3GM Member

- Street Cred : 0
Snowy likes this post
Re: Snowy's 74 Laguna S3 Build - The Road So Far
![]() by REVINKEVIN / Mr. 600+HP Mon Jul 19, 2021 10:08 am
by REVINKEVIN / Mr. 600+HP Mon Jul 19, 2021 10:08 am

REVINKEVIN / Mr. 600+HP- G3GM Senior Member

- Street Cred : 20
Re: Snowy's 74 Laguna S3 Build - The Road So Far
![]() by g3chevy / Mr Pontiac Mon Jul 19, 2021 10:10 am
by g3chevy / Mr Pontiac Mon Jul 19, 2021 10:10 am

g3chevy / Mr Pontiac- Donating Member

- Street Cred : 35
Re: Snowy's 74 Laguna S3 Build - The Road So Far
![]() by fasrnur Mon Jul 19, 2021 8:03 pm
by fasrnur Mon Jul 19, 2021 8:03 pm
We all look forward to your progress pictures.
fasrnur- G3GM Enthusiast

- Street Cred : 9
Snowy likes this post
Re: Snowy's 74 Laguna S3 Build - The Road So Far
![]() by Snowy Wed Jul 21, 2021 11:25 am
by Snowy Wed Jul 21, 2021 11:25 am
REVINKEVIN wrote:Hey. Great start on a very cool car. How is the 400 engine running? I have done several 400 small blocks in the past. I have one right now in my’86 C10. It doesn’t take much to wake them up. I am definitely going to follow along as you bring another Laguna back to life.
I only started it once when it first arrived. It ran rough but it also sat for a long time and I didnt really want to run it anymore with 4 year old gas in it.
Its a 400 2bbl. My first was also a 400 2bbl. My second was a 350 2bbl that I changed out for a 4bbl. Im think of doing the same for this one once I get to the engine & mechanical stuff. I do like to keep it mostly original but I done mind substituting for higher end/performance parts as long as it still looks good.
Im not a fan of chrome so I keep the engine to the stock colors. One of the previous owners decided to paint everything under the hood while it was still on the car and of course it came out terrible so I'll be repainting a lot of parts.
I do have a few questions.
1. I installed a rebuilt heater control in the dash and hooked everything back up. The lever that opens up the blend doors opens fine but is hard to close. I can manually close it easy from underneath. While I was under there, there looks like there should be a spring to help close the door easier? If I do it with just the lever, the lever cable ends up bending.
2. Im thinking about replacing the fuel and vapor lines that run along the frame but it looks like it may be too difficult to do without a lift. Any input on that would be appreciated.
3. I plan on replacing all the fuses but while under there, I noticed a wire coming from the firewall towards the fuse box just sitting there. Its not connected to anything. I can take a picture but I remember in past cars that it may get tucked in with one of the fuses? My 73 Hurst Olds had one but it was for the Hurst digital tach.
I'll take pictures of its current state as soon as I can. The weather has been horrible here in the Northeast. Its either very hot and humid or its raining. Not many nice dry summer days with low humidity this year.
Thanks
Snowy- G3GM Newbie
- Street Cred : 0
Re: Snowy's 74 Laguna S3 Build - The Road So Far
![]() by REVINKEVIN / Mr. 600+HP Wed Jul 21, 2021 5:31 pm
by REVINKEVIN / Mr. 600+HP Wed Jul 21, 2021 5:31 pm
2: First, try taking the lines off at the front and rear. Blow compressed air through them to see how dirty they are. Then you can cap them off and do a pressure test to see if they are leaking. No leaks? Use them. If they fail then you will have a lot of work on your back using Jack stands but you can do it.
3: I just installed a complete Painless wiring kit on my car. My fuse box was pretty bad plus I was adding power windows and a big stereo so I just bit the bullet and did the entire car. It would be worthwhile to buy all new fuses and go that route. You might not have to big of a corrosion issue and everything might be ok. Take a picture of the wire so someone can look it up in the service manual. As you know, people add a lot of things to cars over the years. It’s a good chance that the wire is not stock.
I live on the southwest side of Houston. I completely understand the weather. So, post some pictures and let’s get this thing up in the wind.
REVINKEVIN / Mr. 600+HP- G3GM Senior Member
- Street Cred : 20
Limey SE and Snowy like this post
Re: Snowy's 74 Laguna S3 Build - The Road So Far
![]() by Snowy Thu Jul 22, 2021 2:51 pm
by Snowy Thu Jul 22, 2021 2:51 pm
g3chevy / Mr Pontiac wrote:Let the restoration begin! Now lets see some of those pics of the interior tear down. Those make for a great part of the story.
Im adding pictures to the original post instead of having them scattered all over. I just added the interior, undercarriage, fuse box & heater blend door.
Snowy- G3GM Newbie
- Street Cred : 0
Re: Snowy's 74 Laguna S3 Build - The Road So Far
![]() by REVINKEVIN / Mr. 600+HP Thu Jul 22, 2021 4:51 pm
by REVINKEVIN / Mr. 600+HP Thu Jul 22, 2021 4:51 pm


REVINKEVIN / Mr. 600+HP- G3GM Senior Member
- Street Cred : 20
g3chevy / Mr Pontiac and Snowy like this post
Re: Snowy's 74 Laguna S3 Build - The Road So Far
![]() by Snowy Fri Jul 23, 2021 10:17 am
by Snowy Fri Jul 23, 2021 10:17 am
Wow! Impressive!
Snowy- G3GM Newbie
- Street Cred : 0
Re: Snowy's 74 Laguna S3 Build - The Road So Far
![]() by g3chevy / Mr Pontiac Fri Jul 23, 2021 10:52 am
by g3chevy / Mr Pontiac Fri Jul 23, 2021 10:52 am

g3chevy / Mr Pontiac- Donating Member
- Street Cred : 35
Re: Snowy's 74 Laguna S3 Build - The Road So Far
![]() by REVINKEVIN / Mr. 600+HP Fri Jul 23, 2021 11:34 am
by REVINKEVIN / Mr. 600+HP Fri Jul 23, 2021 11:34 am
REVINKEVIN / Mr. 600+HP- G3GM Senior Member
- Street Cred : 20
Re: Snowy's 74 Laguna S3 Build - The Road So Far
![]() by Snowy Fri Jul 23, 2021 5:21 pm
by Snowy Fri Jul 23, 2021 5:21 pm
Okay, I'll have to get a better look. It will be easier once I have my front seats out. Either way, does it get tucked into the fuse box or is it supposed to connect to something else? It doesnt look like the wiring was messed around with too much.
Snowy- G3GM Newbie
- Street Cred : 0
Re: Snowy's 74 Laguna S3 Build - The Road So Far
![]() by g3chevy / Mr Pontiac Fri Jul 23, 2021 8:46 pm
by g3chevy / Mr Pontiac Fri Jul 23, 2021 8:46 pm
g3chevy / Mr Pontiac- Donating Member
- Street Cred : 35
Snowy likes this post
Re: Snowy's 74 Laguna S3 Build - The Road So Far
![]() by Snowy Mon Nov 08, 2021 10:40 am
by Snowy Mon Nov 08, 2021 10:40 am
Accumulated some more parts. Im hoping to use the winter to repaint my interior pieces. I was hoping to get the car in the garage but I still have a lot of cleanup to do before I can make the room for it. I would have accomplished more but my everyday vehicles are constantly needing some sort of repair.
Snowy- G3GM Newbie
- Street Cred : 0

 Similar topics
» Laguna S3 build numbers question
» 76 Laguna- window sticker, build sheet and more
G3GM :: Media :: G3 Project Pictures
|
|
|
» Rusty's progress Carpet Chevk now onto floor replacement
» PARTS NEED TO GO FOR OUR MOVE I DONT WANNA TAKE WITH
» Need driver side bucket seat 73 Laguna
» Laguna NOSE
» Virtual Ink from this weekend
» 1973 Chevelle SS Station Wagon
» Elcofest 2023
» Wanted drip rails for 1975 four-door Chevelle Malibu-Thanks!
» Parts please