


1977 Chevelle Malibu Classic Progress Photo's aka Mali
G3GM :: Media :: G3 Project Pictures
Page 12 of 27 •  1 ... 7 ... 11, 12, 13 ... 19 ... 27
 ![]()
Re: 1977 Chevelle Malibu Classic Progress Photo's aka Mali
![]() by 77mali Thu Aug 23, 2012 8:32 am
by 77mali Thu Aug 23, 2012 8:32 am
This is Duplicolor flat black enamel over Por 15 & sealed with Duplicolor Acrylic Lacquer clear. (Used flash to get the color closer to what it actually looks like as it looks darker in the shade).
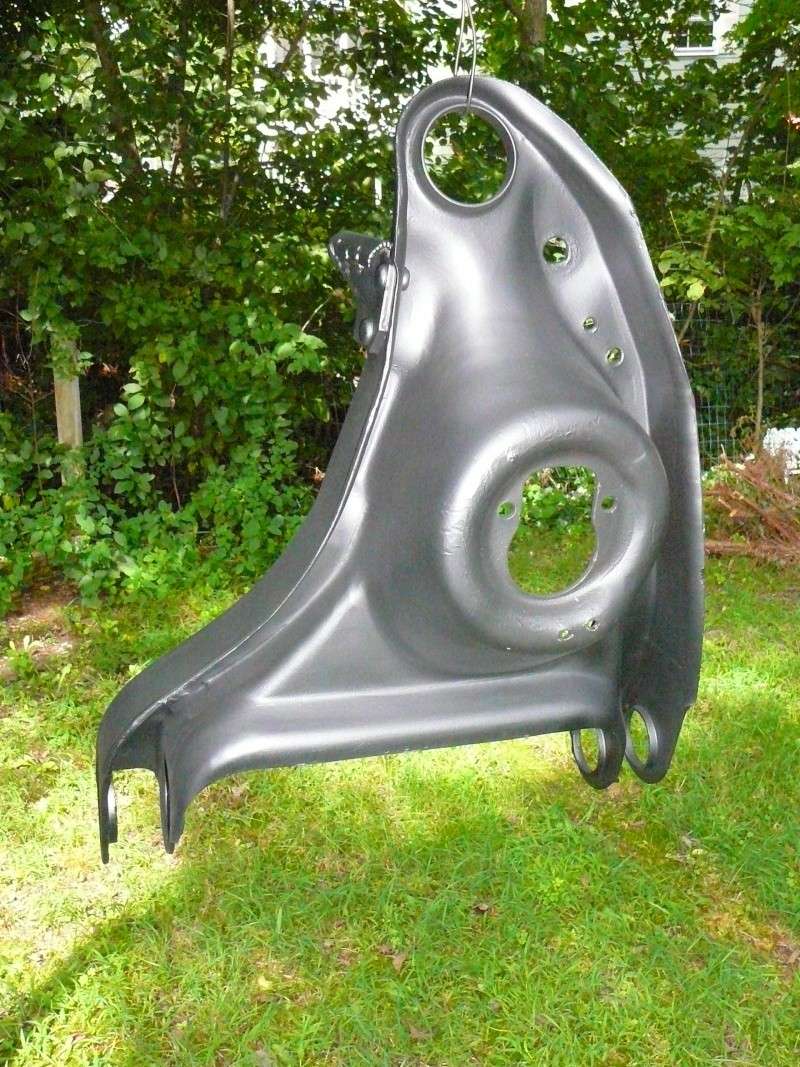
Water pump is Duplicolor semi gloss engine enamel.

77mali- Donating Member

- Street Cred : 62
Re: 1977 Chevelle Malibu Classic Progress Photo's aka Mali
![]() by Dead Man Thu Aug 23, 2012 10:42 am
by Dead Man Thu Aug 23, 2012 10:42 am

Dead Man- G3GM Member

- Street Cred : 4
Re: 1977 Chevelle Malibu Classic Progress Photo's aka Mali
![]() by 77ElClassic Thu Aug 23, 2012 1:35 pm
by 77ElClassic Thu Aug 23, 2012 1:35 pm
77ElClassic- Donating Member
- Street Cred : 5
Re: 1977 Chevelle Malibu Classic Progress Photo's aka Mali
![]() by 77mali Thu Aug 23, 2012 2:36 pm
by 77mali Thu Aug 23, 2012 2:36 pm
77ElClassic wrote:I love that Duplicolor. Most of my chassis was done with Duplicolor low-gloss black engine enamel. Almost 15 years now. Holds up real well.
Awesome paint- love the nozzles too makes the paint come out almost just like a spray gun. Excellent coverage over the Por15.
73ssbb wrote:looking good, but where did you find a new trans tunnel ? or is that just a shinny paint job over the old lol.
Haven't touched the trans tunnel- that's original sheet metal.
77mali- Donating Member
- Street Cred : 62
Re: 1977 Chevelle Malibu Classic Progress Photo's aka Mali
![]() by 77mali Mon Sep 03, 2012 10:06 am
by 77mali Mon Sep 03, 2012 10:06 am
WHOOOOOOOOOOOOOOOOOOOOOOOOO HOOOOOOOOOOOOOOOOOOOOOOOO
77mali- Donating Member
- Street Cred : 62
Re: 1977 Chevelle Malibu Classic Progress Photo's aka Mali
![]() by 77mali Wed Sep 05, 2012 5:51 pm
by 77mali Wed Sep 05, 2012 5:51 pm
77mali wrote:Picking up the engine assembly Weds. hopefully, will edit in a couple pics here.
WHOOOOOOOOOOOOOOOOOOOOOOOOO HOOOOOOOOOOOOOOOOOOOOOOOO
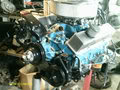
I know it's kind of a tease but I don't want any dirt to get into the engine...LOL. I'm going to get a big pallet bag to cover it up when I finish off the cam & top end. Will post better pics & of re-assembly when I'm ready to take the stretch wrap off.

Nice & Clean...he ended up putting on my guide plates in addition to the head install...still alot to do on it & I'll have to wait some until the engine bay & suspension/steering are complete (while the weather is warm).

77mali- Donating Member
- Street Cred : 62
Re: 1977 Chevelle Malibu Classic Progress Photo's aka Mali
![]() by dragons_lair59 Wed Sep 05, 2012 8:16 pm
by dragons_lair59 Wed Sep 05, 2012 8:16 pm

dragons_lair59- Donating Member
- Street Cred : 11
Re: 1977 Chevelle Malibu Classic Progress Photo's aka Mali
![]() by DiscoMalibu Wed Sep 05, 2012 10:34 pm
by DiscoMalibu Wed Sep 05, 2012 10:34 pm
DiscoMalibu- G3GM Member
- Street Cred : 7
Re: 1977 Chevelle Malibu Classic Progress Photo's aka Mali
![]() by 77mali Wed Sep 05, 2012 11:26 pm
by 77mali Wed Sep 05, 2012 11:26 pm
Yes Disco- black is beautiful
77mali- Donating Member
- Street Cred : 62
Re: 1977 Chevelle Malibu Classic Progress Photo's aka Mali
![]() by 1973 454 MONTE Thu Sep 06, 2012 4:34 pm
by 1973 454 MONTE Thu Sep 06, 2012 4:34 pm
1973 454 MONTE- Donating Member
- Street Cred : 36
Re: 1977 Chevelle Malibu Classic Progress Photo's aka Mali
![]() by DiscoMalibu Thu Sep 06, 2012 10:19 pm
by DiscoMalibu Thu Sep 06, 2012 10:19 pm
DiscoMalibu- G3GM Member
- Street Cred : 7
Re: 1977 Chevelle Malibu Classic Progress Photo's aka Mali
![]() by 77mali Fri Sep 07, 2012 7:17 am
by 77mali Fri Sep 07, 2012 7:17 am
There are all types of shades (or depths) of black.
77mali- Donating Member
- Street Cred : 62
Re: 1977 Chevelle Malibu Classic Progress Photo's aka Mali
![]() by 1973montec Fri Sep 07, 2012 12:01 pm
by 1973montec Fri Sep 07, 2012 12:01 pm

1973montec- Donating Member
- Street Cred : 17
Re: 1977 Chevelle Malibu Classic Progress Photo's aka Mali
![]() by 77mali Fri Sep 07, 2012 5:08 pm
by 77mali Fri Sep 07, 2012 5:08 pm
77mali- Donating Member
- Street Cred : 62
Re: 1977 Chevelle Malibu Classic Progress Photo's aka Mali
![]() by 77mali Sat Sep 15, 2012 8:17 pm
by 77mali Sat Sep 15, 2012 8:17 pm


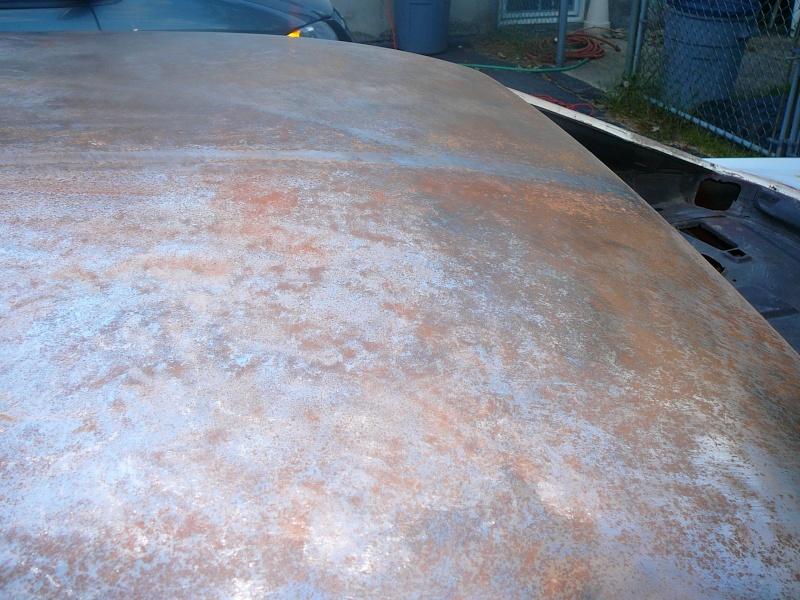
I originally used a product that was supposed to stop rust from the local Autozone but it didn't do what it said it would. This was done before I knew about the Por15...fairly early on in this process (see page 1 LOL!).
The plan is to use the Por15- after clean & prep with their "Metal Ready" which I used on my rear bumpers- I was more than happy with the result. Applying 2 coats and then a top coat of their "Blackote" top coat paint for UV protection until the car is painted. One good thing is that after cutting though all the layers- it's pretty darn straight. A few spots will need filling were the rust came back but I also have the new Por15 "Paste" filler and a "professional" body filler that a friend hooked me up with from his work. Still a bit more sanding and then some 'buffing" to do prior to the coatings but- I'll never have to do it again or worry about rust on that darn roof.


77mali- Donating Member
- Street Cred : 62
Re: 1977 Chevelle Malibu Classic Progress Photo's aka Mali
![]() by Mcarlo77 Sun Sep 16, 2012 4:00 am
by Mcarlo77 Sun Sep 16, 2012 4:00 am
Mcarlo77- Donating Member
- Street Cred : 77
Re: 1977 Chevelle Malibu Classic Progress Photo's aka Mali
![]() by 77mali Sun Sep 16, 2012 8:26 am
by 77mali Sun Sep 16, 2012 8:26 am
With the above disclaimer stated (LOL), I plan to use it as a filler on some of the "craters" on the roof (the deeper ones only) & then coat with the regular Por 15 coating, being very careful to not over build it and have to sand it down. It comes in a "toothpaste" tube and should be fairly easy to place. There is one area in the middle towards the front that was bad and needs to be filled with something, figure I'd give this stuff a shot there and also use it around exterior pinch welds or areas where panels meet up instead of regular body sealer such as a polyurethane or Butyl seam sealant. We'll see...have not tried it yet but I'll post up some pics when I do it this week. Here's a link to the product data & web page. Hope this helped.
http://www.por15.com/Data%20Sheets/porpatch%20directions.pdf
http://www.por15.com/PORPATCH/productinfo/PPB/
77mali- Donating Member
- Street Cred : 62
Re: 1977 Chevelle Malibu Classic Progress Photo's aka Mali
![]() by 77mali Thu Sep 20, 2012 10:40 pm
by 77mali Thu Sep 20, 2012 10:40 pm
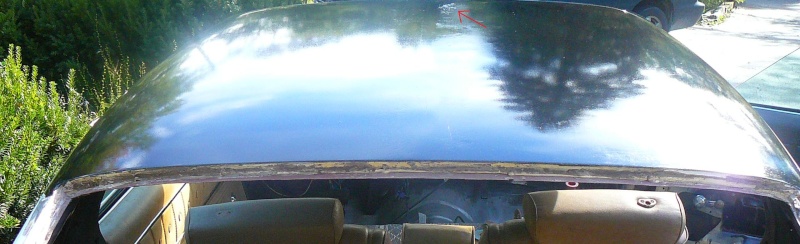
Porpatch:

Worst area of roof- close up (this will need more than Porpatch but they are sealed & they did not go all the way through the panel).
Por15 Coat #1 (The arrow shows the area in the previous pic) The Por15 black does not photograph well...sorry.
77mali- Donating Member
- Street Cred : 62
Re: 1977 Chevelle Malibu Classic Progress Photo's aka Mali
![]() by Limey SE Thu Sep 20, 2012 10:48 pm
by Limey SE Thu Sep 20, 2012 10:48 pm
Limey SE- Management

- Street Cred : 97
Re: 1977 Chevelle Malibu Classic Progress Photo's aka Mali
![]() by 77mali Thu Sep 20, 2012 10:55 pm
by 77mali Thu Sep 20, 2012 10:55 pm
The SE looks good- Looks like you made a lot of progress too.

77mali- Donating Member
- Street Cred : 62
Re: 1977 Chevelle Malibu Classic Progress Photo's aka Mali
![]() by Hawk03 Fri Sep 21, 2012 8:30 am
by Hawk03 Fri Sep 21, 2012 8:30 am
You're making some good progress and making me want to start working on mine
Last edited by Hawk03 on Fri Sep 21, 2012 8:31 am; edited 1 time in total (Reason for editing : added text)

Hawk03- G3GM Enthusiast

- Street Cred : 18
Re: 1977 Chevelle Malibu Classic Progress Photo's aka Mali
![]() by 77mali Fri Sep 21, 2012 9:12 am
by 77mali Fri Sep 21, 2012 9:12 am
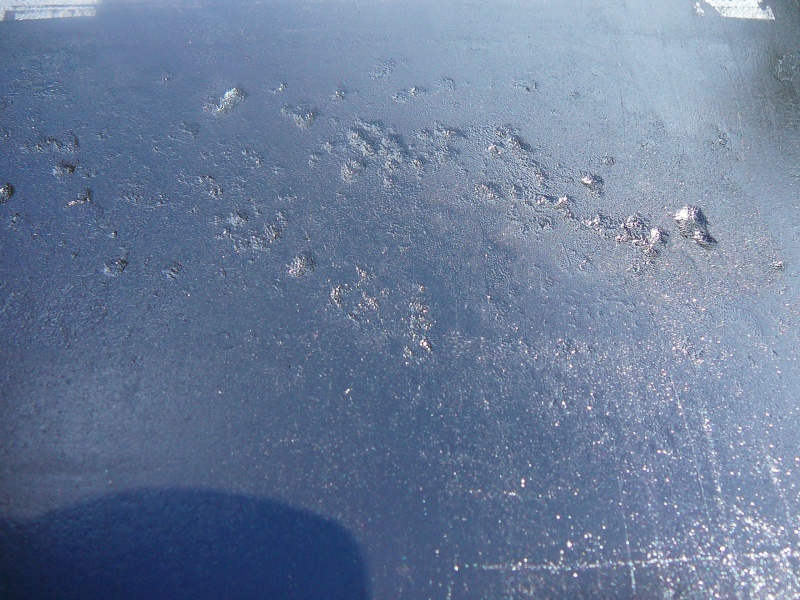
You can spread the Porpatch down super-thin and it covers very well over small pits & imperfections- the pic below is the area that is in the set of pics above just showing bare metal where there were some circular pitted areas. It did good there and on other smaller imperfections.

Somethings I hate about this stuff: It's really very sensitive to moisture/humidity- and if you leave the cans/containers open - the stuff will start to cure in the can. You also have to keep the channel for the lid super clean or you'll end up having to get a can opener- LOL. It's messy and will stain your skin, clothes, etc...and don't get it on anything you don't want it on because it's impossible to get off without sanding it once it dries. Buy small amounts to try & get used to how it reacts before wasting $45-$50/quart and have it go bad. Have enough on hand but this is something you'll want to prep for and think out fully before doing any work with it. Make sure you follow the directions to a fault (especially the surface prep) and have lots of latex gloves around.
77mali- Donating Member
- Street Cred : 62
Re: 1977 Chevelle Malibu Classic Progress Photo's aka Mali
![]() by ant7377 Fri Sep 21, 2012 3:24 pm
by ant7377 Fri Sep 21, 2012 3:24 pm
ant7377- G3GM Addict

- Street Cred : 36
Re: 1977 Chevelle Malibu Classic Progress Photo's aka Mali
![]() by pila Fri Sep 21, 2012 7:35 pm
by pila Fri Sep 21, 2012 7:35 pm
pila- Donating Member
- Street Cred : 43
Re: 1977 Chevelle Malibu Classic Progress Photo's aka Mali
![]() by 77mali Fri Sep 21, 2012 8:28 pm
by 77mali Fri Sep 21, 2012 8:28 pm
I tried the sandwich bag trick- it works. I cut plastic drinking cups to make a "scoop", leaving a handle so I can dunk it in the quart can- transferring it out into throw away containers, thereby leaving the grooves in the can clean. It's good to keep the underside of the lid clean too. I found the key is take out what you need and seal it back up again right away. I keep it in the house and don't even bring the cans outside.
77mali- Donating Member
- Street Cred : 62
Page 12 of 27 • 1 ... 7 ... 11, 12, 13 ... 19 ... 27 ![]()

 Similar topics
» Looking for an In-Dash Tic-tock Tach for my 1977 Chevelle Classic,
» '73 Chevelle coupe progress
G3GM :: Media :: G3 Project Pictures
|
|
|
» Painting Interior Plastic
» Anyone good at photoshop?
» El Camino/Sprint LH Aftermarket Quarter Panel FOR SALE
» 1973 chevelle four speed console
» dashes
» Used OEM Hood 73-77
» 76 Laguna parked in 2002
» Thanks for having me
» 77 elco SS