


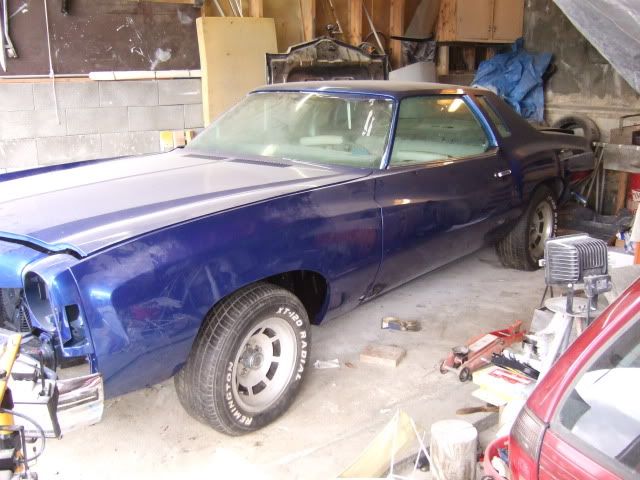
1975 Monte Carlo
G3GM :: Media :: G3 Project Pictures
Page 4 of 11 •  1, 2, 3, 4, 5 ... 9, 10, 11
 ![]()
Re: 1975 Monte Carlo
![]() by The Dude Fri May 20, 2011 9:29 am
by The Dude Fri May 20, 2011 9:29 am

The Dude- Management

- Street Cred : 48
Re: 1975 Monte Carlo
![]() by bigredlaguna Sat May 21, 2011 3:11 am
by bigredlaguna Sat May 21, 2011 3:11 am

bigredlaguna- G3GM Senior Member

- Street Cred : 53
Re: 1975 Monte Carlo
![]() by Biomedtech Sat May 21, 2011 11:14 am
by Biomedtech Sat May 21, 2011 11:14 am
bigredlaguna wrote:Make sure you tighten the lower control arm pivot bolts AFTER you put weight on the wheels. If you tighten them, for instance, before you put the springs in, it is possible to twist the bushing to the point that it will make the car sit higher than it would otherwise.
Hah mini torsion bars!

Biomedtech- G3GM Member

- Street Cred : 5
Re: 1975 Monte Carlo
![]() by Fishgrinder Sun May 22, 2011 5:20 pm
by Fishgrinder Sun May 22, 2011 5:20 pm
bigredlaguna wrote:Make sure you tighten the lower control arm pivot bolts AFTER you put weight on the wheels. If you tighten them, for instance, before you put the springs in, it is possible to twist the bushing to the point that it will make the car sit higher than it would otherwise.
Thanks for the tip bigred. They weren't tightened down on the previous pictures. What I did this weekend was to put the springs in, then put a jack below the lower control arm and jack it up to simulate ride height. Then I tightened the bolts to the recommended torque (all from the manual).
And here are pictures from this weekend:
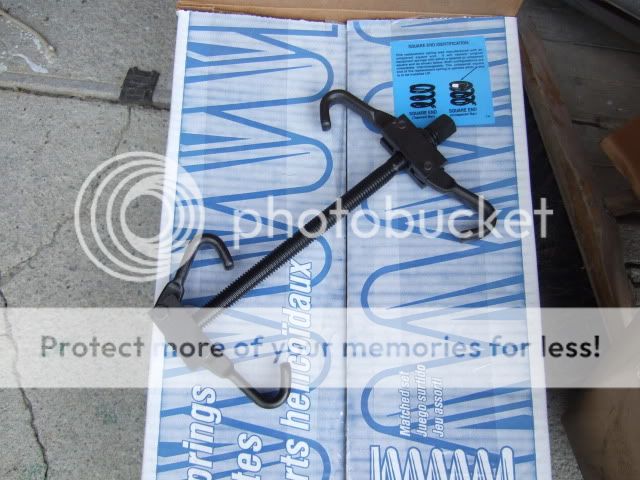
Tool for compressing spring from the inside

For some reason it started slipping when I started on the second spring. So after troubleshooting for an hour or so I had to use a wrench instead of the air-drill.

Here the shock is in as well. The Haynes-book says 100 ft/lb for the top bolt. Is that really the case? I actually twisted of the top part when I put the torque wrench on after tightening with a short ratchet first. Find it hard to believe there was 100 ft/lb in it already.

Another problem. The sway bar seems way to tilted to align up with the end link bushing. I tried to tighten them down to see if they would "morf" in to shape, but the rubber was about to deform. So I just loosened them and checked if it was straighter when the car was on the ground, but no, it still is very tilted. Any tips here?

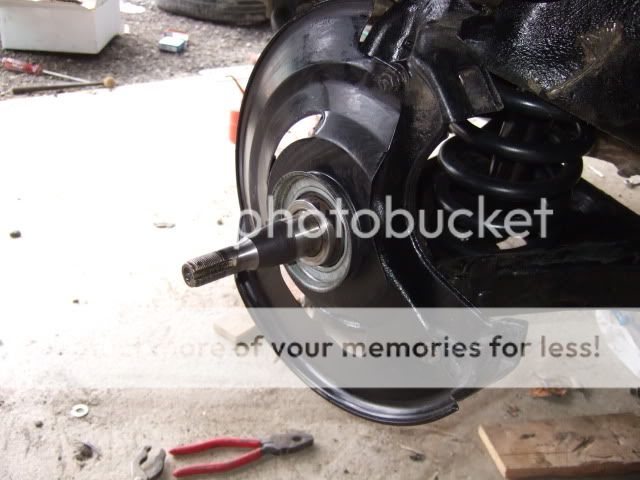
Then I packed and put the wheel bearings in

I used a glove for this (very proud of myself)
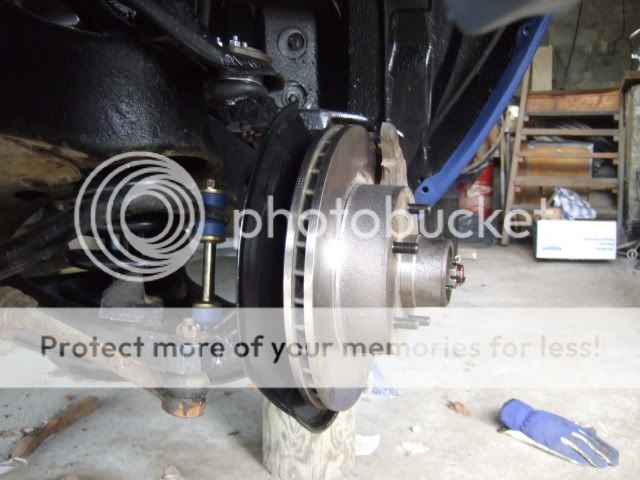
Looks clean!
Rallys on all four for the first time. Height seems to be where I want it.

Fishgrinder- G3GM Member
- Street Cred : 4
abajc3- G3GM Member
- Street Cred : 3
Re: 1975 Monte Carlo
![]() by Limey SE Mon May 23, 2011 4:07 am
by Limey SE Mon May 23, 2011 4:07 am
___________________________________________
1977 Chevelle SE x2
One Mild original
one Wild NON original
Anthony

Limey SE- Management
- Street Cred : 98
Re: 1975 Monte Carlo
![]() by Fishgrinder Mon May 23, 2011 4:51 am
by Fishgrinder Mon May 23, 2011 4:51 am
Here's a picture from before I removed it. Looks identical:

Fishgrinder- G3GM Member
- Street Cred : 4
Re: 1975 Monte Carlo
![]() by 1973 454 MONTE Mon May 23, 2011 7:40 am
by 1973 454 MONTE Mon May 23, 2011 7:40 am
Fishgrinder wrote:
Rallys on all four for the first time. Height seems to be where I want it.
did you use the Napa #'s i sent you? cause it now looks like mine.

1973 454 MONTE- Donating Member

- Street Cred : 36
Re: 1975 Monte Carlo
![]() by Fishgrinder Mon May 23, 2011 8:21 am
by Fishgrinder Mon May 23, 2011 8:21 am
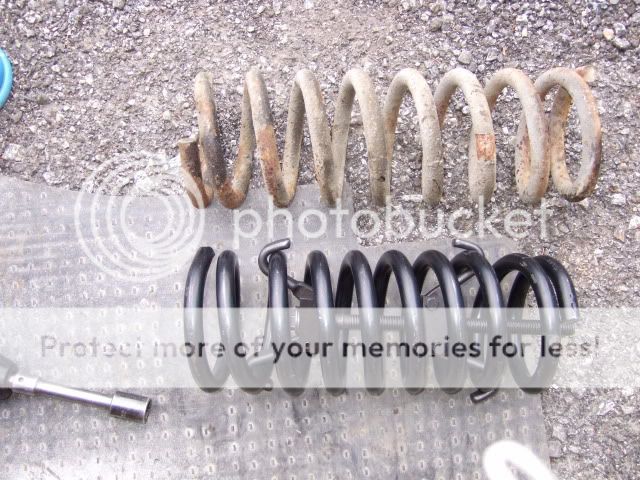
They are not the Napas, as they didn't accept foreign billing adresses. They are stock springs from Summit, for an A/C car. My car doesn't have A/C, so maybe that does the trick togheter with the fresh "stifness"?
Still old springs in the rear.
Fishgrinder- G3GM Member
- Street Cred : 4
Re: 1975 Monte Carlo
![]() by bigredlaguna Mon May 23, 2011 9:43 am
by bigredlaguna Mon May 23, 2011 9:43 am
bigredlaguna- G3GM Senior Member
- Street Cred : 53
Re: 1975 Monte Carlo
![]() by Fishgrinder Mon May 23, 2011 10:03 am
by Fishgrinder Mon May 23, 2011 10:03 am
bigredlaguna wrote:I saw some info on that subject a while back, and as per my memory, the relationship between the bar and the A-arm is supposed to be checked at ride height. The photos you are showing are with an unloaded suspension.
My Haynes book says to jack up the car to remove and install the sway bar. But nothing about lowering it again to tighten the end links. Anyways I checked it when it was on the ground, and the geometry was basicaly unchanged. Are the new springs simpley to stiff?
Strange..
Fishgrinder- G3GM Member
- Street Cred : 4
Re: 1975 Monte Carlo
![]() by bigredlaguna Tue May 24, 2011 1:29 am
by bigredlaguna Tue May 24, 2011 1:29 am
Fishgrinder wrote:bigredlaguna wrote:I saw some info on that subject a while back, and as per my memory, the relationship between the bar and the A-arm is supposed to be checked at ride height. The photos you are showing are with an unloaded suspension.
My Haynes book says to jack up the car to remove and install the sway bar. But nothing about lowering it again to tighten the end links. Anyways I checked it when it was on the ground, and the geometry was basicaly unchanged. Are the new springs simpley to stiff?
Strange..
Nothing to do with installation, just the relationship between the parts once it is at ride height. I'll try to find where I saw that info at.
bigredlaguna- G3GM Senior Member
- Street Cred : 53
Re: 1975 Monte Carlo
![]() by Fishgrinder Tue May 24, 2011 2:35 am
by Fishgrinder Tue May 24, 2011 2:35 am
bigredlaguna wrote:Fishgrinder wrote:bigredlaguna wrote:I saw some info on that subject a while back, and as per my memory, the relationship between the bar and the A-arm is supposed to be checked at ride height. The photos you are showing are with an unloaded suspension.
My Haynes book says to jack up the car to remove and install the sway bar. But nothing about lowering it again to tighten the end links. Anyways I checked it when it was on the ground, and the geometry was basicaly unchanged. Are the new springs simpley to stiff?
Strange..
Nothing to do with installation, just the relationship between the parts once it is at ride height. I'll try to find where I saw that info at.
I'd appreciate that! Thanks Bigred.
Fishgrinder- G3GM Member
- Street Cred : 4
Re: 1975 Monte Carlo
![]() by bigredlaguna Tue May 24, 2011 9:49 am
by bigredlaguna Tue May 24, 2011 9:49 am
"Vehicle must be on level ground or service lift (NOT jacked up, NOT wheels hanging and NOT having the suspension unloaded). Wheels should support the vehicle or lift jacks should support the suspension as if the wheels are supporting it. Make sure stabilizer bar end eyelet (B) is parallel with the control arm (C). Many times they are not. You may be required to use a slightly longer or shorter sleeve length than the original. Measure sleeve length (A) and compare to the chart to find the correct set."
So according to them, the sway bar should be parallel to the A-arm at ride height.
Since the end of the sway bar is curved, you would make an imaginary line from the sway bar centerline @ the bushing to the end where the link attaches. This line is what should match the line of the a-arm at ride height.
If you are reasonably close, you're good to go. If you want to get anal about it, you can use different length spacers on the end link to adjust the relationship between the two.
bigredlaguna- G3GM Senior Member
- Street Cred : 53
Re: 1975 Monte Carlo
![]() by Fishgrinder Wed May 25, 2011 2:06 am
by Fishgrinder Wed May 25, 2011 2:06 am
Fishgrinder- G3GM Member
- Street Cred : 4
Re: 1975 Monte Carlo
![]() by 1973montec Wed May 25, 2011 8:21 pm
by 1973montec Wed May 25, 2011 8:21 pm

1973montec- Donating Member
- Street Cred : 17
Re: 1975 Monte Carlo
![]() by Jedediah Wed May 25, 2011 10:42 pm
by Jedediah Wed May 25, 2011 10:42 pm

Jedediah- G3GM Member
- Street Cred : 4
Re: 1975 Monte Carlo
![]() by 74Malibu383 Thu May 26, 2011 11:45 am
by 74Malibu383 Thu May 26, 2011 11:45 am
If you go with lowering springs, you'll probably have to buy the offset shafts for the upper control arms. Otherwise, you won't have enough shim adjustment.
Personally, if you're going to do all that, I would slap some coil-over's in.
74Malibu383- Donating Member
- Street Cred : 26
Re: 1975 Monte Carlo
![]() by The Dude Thu May 26, 2011 12:04 pm
by The Dude Thu May 26, 2011 12:04 pm
https://www.g3gm.com/t3520-drop-spindles-or-springs
https://www.g3gm.com/t2333-dropping-ideas
https://www.g3gm.com/t3459-is-there-any-suspension-kits-for-our-cars
https://www.g3gm.com/t3533-ride-height-rakes-etc-split-from-impala-rescue
https://www.g3gm.com/t351-2-inch-drop
https://www.g3gm.com/t2578-suspension-design
The Dude- Management
- Street Cred : 48
Jedediah- G3GM Member
- Street Cred : 4
Re: 1975 Monte Carlo
![]() by The Dude Fri May 27, 2011 9:40 am
by The Dude Fri May 27, 2011 9:40 am
The Dude- Management
- Street Cred : 48
Re: 1975 Monte Carlo
![]() by McCauley5983 Sat May 28, 2011 11:35 pm
by McCauley5983 Sat May 28, 2011 11:35 pm

McCauley5983- G3GM Enthusiast

- Street Cred : 14
Re: 1975 Monte Carlo
![]() by bigredlaguna Sun May 29, 2011 12:46 am
by bigredlaguna Sun May 29, 2011 12:46 am
billy-ray wrote:i was thinkin drop spindles might not be a great idea for a "driven car" because when you throw it through a turn i feel like the tires would get less traction because less surface area would be making contact. atleast thats what i believe just a theory
Not necessarily, you would be using the factory settings for alignment and adjusting as if it were original.
With drop springs, the position of the A-arms is different so the alignment would have to be custom specs.
Either way works, I just think that lowering springs takes more planning to get optimal performance because the camber angle is different due to the new position of the arms.
bigredlaguna- G3GM Senior Member
- Street Cred : 53
Re: 1975 Monte Carlo
![]() by McCauley5983 Sun May 29, 2011 11:47 am
by McCauley5983 Sun May 29, 2011 11:47 am
McCauley5983- G3GM Enthusiast
- Street Cred : 14
Re: 1975 Monte Carlo
![]() by Fishgrinder Sat Jun 25, 2011 5:00 pm
by Fishgrinder Sat Jun 25, 2011 5:00 pm
Here's some of the stuff I did this week.

Painted the calipers
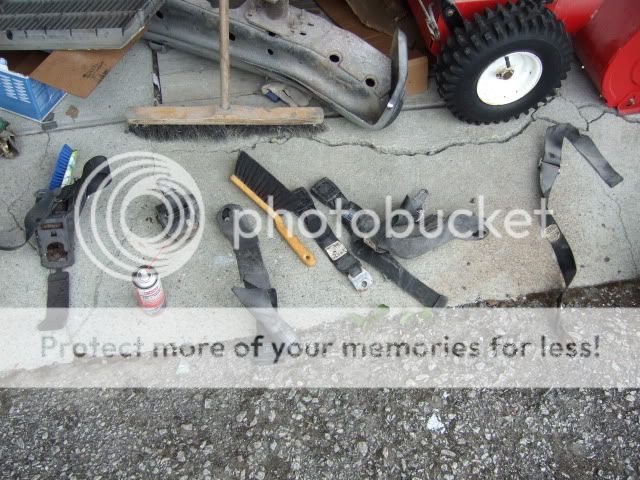
Digged up all the seat belt parts, washed and shined them. I hope the belts are
not fatigued, at least they seem ok.

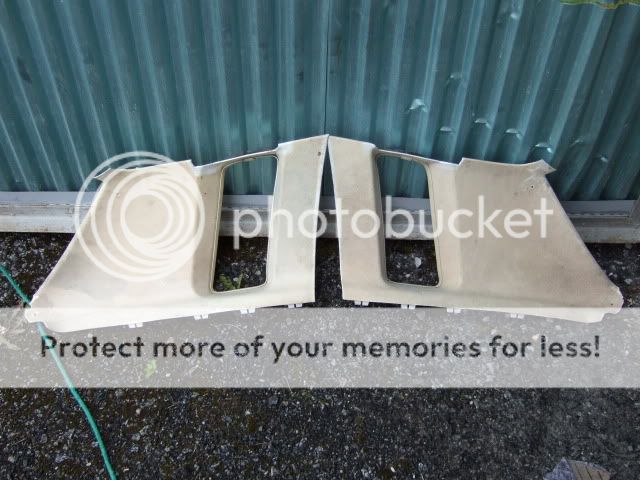
Washed interior panels, and tried to apply some cockpit shine to see if I could
get the color back. That was no go.

So I decided to paint them. I was silly here and used a cheap ordinary spray paint. Although it looks good from a distance, there were lots of runs. I sanded them down again as much as possible and painted them with a vinyl paint.
The result is still questionable, so I'll have to redo some parts of the panels again.
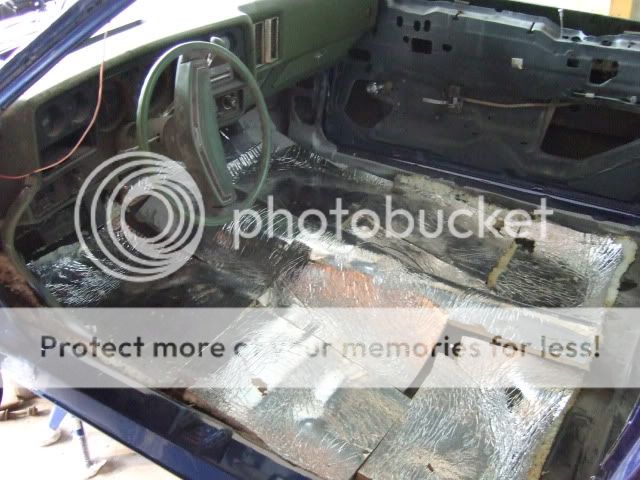
Then I cleaned the whole coupe for sanding dust, to prepare for the new carpet. I actually put in all this insulation just after I bought the car. It's probably one inch thicker than the original, so the carpet fit gets distorted a little. But I hope it provides better sound deadening than from the factory.


New dash cover is also installed, not a perfect fit around the vents next to the glove compartment

Then I started on the brake hoses which probably haven't been replaced in 20 years. Thus they weren't too cooperative. The right side one would unscrew from the coupling after heating it with a burner. However, the hose almost blew up in my face due to expansion from the heat. Luckily it was drained, but that makes you think.

On the left side I cut the hose before heating the coupling. But his wouldn't unscrew even after several rounds with heating, and the coupling head was just getting more and more rounded from my attempts. In the end I cut it close to the line with an hack saw to try to get it trough the retainer bracket. However, after it came off, the parts would separate. Maybe all the vibrations from the sawing did it

And when I was going to put the new hoses on, they turned out to be wrong ones
Well, it's good to see the parts pile getting smaller and smaller for each time now.
Fishgrinder- G3GM Member
- Street Cred : 4
Page 4 of 11 • 1, 2, 3, 4, 5 ... 9, 10, 11 ![]()

 Similar topics
» 1975 Monte Carlo header panel bracket
» 1975 monte Carlo Window trim clips
G3GM :: Media :: G3 Project Pictures
|
|
|
» Q-Jet Tuning
» PARTS NEED TO GO FOR OUR MOVE I DONT WANNA TAKE WITH
» Need driver side bucket seat 73 Laguna
» Laguna NOSE
» Virtual Ink from this weekend
» 1973 Chevelle SS Station Wagon
» Elcofest 2023
» Wanted drip rails for 1975 four-door Chevelle Malibu-Thanks!
» Parts please