


Hawk03 Redo
G3GM :: Media :: G3 Project Pictures
Page 6 of 7 •  1, 2, 3, 4, 5, 6, 7
 ![]()
Re: Hawk03 Redo
![]() by Hawk03 Sun Sep 08, 2019 2:42 pm
by Hawk03 Sun Sep 08, 2019 2:42 pm
thatfnthing wrote:Man, that car looks good! Nice work!
The white panels and seats make a great contrast, but making sure they stay white would keep me awake at night.
Thanks! There's plenty of ways to clean the white if it gets dirty. Everything but the seats are painted so if its too bad, I can just touch it up
g3chevy - I finally installed the tilt column! The hybrid shaft was the key and it works great. There is one issue though. There is a squeak in the lower part of the column when turning. It sounds like a bad bushing type squeal, so I'm guessing something needs to be greased. There is a slight grind feeling too. Any ideas?


Hawk03- G3GM Enthusiast

- Street Cred : 18
Re: Hawk03 Redo
![]() by g3chevy / Mr Pontiac Sun Sep 08, 2019 10:35 pm
by g3chevy / Mr Pontiac Sun Sep 08, 2019 10:35 pm

g3chevy / Mr Pontiac- Donating Member

- Street Cred : 35
Re: Hawk03 Redo
![]() by testpilot61 Sat Sep 14, 2019 10:02 am
by testpilot61 Sat Sep 14, 2019 10:02 am
Thanks,
Jerry Harman
testpilot61
testpilot61- Donating Member
- Street Cred : 3
Re: Hawk03 Redo
![]() by Hawk03 Sun Sep 15, 2019 6:49 pm
by Hawk03 Sun Sep 15, 2019 6:49 pm
g3chevy wrote:I think on 76 and 77 model steering columns they used a plastic retainer and bushing setup. If I remember correctly this was a 75 column so it may have actual ball bearings and a metal race and bushing assembly. With it installed you can spray it clean with a can of brake cleaner and if you have a needle attachment for your grease gun you can inject grease back into the bearings and it should operate smoothly. You can do the same with the newer style plastic bushing as well. Another option is to remove the intermediate shaft and remove the bearing/bushing assembly from the end of the steering column while still installed in the vehicle then clean and grease it on the bench. Hope this helps. If you have any issues after that send me a PM and I'll give you my cell and we can figure out either way.
Thanks! That helps and it does feel like ball bearings. I will have to dig into it in a few weeks.
testpilot61 wrote:What gages did you install? They look great. Were you able to use the existing holes in the dash for your gages?
Thanks,
Jerry Harman
testpilot61
Thank you! I have Autometer electric fuel, volts, temp and oil pressure gauges. The speedo and tach are factory with a white overlay. I had to widen the holes in the bezel to make the gauges fit. I also had to cut the gauge bracket to make it fit. I made my own wiring harness too.


Hawk03- G3GM Enthusiast
- Street Cred : 18
Re: Hawk03 Redo
![]() by Hawk03 Sun Oct 20, 2019 9:06 pm
by Hawk03 Sun Oct 20, 2019 9:06 pm


Hawk03- G3GM Enthusiast
- Street Cred : 18

thatfnthing- Donating Member
- Street Cred : 65
impalamonte- G3GM Enthusiast
- Street Cred : 18
g3chevy / Mr Pontiac- Donating Member
- Street Cred : 35
Re: Hawk03 Redo
![]() by Hawk03 Sat May 16, 2020 10:27 am
by Hawk03 Sat May 16, 2020 10:27 am
Installed a couple of fuse panels, one switched and one with power all the time. Link to process is here: https://www.g3gm.com/t12091-additional-fuse-panel
Installed them in the passenger side kick panel.

Since I had the additional fuse panels, I could start adding some add ons. I installed an alarm system with power door locks with the remote. I also added a power and remote trunk release. I installed door looms on each side to run the wires. https://www.g3gm.com/t12574-door-jamb-boot-install


I added DRL lights to the front parking lights. When the key is turned to IGN, the lights are white, when the parking/head lights are activated, the lights are amber and flash amber when the turn signal is activated. thatfnthing deserves the credit for figuring out and diagramming the wiring schematics, as well as putting up with my questions and miscues during the process. It included adding relays and flasher for each side and cutting into the factory wiring. Below are the relays and flashers, which I installed above the drivers side kick panel.

I added some aluminum tape to the parking light housing and made clear lenses.

I didn't realize the housings were different between years. I think my front bumper is a 74 or 75 and my original bumper was a 77. The 77 housing is on the right.

The lights function like I want them to although I will be switching out the lights for more of a light bar type DRL that is found on newer cars. The current white lights are not as bright as I was hoping.


I decided it was time to install my new/used dash pad. I had to repair a crack in the pad and paint the dash firethorn red and then paint the lower part to freshen the color. (pictures of dash repair and paint are on a different page, repair is here https://www.g3gm.com/t11862-dash-pad-repair)


Added some 4x6 speakers to the dash bracket.


I greased the steering column bearings which were really dry. Should help with the grind when turning the car.

This is how it currently sits. I'm just waiting on some warmer/non-rainy weather to paint the lower ducts and I should be able to button it up. I painted the vents black, which I think gives the dash a cleaner look.


I'm also in process of adding a new package tray and adding a white piece of vinyl under the rear window. I will be removing the tint as well since its really old. At some point I will have more installed but that won't be until the pandemic is over and things are back to normal.
I'm going to apply some vinyl to the cardboard package tray and paint to match the dash.


I have a few random things to work on and finish as well so I'll hopefully have things finished soon.
Last edited by Hawk03 on Sat May 16, 2020 1:23 pm; edited 1 time in total
Hawk03- G3GM Enthusiast
- Street Cred : 18
Re: Hawk03 Redo
![]() by g3chevy / Mr Pontiac Sat May 16, 2020 12:04 pm
by g3chevy / Mr Pontiac Sat May 16, 2020 12:04 pm
g3chevy / Mr Pontiac- Donating Member
- Street Cred : 35
Re: Hawk03 Redo
![]() by Hawk03 Sat May 16, 2020 1:25 pm
by Hawk03 Sat May 16, 2020 1:25 pm
g3chevy wrote:Great info Hawk! But it looks like several of your pictures are not showing up in the post. Its just showing the link. I also tried viewing in another browser and got the same results.
Thanks! I tried linking the pictures from my Google account but that didn't work. Thanks for the info on the bearing, as you can see it was completely dry.
Hawk03- G3GM Enthusiast
- Street Cred : 18
Re: Hawk03 Redo
![]() by g3chevy / Mr Pontiac Sat May 16, 2020 4:48 pm
by g3chevy / Mr Pontiac Sat May 16, 2020 4:48 pm
g3chevy / Mr Pontiac- Donating Member
- Street Cred : 35
Re: Hawk03 Redo
![]() by Hawk03 Sat May 16, 2020 6:36 pm
by Hawk03 Sat May 16, 2020 6:36 pm
g3chevy wrote:Oh dang! That is bone dry. Were you able to grease it and make it rotate smoothly?
Yes I did. I used an angled pick tool to pack the grease down through the bearing. It took a lot of grease and time to pack it down but its better now. I compared the noise and rotation to my old column (I had them side by side) and its a little louder, probably due to one using the bearing vs rubber bushing, but I won't how good it is until I drive it.
Hawk03- G3GM Enthusiast
- Street Cred : 18
Re: Hawk03 Redo
![]() by thatfnthing Sun May 17, 2020 2:05 pm
by thatfnthing Sun May 17, 2020 2:05 pm
Hawk03 wrote:I added DRL lights to the front parking lights. When the key is turned to IGN, the lights are white, when the parking/head lights are activated, the lights are amber and flash amber when the turn signal is activated. thatfnthing deserves the credit for figuring out and diagramming the wiring schematics, as well as putting up with my questions and miscues during the process.
I am always happy to help, but I just kind of got you started and then just kibitzed a bit. You did all the heavy lifting, and did a fine job of it!

thatfnthing- Donating Member
- Street Cred : 65
Re: Hawk03 Redo
![]() by impalamonte Wed May 20, 2020 12:24 pm
by impalamonte Wed May 20, 2020 12:24 pm
thatfhthing ....has helped me on more than several occasions with wiring too. He knows his stuff !!
impalamonte- G3GM Enthusiast
- Street Cred : 18
Re: Hawk03 Redo
![]() by Hawk03 Wed May 20, 2020 7:31 pm
by Hawk03 Wed May 20, 2020 7:31 pm
impalamonte wrote:Hawk....great work! You have been putting in some time on the project !!
thatfhthing ....has helped me on more than several occasions with wiring too. He knows his stuff !!
Thanks guys! I'm glad we have specialists here to help on projects. I would have never been able to figure out the DRLs or the fuse panel on my own.
This pandemic is allowing me a lot of time to work on projects I've been trying to get to for the past few years. I do one thing then go down a rabbit hole to finish another few other things. I'm just glad I bought everything I needed over the past couple of years so its on hand. I need it to stop raining and warm up so I can start painting things so I can reinstall them.
Hawk03- G3GM Enthusiast
- Street Cred : 18
Re: Hawk03 Redo
![]() by g3chevy / Mr Pontiac Wed May 20, 2020 10:20 pm
by g3chevy / Mr Pontiac Wed May 20, 2020 10:20 pm
g3chevy / Mr Pontiac- Donating Member
- Street Cred : 35
Re: Hawk03 Redo
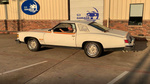
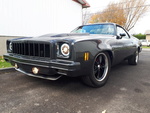
![]() by Hawk03 Tue May 26, 2020 7:24 pm
by Hawk03 Tue May 26, 2020 7:24 pm
Before

Updated

Hawk03- G3GM Enthusiast
- Street Cred : 18
tropdeprojet- Donating Member
- Street Cred : 5
Re: Hawk03 Redo
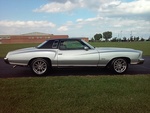
![]() by Hawk03 Sun Jun 14, 2020 9:34 am
by Hawk03 Sun Jun 14, 2020 9:34 am
New dash is in and looks great, especially in the sun.
The trunk was filthy so I cleaned it, painted the whole thing with Eastwood rust encapsulator and carpeted it. I'm glad I don't have to crawl in the trunk again and deal with carpet installs, that's not a fun process. My body is still feeling the effects. I also finished the package tray, installed new rear speakers and painted the speaker grills to match the package tray. I also painted a piece of vinyl the same color as the panels and glued it to the metal strip under the rear window. I painted the rear seat to match the panel colors. I think the interior turned out pretty good. Not sure if I mentioned this before but my front seat belts are from a third gen camaro and the buckles are from a 2002 Cavalier.
I also installed a new headunit and sound system. The headunit has the capability to connect your phone and run Android Auto which gives me the ability to have GPS which also allows me to know my speed using Waze. I can control my apps using the touch screen or by using voice control. I installed a USB port in the console which is connected to the headunit. I installed a backup camera on the bottom of the rear bumper, which I can turn on at anytime and the headunit screen will switch to the rear camera view when I select reverse.


The steering column is quiet and smooth!g3chevy wrote:Oh dang! That is bone dry. Were you able to grease it and make it rotate smoothly?
Hawk03- G3GM Enthusiast
- Street Cred : 18
Re: Hawk03 Redo
![]() by Hawk03 Mon Oct 26, 2020 1:43 pm
by Hawk03 Mon Oct 26, 2020 1:43 pm


Hawk03- G3GM Enthusiast
- Street Cred : 18
Limey SE likes this post
Re: Hawk03 Redo
![]() by Limey SE Tue Oct 27, 2020 8:01 am
by Limey SE Tue Oct 27, 2020 8:01 am
___________________________________________
1977 Chevelle SE x2
One Mild original
one Wild NON original
Anthony

Limey SE- Management

- Street Cred : 98
Re: Hawk03 Redo
![]() by Hawk03 Tue Oct 27, 2020 8:55 am
by Hawk03 Tue Oct 27, 2020 8:55 am
Limey SE wrote:Looking great Hawk
Thanks Limey!
I took the car to Cars and Coffee this past weekend and received some compliments. Unfortunately, there are not a lot of older vehicles at our Cars and Coffee events so there are not a lot of people that are interested in "classics." Its kind of a bummer but thats the way it goes.
Hawk03- G3GM Enthusiast
- Street Cred : 18
Re: Hawk03 Redo
![]() by Limey SE Tue Oct 27, 2020 9:35 pm
by Limey SE Tue Oct 27, 2020 9:35 pm
___________________________________________
1977 Chevelle SE x2
One Mild original
one Wild NON original
Anthony
Limey SE- Management
- Street Cred : 98
Re: Hawk03 Redo
![]() by Hawk03 Fri Jun 25, 2021 10:52 pm
by Hawk03 Fri Jun 25, 2021 10:52 pm

Hawk03- G3GM Enthusiast
- Street Cred : 18
Page 6 of 7 • 1, 2, 3, 4, 5, 6, 7 ![]()


G3GM :: Media :: G3 Project Pictures
|
|
|
» Rusty's progress Carpet Chevk now onto floor replacement
» PARTS NEED TO GO FOR OUR MOVE I DONT WANNA TAKE WITH
» Need driver side bucket seat 73 Laguna
» Laguna NOSE
» Virtual Ink from this weekend
» 1973 Chevelle SS Station Wagon
» Elcofest 2023
» Wanted drip rails for 1975 four-door Chevelle Malibu-Thanks!
» Parts please