


Interior removal / update.
Page 4 of 5 •  1, 2, 3, 4, 5
 ![]()
Re: Interior removal / update.
![]() by Dinomyte Fri May 08, 2015 8:22 am
by Dinomyte Fri May 08, 2015 8:22 am
I'm unable to figure out how to get the trim of the seat upholstery cover off so I can remove the hard plastic shell that is held on with "two screws" as somebody mentioned. I keep feeling like I'm going to break something if I pry too hard. Can anyone offer some advice.
thanks
Dinomyte- Donating Member

- Street Cred : 11
Re: Interior removal / update.
![]() by Mcarlo77 Fri May 08, 2015 9:05 am
by Mcarlo77 Fri May 08, 2015 9:05 am
Mcarlo77- Donating Member
- Street Cred : 77
Re: Interior removal / update.
![]() by Dinomyte Thu May 21, 2015 9:40 pm
by Dinomyte Thu May 21, 2015 9:40 pm
Thanks to Mcarlo77 got my console in and looking good.
Sorting out the shifter next and then everything goes back in. Hopefully in time for
2015 Fleetwood Country Cruize-In I believe it's billed as the biggest outdoor show in North America. Anybody comeing?
Dinomyte- Donating Member
- Street Cred : 11
Re: Interior removal / update.
![]() by Mcarlo77 Thu May 21, 2015 10:57 pm
by Mcarlo77 Thu May 21, 2015 10:57 pm
I've been working with JB Weld using it like Bondo filling moon craters in my trunk pan. I think it would do the job for you, but it takes more work to sand and feather it into the surrounding area. You're going to end up with a smooth surface wherever you use it, so why not just sand and feather the spots without it?
Mcarlo77- Donating Member
- Street Cred : 77
Re: Interior removal / update.
![]() by dynchel Thu May 21, 2015 11:14 pm
by dynchel Thu May 21, 2015 11:14 pm

dynchel- Donating Member
- Street Cred : 40
Re: Interior removal / update.
![]() by Wallyuph Fri May 22, 2015 7:25 am
by Wallyuph Fri May 22, 2015 7:25 am

Wallyuph- Donating Member
- Street Cred : 31
Re: Interior removal / update.
![]() by Dinomyte Fri May 22, 2015 8:07 am
by Dinomyte Fri May 22, 2015 8:07 am
So the plan is,
1.sand off all the loose like stuff, already done as I tried to feather in some of the smaller ones and it was working.
2. JBweld to fill the larger gouges as some are fairly deep, and sand them smooth
3. rock guard then paint.
I'll let you know how it works out. . .
Dinomyte- Donating Member
- Street Cred : 11
Re: Interior removal / update.
![]() by Wallyuph Sat May 23, 2015 8:53 am
by Wallyuph Sat May 23, 2015 8:53 am
Wallyuph- Donating Member
- Street Cred : 31
Re: Interior removal / update.
![]() by Dinomyte Sun May 24, 2015 8:14 am
by Dinomyte Sun May 24, 2015 8:14 am
Thanks
Dinomyte- Donating Member
- Street Cred : 11
Re: Interior removal / update.
![]() by Wallyuph Sun May 24, 2015 11:22 am
by Wallyuph Sun May 24, 2015 11:22 am
Let me know how it turns out. You may want to take some before during and after shots for everyone.Dinomyte wrote:Wally - you are the man! Two part flexible bumper repair worked like a charm on the bases of the swivels, so today the backs get that treatment.
Thanks
Wallyuph- Donating Member
- Street Cred : 31
Re: Interior removal / update.
![]() by Dinomyte Sun May 31, 2015 10:00 am
by Dinomyte Sun May 31, 2015 10:00 am
Next day I applied paint, now I'd forgotten that rocker guard really sucks up paint, and as such I've put 7 or 8 coats on and still looks like it needs more. I took pictures but they don't show what you can see with out a flash going off. It looks like I've got light and dark patches. The texture feels right but looks like I've done a poor job or painting. I'm wondering if it's because of the light colours as opposed to black?
Dinomyte- Donating Member
- Street Cred : 11
Re: Interior removal / update.
![]() by Wallyuph Sun May 31, 2015 8:30 pm
by Wallyuph Sun May 31, 2015 8:30 pm
Wallyuph- Donating Member
- Street Cred : 31
Re: Interior removal / update.
![]() by Dinomyte Sun May 31, 2015 11:49 pm
by Dinomyte Sun May 31, 2015 11:49 pm
Wallyuph wrote:I have used 3M clear brand of rock guard and it the paint covered in two coats. I used SEM paint
Used SEM paint too, and not sure of the brand of rock guard but it was white as opposed to clear.
I'm tempted to sand and start over again with out the rock guard, but really want to make it Saturdays Cruize-In.
On a related note here.
Interior pieces get installed in the following order. Yes I've had to remove and reinstall a number of pieces today to get it right.
0 - the fixed piece between the rear window and the parcel tray.
1 - head liner
2 - the panels at the side of the back seat, assemble the two pieces together then install the panel with a single screw, repeat for the other side.
3 - the panel between head liner and rear window. This is the one with the really long panel plug, which is for guidance.
4 - sail panels, left and right. (don't put the parcel tray in before this, you'll never get them in)
5 - piece on the A pillar - with a single screw
6 - piece above the door - clips and a screw
7 - piece between the front window and the head liner
8 - the rear parcel tray, don't forget the two pieces of sponge, they stop a lot of rattling.
9 - rear seat back, installing two outside seat belts to hold it in place,
That's as far as I got today, I'll edit this later but I'm sure it's carpet, console, inner belts, seats, outer belts, rear seat back, door sills,
The doors are bottom half then top half, install the arm rest if you removed it before the lower panel.
Dinomyte- Donating Member
- Street Cred : 11
Re: Interior removal / update.
![]() by Mcarlo77 Mon Jun 01, 2015 7:43 pm
by Mcarlo77 Mon Jun 01, 2015 7:43 pm
Mcarlo77- Donating Member
- Street Cred : 77
Re: Interior removal / update.
![]() by Dinomyte Mon Jun 01, 2015 9:24 pm
by Dinomyte Mon Jun 01, 2015 9:24 pm
Now for progress on the seat backs. I sanded them down a little, just enough to scuff things with 220 paper, and primed them when I got home from work, got two coats of paint on them after dinner, they are looking better already, but wet paint is always deceiving.
Dinomyte- Donating Member
- Street Cred : 11
Re: Interior removal / update.
![]() by Dinomyte Sun Jun 07, 2015 2:33 pm
by Dinomyte Sun Jun 07, 2015 2:33 pm
I'll post pictures once the carpet issue is solved. Got a ACC carpet through NOS Reproductions here in London, and it's too narrow, by 3/4" on each side
Dinomyte- Donating Member
- Street Cred : 11
Re: Interior removal / update.
![]() by Roadcaptain S3 Sun Jun 07, 2015 9:05 pm
by Roadcaptain S3 Sun Jun 07, 2015 9:05 pm

Roadcaptain S3- Donating Member
- Street Cred : 26
Re: Interior removal / update.
![]() by Dinomyte Mon Jun 08, 2015 7:07 am
by Dinomyte Mon Jun 08, 2015 7:07 am
Roadcaptain S3 wrote:What kind of seat belts are you using?
I've got a correct set of swivel bucket seat belts, got them from Mcarlo77. They have a floor and a roof mounted re-tractor, the roof one goes in the same place, the floor one needed a new mount but I've got that mount in the wrong place. (My car had a bench seat in it that was removed) None of the other mount points where / are in the floor pan.
Dinomyte- Donating Member
- Street Cred : 11
Re: Interior removal / update.
![]() by Roadcaptain S3 Mon Jun 08, 2015 8:29 am
by Roadcaptain S3 Mon Jun 08, 2015 8:29 am
I would either have had to drill holes in the floor, fab a bracket or do what I did, which was use belts from a later model car.
https://www.g3gm.com/t9028p60-roadcaptain-s-77-build-thread?highlight=roadcaptains+build
The bummer is that some of the earlier cars had 2 separate mounting points for
bench and/or swivel belts. But my 77 only had one.
Roadcaptain S3- Donating Member
- Street Cred : 26
Re: Interior removal / update.
![]() by Mcarlo77 Mon Jun 08, 2015 9:23 am
by Mcarlo77 Mon Jun 08, 2015 9:23 am
Mcarlo77- Donating Member
- Street Cred : 77
Re: Interior removal / update.
![]() by Dinomyte Mon Jun 08, 2015 10:18 am
by Dinomyte Mon Jun 08, 2015 10:18 am
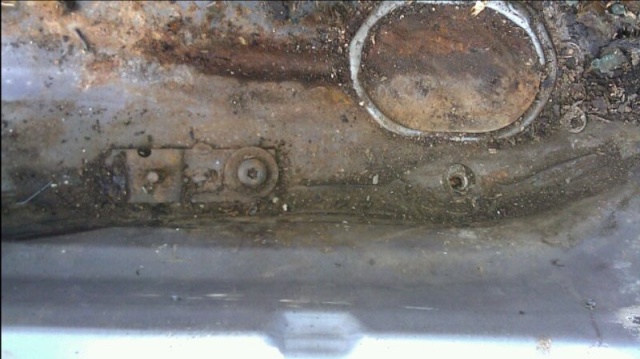
Mcarlo77 wrote:Dino...here is the best pic I have showing the relationship of rear outer swivel bucket seat mount (5" lg brkt) to seat belt mount (the empty hole to the right or behind it). This is the driver side. Notice the seat belt hole is just about centered to the oval floor pan access plate (wth is the purpose of that plate, anyway...drainage?). Using measurements from the photo, I'd say about 8 3/4" ctr-to-ctr from seat mount stud to seat belt hole. Wished I'd known you needed these dimensions as I could have taken them this past weekend when I was out cutting some brackets from a swivel bucket car. If this info doesn't help, let me know and I'll get you actual measurements next time I'm out there.
Thanks Steve - just to make sure I've got this right this time.
From LEFT to RIGHT in the picture we have
1 - the stud for the rear outward seat mount
2 - the Torx bolt that holds the bracket into the mount point for the bench re-tractor / rear outward foot.
3 - the mounting point for swivel bucket re-tractor
4 - something that looks like another mount point but might not be anything.
If this is right I know what i did wrong. I thought the bracket was for the re-tractor, and bolted under the rear outward foot of the seat.
BTW - the "floor pan access plate" aka drain hole serves the purpose of allowing any sort of fluid to drain out during production, and also a place for any fluid to collect and rust out the plug rather than the floor pan, then you can replace the plug, at least that's what I've been told.
Dinomyte- Donating Member
- Street Cred : 11
Re: Interior removal / update.
![]() by Mcarlo77 Mon Jun 08, 2015 1:21 pm
by Mcarlo77 Mon Jun 08, 2015 1:21 pm
#2) Correct
#3) Correct
#4) Nothing there
Mcarlo77- Donating Member
- Street Cred : 77
Re: Interior removal / update.
![]() by Dinomyte Sun Jun 14, 2015 9:44 am
by Dinomyte Sun Jun 14, 2015 9:44 am
Next on the list is to get the console shifter in and fix the rug at the same time.
I was looking at all sorts of stuff for the floor shifter I just can't find information on the gear indicator. I've got a column shift car that's being converted to floor shift. I've got a tilt column (but not ready to go in) is the indicator connected the same way for floor and column? Am I looking for information I don't need?
thanks
Dinomyte- Donating Member
- Street Cred : 11
Re: Interior removal / update.
![]() by dynchel Sun Jun 14, 2015 10:15 am
by dynchel Sun Jun 14, 2015 10:15 am
dynchel- Donating Member
- Street Cred : 40
Re: Interior removal / update.
![]() by Mcarlo77 Sun Jun 14, 2015 2:10 pm
by Mcarlo77 Sun Jun 14, 2015 2:10 pm
Mcarlo77- Donating Member
- Street Cred : 77
Page 4 of 5 • 1, 2, 3, 4, 5 ![]()


|
|
|
» Q-Jet Tuning
» PARTS NEED TO GO FOR OUR MOVE I DONT WANNA TAKE WITH
» Need driver side bucket seat 73 Laguna
» Laguna NOSE
» Virtual Ink from this weekend
» 1973 Chevelle SS Station Wagon
» Elcofest 2023
» Wanted drip rails for 1975 four-door Chevelle Malibu-Thanks!
» Parts please