


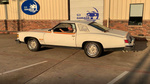
75 el camino project.
G3GM :: Media :: G3 Project Pictures
Page 6 of 11 •  1, 2, 3 ... 5, 6, 7 ... 9, 10, 11
 ![]()


riddick75- G3GM Member

- Street Cred : 6

thatfnthing- Donating Member

- Street Cred : 65
Re: 75 el camino project.
![]() by g3chevy / Mr Pontiac Mon Dec 23, 2019 12:32 pm
by g3chevy / Mr Pontiac Mon Dec 23, 2019 12:32 pm
g3chevy / Mr Pontiac- Donating Member
- Street Cred : 35
Re: 75 el camino project.
![]() by tropdeprojet Mon Dec 23, 2019 4:00 pm
by tropdeprojet Mon Dec 23, 2019 4:00 pm
Love the dash process.
tropdeprojet- Donating Member
- Street Cred : 5
Re: 75 el camino project.
![]() by Limey SE Mon Dec 23, 2019 6:18 pm
by Limey SE Mon Dec 23, 2019 6:18 pm
g3chevy wrote:You are getting close! Looks awesome! So how did your dash turn out?
TIMES 2 Look's great and these warm Temps sure is Helping progress I would say Brother 50's till weekend WHAAAAAAAA
___________________________________________
1977 Chevelle SE x2
One Mild original
one Wild NON original
Anthony

Limey SE- Management

- Street Cred : 98
Re: 75 el camino project.
![]() by riddick75 Mon Dec 23, 2019 10:15 pm
by riddick75 Mon Dec 23, 2019 10:15 pm
riddick75- G3GM Member
- Street Cred : 6
Re: 75 el camino project.
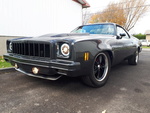
![]() by riddick75 Mon Dec 23, 2019 10:20 pm
by riddick75 Mon Dec 23, 2019 10:20 pm

front bumper installed


side mirrors installed

rear marker lights installed completing the whole back end, also have the gas tank and the air shocks installed

back wall with jacks and stuff installed

rear window back in
riddick75- G3GM Member
- Street Cred : 6
Re: 75 el camino project.
![]() by riddick75 Sat Dec 28, 2019 5:41 pm
by riddick75 Sat Dec 28, 2019 5:41 pm

is there a seal between the chrome trim to body? I know there is one between the window gasket track and chrome but I cleaned the chrome too good I can't tell if there was anything. and also does anyone know if there is any kind of sealant on the A-pillar pinch weld cover.
riddick75- G3GM Member
- Street Cred : 6
Re: 75 el camino project.
![]() by riddick75 Sat Dec 28, 2019 6:07 pm
by riddick75 Sat Dec 28, 2019 6:07 pm
riddick75- G3GM Member
- Street Cred : 6
Re: 75 el camino project.
![]() by g3chevy / Mr Pontiac Sat Dec 28, 2019 11:34 pm
by g3chevy / Mr Pontiac Sat Dec 28, 2019 11:34 pm
https://www.ebay.com/itm/1964-77-GM-Roof-Rail-Side-Window-Channel-to-Body-Weatherstrip-Seal-14-Hardtop/201033833139?ssPageName=STRK%3AMEBIDX%3AIT&_trksid=p2060353.m1438.l2649

g3chevy / Mr Pontiac- Donating Member
- Street Cred : 35
Re: 75 el camino project.
![]() by Joe73 Sun Dec 29, 2019 7:43 am
by Joe73 Sun Dec 29, 2019 7:43 am
riddick75 wrote:and also if anyone knows what or where to get the plastic that protects the glass from the touching edge of the trim around the front and rear window like an anti squeak or scratch guard
That plastic you mention is part of the window trim itself. Its not really needed but it did come from the factory. I dont think it was an anti-squeak but more of not allowing dirt to get under the trim that easily. Very thin, black plastic thats on the bottom side of factory trim.
All my original trim has it. I'd grab a pic but my trim is currently all tucked away. I wouldnt be concerned using the trim without it especially if the car is garage kept. Most cars I see dont have it or its broken off.

Joe73- Donating Member
- Street Cred : 83
Re: 75 el camino project.
![]() by riddick75 Sun Dec 29, 2019 12:06 pm
by riddick75 Sun Dec 29, 2019 12:06 pm
Joe73 wrote:
That plastic you mention is part of the window trim itself. Its not really needed but it did come from the factory. I dont think it was an anti-squeak but more of not allowing dirt to get under the trim that easily. Very thin, black plastic thats on the bottom side of factory trim.
All my original trim has it. I'd grab a pic but my trim is currently all tucked away. I wouldnt be concerned using the trim without it especially if the car is garage kept. Most cars I see dont have it or its broken off.
most of my trim has it but its really brittle and broken off in spots, and the top one has like 4 2inch sections of it spaced out, making me think it was protecting the glass from the aluminum from making noise or scratching it, Ill get pictures of it today but that is exactly what I was talking about.
g3chevy wrote:Here is the stuff you need under your drip rails. Its not like what the factory used but it will work. Not sure what you mean "plastic that protects the glass from the touching edge of the trim around the front and rear window". Do you have a pic?
I ended up using truck cap seal and trimmed it where needed, seems to work pretty well.
riddick75- G3GM Member
- Street Cred : 6


riddick75- G3GM Member
- Street Cred : 6
Re: 75 el camino project.
![]() by riddick75 Tue Dec 31, 2019 4:47 pm
by riddick75 Tue Dec 31, 2019 4:47 pm


riddick75- G3GM Member
- Street Cred : 6
Re: 75 el camino project.
![]() by riddick75 Thu Mar 12, 2020 8:36 pm
by riddick75 Thu Mar 12, 2020 8:36 pm


and where the wire shield goes. someone said one side mount to the starter its self, Im guessing the lug with 2 nuts on it on the back of the motor casing itself, just not sure where the other end goes,

riddick75- G3GM Member
- Street Cred : 6
Re: 75 el camino project.
![]() by Joe73 Fri Mar 13, 2020 5:59 am
by Joe73 Fri Mar 13, 2020 5:59 am
Joe73- Donating Member
- Street Cred : 83
Re: 75 el camino project.
![]() by thatfnthing Sun Mar 15, 2020 6:05 pm
by thatfnthing Sun Mar 15, 2020 6:05 pm
riddick75 wrote:...one is a power wire that junctions with the alternator power wire and has a fusible link on it,
That'll be the main feed back to the horn relay -- it's the primary feed for every circuit in the car. From there it will branch out to everything else. Hence the connection from the alternator, as the alternator actually powers all that when the car is running.
riddick75 wrote: the other is either black, brown, or maybe even purple (i'm color blind, combined with 50 plus years of dirt and grime) and has like a plastic nub on it by the eyelet.
As Joe mentioned, that wire is actually purple and is the starter feed from the key to start the car.
thatfnthing- Donating Member
- Street Cred : 65
Re: 75 el camino project.
![]() by riddick75 Mon Mar 16, 2020 5:34 pm
by riddick75 Mon Mar 16, 2020 5:34 pm


next onto figure the rest of the wiring, mostly the choke wire and rebuilding the carb.
riddick75- G3GM Member
- Street Cred : 6
Re: 75 el camino project.
![]() by riddick75 Fri Mar 27, 2020 7:32 pm
by riddick75 Fri Mar 27, 2020 7:32 pm

got the bracket under the dash figured out

still a few wires I gotta get figured out where they go, like what connects to the right rear marker that goes up from the passenger side. none of the connectors match up. and a few more that I have no idea
this one, brown wire kinda reaches under the air box with a clip to keep it up somewhere

this one is a weird female spade type with a black wire that has another black wire that seemed to connect to make it longer but still no idea

and this one is like a pink and brown connected on one terminal and seems like it might go to the neutral safety switch

also got the passenger door panel on but the back edge seems like there is a huge gap between it and the door. but the top looks like it lines up perfectly.


riddick75- G3GM Member
- Street Cred : 6
Re: 75 el camino project.
![]() by thatfnthing Sat Mar 28, 2020 12:59 pm
by thatfnthing Sat Mar 28, 2020 12:59 pm
riddick75 wrote:this one, brown wire kinda reaches under the air box with a clip to keep it up somewhere
Check to see if it has 12V when you turn on the ign switch. If so, my guess is it's the main power feed for the selector switch. It appears to be the only free-roaming brown wire in the HVAC neighborhood. The other side of the connector will have 2 yellow wires, which transfer the juice to the selector and the thermoswitch on the engine block.

thatfnthing- Donating Member
- Street Cred : 65
Re: 75 el camino project.
![]() by thatfnthing Sat Mar 28, 2020 1:14 pm
by thatfnthing Sat Mar 28, 2020 1:14 pm
riddick75 wrote:and this one is like a pink and brown connected on one terminal and seems like it might go to the neutral safety switch
The backup lamp switch will be pink and lt green. Neutral will be two fat purples. This would appear to be that same feed for the HVAC (brown wire) from the fuse box, and the pink splices in to feed the GEN light. This makes me think I'm looking at the wrong end of the brown wire in the previous post -- look at that wire and see where the other end is. One end should be to this connector, and the other end should be the two yellow wires I mentioned. It's possible I was thinking the loose end of the single brown wire above was the connector for the two yellow wires, when it actually might be the thing that connects to this one.
Last edited by thatfnthing on Sun Mar 29, 2020 2:11 pm; edited 1 time in total (Reason for editing : mislabeled b/u and neutral switches)
thatfnthing- Donating Member
- Street Cred : 65
Re: 75 el camino project.
![]() by thatfnthing Sat Mar 28, 2020 1:18 pm
by thatfnthing Sat Mar 28, 2020 1:18 pm
riddick75 wrote:this one is a weird female spade type with a black wire that has another black wire that seemed to connect to make it longer but still no idea
Can you take a shot at a better angle, like from the side? Can't really make out anything here...
thatfnthing- Donating Member
- Street Cred : 65
Re: 75 el camino project.
![]() by riddick75 Sat Mar 28, 2020 8:31 pm
by riddick75 Sat Mar 28, 2020 8:31 pm
the brown wire by the air box is a male spade that is spliced with another brown wire at the thermal switch, with a yellow wire, both of the other ones go over the air box and I can't follow them.


the neutral switch I have a 2 purple which I think is reverse light, and a green and pink which I think is from the ignition, and 2 more blades that I don't know about, should there be anything on them?

this is a side of the single black wire it goes into the large harness that goes to the back of the instrument cluster. and the black box might be the turn signal flasher maybe? goes into the same harness as that, and the second picture is with the wire that was attached to it reconnected, it has a single female terminal. and its long enough to reach anywhere in the cab so I'm at a loss. right now I'm not quite ready to put a battery on to test anything, worried about loose wires sparking, but soon I'll have to just to see what is missing.


riddick75- G3GM Member
- Street Cred : 6
Re: 75 el camino project.
![]() by thatfnthing Sun Mar 29, 2020 2:10 pm
by thatfnthing Sun Mar 29, 2020 2:10 pm
riddick75 wrote:the neutral switch I have a 2 purple which I think is reverse light, and a green and pink which I think is from the ignition, and 2 more blades that I don't know about, should there be anything on them?
Okay, I misspoke above (and I went back and corrected it), the pink/lt green are the backup lights, and the two fat purple wires (1 should have white stripes) are the neutral safety switch to the starter. This is what happens when I look at this stuff without enough caffeine.
The remaining blades should for the seat belt sensors (yellow w/black stripe and a black wire).
thatfnthing- Donating Member
- Street Cred : 65
Re: 75 el camino project.
![]() by thatfnthing Sun Mar 29, 2020 7:42 pm
by thatfnthing Sun Mar 29, 2020 7:42 pm
riddick75 wrote:the brown wire by the air box is a male spade that is spliced with another brown wire at the thermal switch, with a yellow wire, both of the other ones go over the air box and I can't follow them.
Okay, this one has me scratching my head. That's not the thermo switch -- the thermo switch is screwed into the engine block. The problem is I can't find that thing in any of the diagrams, either 73 or 76 (thinking maybe it came after my 73), and I can't find any combo of two browns and a yellow in the same connector. Still looking, but I'm limited to the diagrams and manuals since all of that is gone in my car. Maybe someone else can chime in with what that thing is, but I'll keep looking in the meantime.
thatfnthing- Donating Member
- Street Cred : 65
Page 6 of 11 • 1, 2, 3 ... 5, 6, 7 ... 9, 10, 11 ![]()

 Similar topics
» MY DAILY DRIVER/PROJECT 73 EL CAMINO SS
» Classic Car Restoration Club: 1977 El Camino Project Car-Overview
G3GM :: Media :: G3 Project Pictures
|
|
|
» Q-Jet Tuning
» PARTS NEED TO GO FOR OUR MOVE I DONT WANNA TAKE WITH
» Need driver side bucket seat 73 Laguna
» Laguna NOSE
» Virtual Ink from this weekend
» 1973 Chevelle SS Station Wagon
» Elcofest 2023
» Wanted drip rails for 1975 four-door Chevelle Malibu-Thanks!
» Parts please